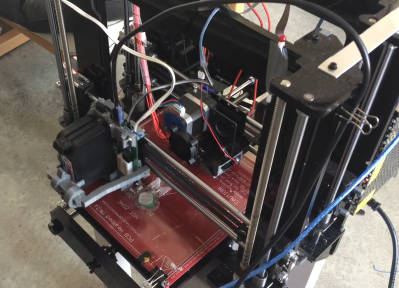
Open-Source Robotic Arm For All Purposes

A set of helping hands is a nice tool to have around the shop, especially if soldering or gluing small components is a common task. What we all really want, though, is a robotic arm. Sure, it could help us set up glue or solder but it can do virtually any other task it is assigned as well. A general-purpose tool like this might be out of reach of most of us, unless we have a 3D printer to make this open-source robotic arm at home.

The KAUDA Robotic Arm from [Giovanni Lerda] is a five-axis arm with a gripping tool and has a completely open-source set of schematics so it can be printed on any 3D printer. The robot arm uses three stepper motors and two servo motors, and is based on the Arduino MEGA 2560 for control. The electrical schematics are also open-source, so getting this one up and running is just an issue of printing, wiring, and implementing some software. To that end there are software examples available, and they can easily be modified to fit one’s robotic needs.

A project like this could be helpful for any number of other projects, or also just as a lesson in robotics for yourself or even in a classroom, since many schools now have their own 3D printers. With everything being open-source, this is a much simpler endeavor now than other projects we’ve seen that attempted to get robotic arms running again.

Continue reading “Open-Source Robotic Arm For All Purposes”

Filament Dust Filter Helps Keep Your Print Quality High

If we’re honest, our workshop isn’t as clean as it probably should be, and likely many makers out there will say the same. This can have knock-on effects, such as iron filings clogging motors, or in this case, dust affecting the quality of 3D prints. Aiming to tackle this, [3Demon] built a fun Spongebob-themed dust filter for their 3D printer.

The filter works in a simple way. The Spongebob shell is 3D printed in two halves, with a hinge joining both parts. Inside each half, a section of sponge is stuck inside. The two halves are then closed with a snap fit, with the filament passing through a hole in Spongebob’s head and out through the (square) pants. With the sponge packed in nice and tight, dust is wiped from the filament as it feeds through bob to the printer.

While it’s important to install carefully to avoid filament feed issues, it’s an easy way to automatically clean filament during the printing process. You may be surprised just how dirty your filament gets after sitting on the shelf for a few months. Getting rid of such contamination decreases the likelihood of annoying problems like delaminations and jams. Avid printers may also want to consider making their own filament, too. Happy printing!

Re-imagining The Crossed Gantry 3D Printer

Simply having a few go-to 3D printer motion system designs is no reason to stop exploring them, as even small iterations on an existing architecture can yield some tremendous improvements. In the last few months, both [Annex_Engineering] and [wesc23] have been piloting a rail-derived crossed gantry architecture, a “CroXY” as it’s come to be known. Borrowing concepts from Ultimaker’s crossed gantry using rods, the Hypercube Overkill project, and perhaps even each other, the results are two compact machine frames capable of beautiful prints at extremely high speeds–upwards of 400 mm/sec in [Annex_Engineering’s] case!

Both gantry designs take a rotated MGN12 rail (a la the Railcore) and cross two of them, mounting the carriage at the intersection point much like an Ultimaker. Each crossed rail controls a degree of freedom with vanilla Cartesian kinematics, but each degree of freedom also has a redundant motor for added torque. Like the CoreXY design, this setup is tailored for clean prints at high speeds since the motion-related motors have been removed from the moving mass. However the overall belt length has been reduced tremendously, resulting in a much stiffer setup.

But the innovation doesn’t stop there. Both gantries also feature a unique take on a removable Z probe. When the machine needs to level the bed, it travels to a corner to “quickdraw” a magnetically attached limit switch from a holster. Once mounted, this probe becomes the lowest point on the carriage, allowing the carriage to travel around the bed probing points. When finished, the probe simply slots back into its holster, and the print can begin.

Both [wesc23’s] CroXY and a variant of [Annex_Engineering’s] K2 are up on Github complete with bills of materials if you’re curious to poke into the finer details. With commercial 3D printer manufacturers spending the last few years in a race to the bottom, it’s exciting to still see new design pattern contributions that push for quality and performance. For more design patterns contributions, have a look at [Mark Rehorst’s] Kinematically coupled bed design.

Continue reading “Re-imagining The Crossed Gantry 3D Printer”

Can A 3D Printer Print Better Filament For Itself?

3D printed parts are generally no way near the strength of an equivalent injection moulded part and techniques such as a sustained heat treatment, though effective usually distort the part beyond use.

[CNC Kitchen] was investigating the results (video, embedded below) of a recent paper, that described a novel ABS filament reinforced by a “star” shaped Polycarbonate core, an arrangement the authors claim is resilient to deformation during the annealing process often necessary to increase part strength. While the researchers had access to specialised equipment needed to manufacture such a composite material, [CNC Kitchen’s] solution of simply using his dual extruder setup to directly print the required hybrid filament is something we feel, strongly resonates with the now old school, RepRap “print your printer” sentiment.

The printed filament seems to have reasonable dimensional accuracy and passing the printed spool through a heater block without the nozzle attached, ensured there would be no obvious clogs. The rest of the video focuses on a very thorough comparison of strength and deformation between the garden variety Polycarbonate, ABS and this new hybrid filament after the annealing process. Although he concludes with mixed results, just being able to combine and print your own hybrid filament is super cool and a success in its own right!

Interested in multi-material filaments? Check out our article on a more conventional approach which does not involve printing it yourself!

Continue reading “Can A 3D Printer Print Better Filament For Itself?”

Hackaday Podcast 069: Calculator Controversy, Socketing SOIC, Metal On The Moon, And Basking In Bench Tools

Hackaday editors Mike Szczys and Elliot Williams march to the beat of the hardware hacking drum as they recount the greatest hacks to hit the ‘net this week. First up: Casio stepped in it with a spurious DMCA takedown notice. There’s a finite matrix of resistors that form a glorious clock now on display at CERN. Will a patio paver solve your 3D printer noise problems? And if you ever build with copper clad, you can’t miss this speedrun of priceless prototyping protips.

Take a look at the links below if you want to follow along, and as always, tell us what you think about this episode in the comments!

Direct download (60 MB or so.)

Continue reading “Hackaday Podcast 069: Calculator Controversy, Socketing SOIC, Metal On The Moon, And Basking In Bench Tools”

An All Lead Screw 3D Printer You Can Build Yourself

There was a time when the curious hardware hacker  had to build their own 3D printer, because commercial models were so expensive as to be unaffordable except by well-funded institutions. We’re fortunate then to live in an era in which a good quality off-the-shelf machine can be had without breaking the bank, but that is not to say that home-made 3D printers are a thing of the past. Instead the community of rapid prototyping experimenters continue to push the boundaries of the art, and from that we all benefit. An example comes from [Morgan Lowe], whose 3DLS lead screw driven 3D printer joins the freely downloadable designs to be found on Thingiverse.

If at first sight you think it looks a little familiar, you are correct, as it takes its frame design from the popular AM8 metal frame upgrade for the Anet A8 off-the-shelf printer. It draws heavily from other A8 upgrades, and brings in some parts such as the extruder and bed from the Creality Ender3. This is the beauty of incremental open source, and the result is a belt-free printer that does a decent-looking Benchy on the bench, and as a party piece manages to print a slightly more hairy little plastic boat when suspended at 45 degrees by a rope from the ceiling.

When dipping a toe into the world of home made 3D printers it’s interesting to take a look into some of the earlier Hackaday RepRap posts, and see how far we’ve come.

Flexible Build Platforms Work For FDM, How About SLA?

Flexible steel sheets as the foundation for build platforms are used to great advantage in FDM 3D printers. These coated sheets are held flat by magnets during printing, and after printing is done the sheet (with print attached) can be removed and flexed to pop the prints free. This got [Jan Mrázek] thinking. He was pretty sure the concept could extend to the build platform on his Elegoo Mars resin printer. With a flexible build platform, troublesome prints could be more easily removed, so he non-destructively modified his printer to have a similar system. [Jan] is clear that this is only a proof of concept, but the test results were good! He printed several jobs that were known to be trouble, and they were all a piece of cake to remove.

[Jan]’s mod consists of a 3D printed, two-piece unit that encapsulates the normal build platform and contains a few strong magnets. A thin sheet of steel sticks flat to this new piece, held in place by the magnets within, and becomes the new build platform. After a print is done, the sheet is removed and [Jan] reports that its flexibility is a big help in removing otherwise troublesome prints, such as the 3D printed solder stencil we covered recently.

[Jan] provides his CAD model but doesn’t really recommend using it for anything other than development work. Results were promising, but there are a number of drawbacks to the prototype. For one thing, it makes the build platform thicker and the Z-axis limit switch needs to be physically lowered in order to zero the unit. Also, the thicker build platform means the volume of resin the build tank can hold is reduced. Still, the idea clearly has merit and shows there absolutely is value in hardware having a hackable design.