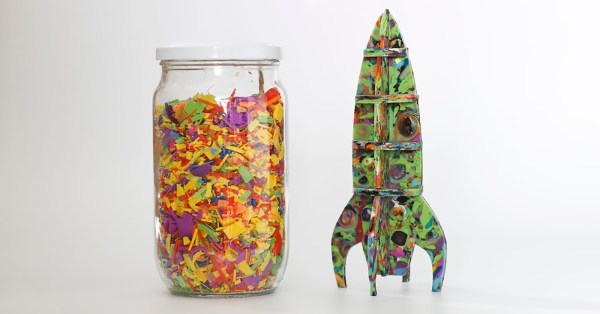
Ardu McDuino Plays The Bagpipes

To “pipe in” the new year, [John] decided to build a bagpipe-playing robot. Unlike other instrument-playing robots that we’ve seen before, this one is somewhat anatomically correct as well. John went the extra mile and 3D printed fingers and hands to play his set of pipes.

The brains of the robot are handled by an Arduino Mega 2560, which drives a set of solenoids through a driver board. The hands themselves are printed from the open source Enabling the Future project which is an organization that 3D prints prosthetic hands for matched recipients, especially people who can’t otherwise afford prosthetics. He had to scale up his hands by 171% to get them to play the pipes correctly, but from there it was a fairly straightforward matter of providing air to the bag (via a human being) and programming the Arduino to play a few songs.

The bagpipe isn’t a particularly common instrument (at least in parts of the world that aren’t Scottish) so it’s interesting to see a robot built to play one. Of course, your music-playing robot might be able to make music with something that’s not generally considered a musical instrument at all. And if none of these suit your needs, you can always build your own purpose-built semi-robotic instrument as well.

Continue reading “Ardu McDuino Plays The Bagpipes”

Where There’s Smoke, There’s A Knockoff 3D Printer

These days, it’s possible to buy clones of popular 3D printers from China for satisfyingly low prices. As always, you get what you pay for, and while usable, often they require some modification to reach their full potential. [g3ggo] recently laid down €270 for a clone of the Prusa i3 by Geeetech, knowing it would require some modifications for safety and performance.

First on the bill was a wobbly Z-axis, which was dealt with by printing some new parts designed to fix this issue which have already been developed by the community. Forums are your friend here – often an enterprising user will have already developed fixes for the most common issues, and if they haven’t, you can always step up to be the hero yourself. There was a darker problem lurking inside, though.

[g3ggo] began to wonder why the MOSFETs for the hot end were running so hot. It turned out to be an issue of gate drive – the FETs were only being driven with 5V, which for the given part, wasn’t enough to reach its lowest R_DS(on) and thus was causing the overheating issue. It gets worse, though – the heatsinks on the MOSFETs were bolted on directly without insulation, and sitting fractions of a millimeter above traces on the PCB. Unfortunately, with a small scratch to the soldermask, this caused a short circuit, destroying the hot end and MOSFETs and narrowly avoiding a fire. This is why you never leave 3D printers unattended.

The fix? Replacing the MOSFETs with a part that could deal with a 5V gate drive was the first step, followed by using insulating pads & glue to stop the heatsinks contacting the PCB. Now with the cooler running MOSFETs, there’s less chance of fire, and the mainboard’s cooling fan isn’t even required anymore. Overall, for a small investment in time and parts, [g3ggo] now has a useful 3D printer and learned something along the way. Solid effort!

Derek Schulte: Path Planning For 3D Printers

[Derek Schulte] designed and sells a consumer 3D printer, and that gives him a lot of insight into what makes them tick. His printer, the New Matter MOD-t, is different from the 3D printer that you’re using now in a few different ways. Most interestingly, it uses closed-loop feedback and DC motors instead of steppers, and it uses a fairly beefy 32-bit ARM processor instead of the glorified Arduino Uno that’s running many printers out there.

The first of these choices meant that [Derek] had to write his own motor control and path planning software, and the second means that he has the processing to back it up. In his talk, he goes into real detail about how they ended up with the path planning system they did, and exactly how it works. If you’ve ever thought hard about how a physical printhead, with momentum, makes the infinitely sharp corners that it’s being told to in the G-code, this talk is for you. (Spoiler: it doesn’t break the laws of physics, and navigating through the curve involves math.)

Continue reading “Derek Schulte: Path Planning For 3D Printers”

RooBee One, An Open-source SLA/DLP 3D Printer

[Aldric Negrier] is no stranger to the 3D printing world. Having built a few already, he designed and built an SLA/DLP 3D printer, named RooBee One, sharing the plans on Instructables. He also published tons of other stuff, like a 3D Printed Syringe Pump Rack and a 3D Scanning Rig And DIY Turntable. It’s really worth while going through his whole Instructables repository.

This open-source 3D printer was inspired by the Cristelia – SLA/LCD 3d printer and the Vulcanus MAX 3D printer (that he designed). RooBee One has an aluminium frame and an adjustable print area of 80x60x200 mm, with up to 150x105x200mm build volume using an ACER DLP projector. In addition, a fan on top of the printer was added to extract the toxic vapours outside and away from the printer operator. The electronics are based on the Arduino MEGA with the RAMPS 1.4 shield and one NEMA 17 stepper motor. As for the Arduino Mega firmware, [Aldric] choose to use Repetier, which he usually uses in his other printers.

The SLA resin he used is the Standard Blend Resin from Fun to Do Resins. These resins tend to release toxic airborne particles, so extra care should be taken to ventilate the area while printing and also do a proper cleaning afterwards.

You can get a glimpse of the printer making a small gear come to life in the following video:

Continue reading “RooBee One, An Open-source SLA/DLP 3D Printer”

IKEA Table 3D Printer

In this Instructable, [Wayne Mason-Drust] shares the step by step guide on how to make a cool, good-looking, 3D printer based on the Ikea LACK table. From an Ikea lantern weather station to a fully printed CNC based on an Ikea table, it’s almost safe to say that a 3D printer Ikea hack was overdue.

The idea to use a Ikea table as a base for a 3D printer first came to [Wayne] as he used this table to support other 3D printer he had working in his business. He realized that, even after five years of use, the table showed no signs of wear or distortion. So he decided to start to work on a 3D printer based on this precise table, the one that used to hold the printer.

[Wayne] stacked two together and named it Printtable (pun intended?). This open source, cartesian rep-rap 3D printer looks pretty slick. With a build area of 340mm X 320mm and 300mm on the Z axis and a price tag for the parts starting as low as $395, seems like a pretty decent 3D printer. With some work sourcing the parts, maybe it can be even lower.

Or we can just wait until Ikea starts selling them.

Continue reading “IKEA Table 3D Printer”

3D Printed Greeting Cards

T’is the season to hack, and the maker brigade won’t disappoint — there’s no better way to crank out a few cute holiday tchotchkes than to fire up the 3D printer. [Niklas Roy] has released gDraw, a software package that creates G-code to print out 2D drawings on your 3D printer.

The interface is simple, allowing the quick and easy creation of basic vector drawings. The program then converts the paths in the drawing to a G-code representation that your printer follows to squirt them out in plastic. Think of it as the 3D printed equivalent of the “Stroke Path” tool in Photoshop.

[Niklas] chose to demonstrate the software by creating some interesting greeting cards that Big Christmas is sure to rip off next year and sell for $30 a pop. The printed plastic drawings give a fun 3D effect to the cards, and we’d love to see more examples of art created with this technique. The software was designed to work with the Ultimaker 2, but with tweaks, it should be able to generate code for other printers, too.

We’ve seen plenty of great festive hacks over the years — like this awesome laser projection setup.

Inside The Printrbot Printrhub

A new version of the Printrbot Simple was released this summer, and this sleek new model includes a few highly desirable features. The metal enclosure was improved, linear rails added, a power switch was thrown in, and the biggest feature — a touch screen — makes headless printing easy.

Adding a usable display and achieving reliable WiFi are big engineering challenges, and thanks to the Internet of Things it’s only going to become more common to expect those features. How did the Printrbot team implement this? [Philip Shuster] recently released a write-up of how the Printrbot Printrhub came together.

The story of the display and WiFi module in the newest Printrbot begins about a year ago with a post on Hackaday. [Philip] built the Little Helper, a little electronic Swiss Army knife capable of basic IO, sending out PWM pulses, sniffing I2C, and a few other handy features. The Printrbot team reached out to [Philip], and after a few conversations, he was roped into the development team for the Printrhub.

Departing slightly from the Little Helper, the Printrhub features the same microcontroller found in the Teensy 3, a 2.8 inch TFT display, capacitive touch sensor, microSD card slot, and an ESP-12 module to handle the WiFi connection. The display system was tricky, but the team eventually got it working. Using an ESP8266 as the WiFi module for a printer is more difficult than you would think, but that works too.

One of the more interesting challenges for 3D printers in the last few years is the development of a good printer display with wireless connectivity. Yes, those graphic LCDs attached to an Arduino still work, but a display from 1980 doesn’t sell printers. In just a few months, the Printrbot team came up with a relatively simple, very elegant display that does everything and they’re releasing all the hardware as open source. That’s great news, and we can’t wait to see similar setups in other makes of 3D printers.