Resin Printers Are Now Cheaper, Still Kind Of A Hassle

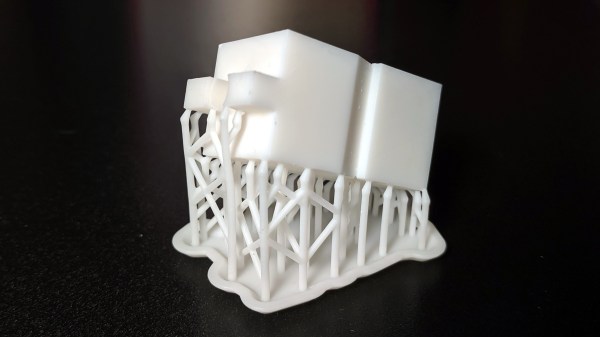
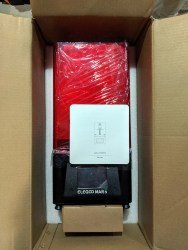
Your run-of-the-mill desktop 3D printer is based on a technology known as Fused Deposition Modeling (FDM), where the machine squirts out layers of hot plastic that stick to each other. But that’s not the only way to print a Benchy. One of the more exotic alternative techniques uses a photosensitive resin that gets hardened layer by layer. The results are impressive, but historically the printers have been very expensive.

But it looks like that’s finally about to change. The [3D Printing Nerd] recently did a review of the Longer3D Orange 10 which costs about $230, less than many FDM printers. It isn’t alone, either. Monoprice has a $200 resin printer, assuming you can find it in stock.

The resin isn’t cheap and it’s harder to handle than filament. Why is it harder to handle? For one is smells, but more importantly, you aren’t supposed to get it on your skin. The trade off is that the resulting printed parts look fantastic, with fine detail that isn’t readily possible with traditional 3D printing techniques.

Some resin printers use a laser to cure resin at particular coordinates. This printer uses an LCD to produce an image that creates each layer. Because the LCD exposes all the resin at one time, each layer takes a fixed amount of time no matter how big or detailed the layer is. Unfortunately, using these displays means the build area isn’t very large: the manufacturer says it’s 98 by 55 millimeters with a height of up to 140mm. The claimed resolution, though, is 10 microns on the Z-axis and 115 microns on the LCD surface.

Getting the prints out of the printer requires you to remove the uncured resin. In the video, they used a playing card and two alcohol baths. After you remove the uncured resin, you’ll want to do a final curing step. More expensive printers have dedicated curing stations but on this budget printer, you have to cure the parts separately. How? By leaving them out in the sun. Presumably, you could use any suitable UV light source.

There are a few other similar-priced options out there. Sparkmaker, Wanhao (resold by Monoprice). If you’re willing to spend more, Prusa has even thrown their orange hat into the ring. If you were wondering if you could use the LCD in your phone to do this, the answer is sort of.

Continue reading “Resin Printers Are Now Cheaper, Still Kind Of A Hassle”

Preserving Historic NASA Display Technology

When [Patrick Hickey] spent a tidy sum on eBay to purchase a pair of seven-segment displays used in the Launch Control Center at Kennedy Space Center during the Apollo program, he could have just put them up on a shelf. It’s certainly what most people would have done. Instead, he’s decided to study and document their design with the hope of eventually creating 3D replicas of these unique pieces of NASA history.

With a half century now separating us from the Moon landing, it’s more important than ever to preserve the incredible technology that NASA used during mankind’s greatest adventure. Legitimate Apollo-era hardware is fairly scarce on the open market, and certainly not cheap. As [Patrick] explains on the Hackaday.io page for this project, being able to 3D print accurate replicas of these displays is perhaps the best way we can be sure they won’t be lost to history.

But more than that, he also wants others to be able to see them in operation and perhaps even use them in their own projects. So that means coming up with modern electronics that stand-in for the 60s era hardware which originally powered them.

Since [Patrick] doesn’t have access to whatever (likely incandescent) lighting source these displays used originally, his electronics are strictly functional rather than being an attempt at a historic recreation. But we have to say, the effect looks fantastic regardless.

Currently, [Patrick] is putting most of his efforts on the smaller of the two displays that he calls “Type A”. The chunk of milled aluminum with integrated cooling fins has a relatively simple shape that should lend itself to replication through 3D scanning or even just a pair of calipers. He’s also put together a proof of concept for how he intends to light the display with 5mm LEDs on a carefully trimmed bit of protoboard, which he plans on eventually refining to reduce the number of wires used.

One aspect he’s still a little unsure of is how best to replicate the front mask. It appears to be made of etched metal with an integrated fiberglass diffuser, and while he’s already come up with a few possible ways to create a similar front panel for his 3D printed version, he’s certainly open to suggestions from the community.

This isn’t the first time we’ve seen a dedicated individual use 3D printing to recreate a rare and expensive object. While the purists will say that an extruded plastic version doesn’t compare to the real thing, we think it’s certainly better than letting technology like this fade into obscurity.

The March Toward A DIY Metal 3D Printer

[Hyna] has spent seven years working with electron microscopes and five years with 3D printers. Now the goal is to combine expertise from both realms into a metal 3D printer based on electron-beam melting (EBM). The concept is something of an all-in-one device that combines traits of an electron beam welder, an FDM 3D printer, and an electron microscope. While under high vacuum, an electron beam will be used to fuse metal (either a wire or a powder) to build up objects layer by layer. That end goal is still in the future, but [Hyna] has made significant progress on the vacuum chamber and the high voltage system.

The device is built around a structure made of 80/20 extruded aluminum framing. The main platform showcases an electron gun, encased within a glass jar that is further encased within a metal mesh to prevent the glass from spreading too far in the event of an implosion.

The design of the home-brewed high-voltage power supply involves an isolation transformer (designed to 60kV), using a half-bridge topology to prevent high leakage inductance. The transformer is connected to a buck converter for filament heating and a step up. The mains of the system are also connected to a voltage converter, which can be current-fed or voltage-fed to operate as either an electron beam welder or scanning electron microscope (SEM). During operation, the power supply connects to a 24V input and delivers the beam through a Wehnelt cylinder, an electrode opposite an anode that focuses and controls the electron beam. The entire system is currently being driven by an FPGA and STM32.

The vacuum enclosure itself is quite far along. [Hyna] milled a board with two outputs for a solid state relay (SSR) to a 230V pre-vacuum pump and a 230V pre-vacuum pump valve, two outputs for vent valves, and inputs from a Piranni gauge and a Cold Cathode Gauge, as well as a port for a TMP controller. After demoing the project at Maker Faire Prague, [Hyna] went back and milled a mold for a silicone gasket, a better vacuum seal for the electron beam.

While we’ve heard a lot about different metal 3D printing methods, this is the first time we’ve seen an EBM project outside of industry. And this may be the first to attempt to combine three separate uses for an HV electron beam into the same build.

3D Printed Prosthesis Reads Your Mind, Sees With Its Hand

Hobbyist electronics and robotics are getting cheaper and easier to build as time moves on, and one advantage of that is the possibility of affordable prosthetics. A great example is this transhumeral prosthesis from [Duy], his entry for this year’s Hackaday Prize.

Side views of the 3D printed prosthesis arm.With ten degrees of freedom, including individual fingers, two axes for the thumb and enough wrist movement for the hand to wave with, this is already a pretty impressive robotics build in and of itself. The features don’t stop there however. The entire prosthesis is modular and can be used in different configurations, and it’s all 3D printed for ease of customization and manufacturing. Along with the myoelectric sensor which is how these prostheses are usually controlled, [Duy] also designed the hand to be controlled with computer vision and brain-controlled interfaces.

The palm of the hand has a camera embedded in it, and by passing that feed through CV software the hand can recognize and track objects the user moves it close to. This makes it easier to grab onto them, since the different gripping patterns required for each object can be programmed into the Raspberry Pi controlling the actuators. Because the alpha-wave BCI may not offer enough discernment for a full range of movement of each finger, this is where computer aid can help the prosthesis feel more natural to the user.

We’ve seen a fair amount of creative custom prostheses here, like this one which uses AI to allow the user to play music with it, and this one which gives its user a tattoo machine for an appendage.

Continue reading “3D Printed Prosthesis Reads Your Mind, Sees With Its Hand”

E3D’s Love Letter To Toolchanging 3D Printers

It’s been just over a year since E3D whetted our appetites for toolchanging printers. Now, with the impending release of their first toolchanging system, they’ve taken the best parts of their design and released them into the wild as open source. Head on over to Github for a complete solution to exchanging, locating, and parking tools on a 3D printer.

For anyone interested in fabricating the design, the files are in a format that you can almost re-zip and email to a manufacturer for quotes. As is, the repository offers STP-style CAD files, a complete set of dimensioned drawings, exploded views, and even a bill of materials. Taken as a whole, the system elegantly solves the classic problems that we’d encounter in toolchanging. Locking tools is done with a spring-based T-bar that swivels onto an wedge-shaped groove on the back of each tool plate. Locating tools is done so with a 3-groove kinematic coupling fabriacted from dowel pins. With these problems solved and presented so cleanly, these files become a path by which we can establish a common means for exchanging tools on 3D printer systems.

It’s worth asking: why develop an exceptional design and then release it for free? I’ll speculate that E3D has done an excellent job over the years establishing a well-recognized standard set of stock parts. Nearly every 3D printer builder is bound to have at least one spare V6 hotend sitting idle in a disassembled pool of former-3D-printers. With tool-changing positioned to become another step forward in the space of possibilities with 3D printing, setting the standard for tools early encourages the community to continue developing applications that lean on E3D’s ecosystem of parts.

In the last 30 years, 3D printing has transformed away from a patent-trolling duopoly to a community-friendly group of contributors that lean on each other’s shoulders with shared findings. It’s a kind gesture to the open-source community of machine builders to receive such a feature-complete mechanism. With that said, let’s start rolling the toolchanger hacks.

The Flat-Pack 3D Printed Model

For a hundred years or thereabouts, if you made something out of plastic, you used a mold. Your part would come out of the mold with sprues and flash that had to be removed. Somewhere along the way, someone realized you could use these sprues to hold parts in a frame, and a while later the plastic model was invented. Brilliant. Fast forward a few decades and you have 3D printing. There’s still plastic waste in 3D printing, but it’s in the form of wasteful supports. What if someone designed a 3D printable object like a flat-pack plastic model? That’s what you get when you make a Fully 3D-printable wind up car, just as [Brian Brocken] did. It’s his entry for the Hackaday Prize this year, and it prints out as completely flat parts that snap together into a 3D model.

This 3D model is a fairly standard wind-up car with a plastic spring, escapement, and gear train to drive the rear wheels. Mechanically, there’s nothing too interesting here apart from some nice gears and wheels designed in Fusion 360. Where this build gets serious is how everything is placed on the printer. Every part is contained in one of two frames, laid out to resemble the panels of parts in a traditional plastic model.

These frames, or sprue trees, or whatever we’re calling this technique in the land of 3D printing, form a system of supports that keep all the parts contained until this kit is ready to be assembled. It’s effectively a 3D printable gift card, flat packed for your convenience and ease of shipping. A great project, and one that proves there’s still some innovation left in the world of 3D printing.

Hackaday Podcast 024: Mashing Smartphone Buttons, Sound Blastering, Trash Printing, And A Ludicrous Loom

Hackaday Editors Elliot Williams and Mike Szczys wade through the fun hacks of the week. Looks like Google got caught ripping off song lyrics (how they got caught is the hack) and electric cars are getting artificially noisier. We look at 3D Printing directly from used plastic, and building a loom with many hundreds of 3D printed parts. The Sound Blaster 1.0 lives again thanks to some (well-explained) reverse engineered circuitry. Your smartphone is about to get a lot more buttons that work without any extra electronics, and we’ll finish things up with brass etching and downloadable nuclear reactor plans.

Take a look at the links below if you want to follow along, and as always tell us what you think about this episode in the comments!

Take a look at the links below if you want to follow along, and as always, tell us what you think about this episode in the comments!

Direct download (60 MB or so.)

Continue reading “Hackaday Podcast 024: Mashing Smartphone Buttons, Sound Blastering, Trash Printing, And A Ludicrous Loom”