The Enigma machine as used by the German military during World War Two exerts a curious fascination among our community of hardware hackers and makers. Perhaps it is the mechanical complexity of the machine itself, or maybe the tale of how its encoded messages were decrypted by Allied codebreakers that contributes to this interest, but whatever it is we’ve seen a succession of Enigma-related projects over the years that shows no sign of abating.
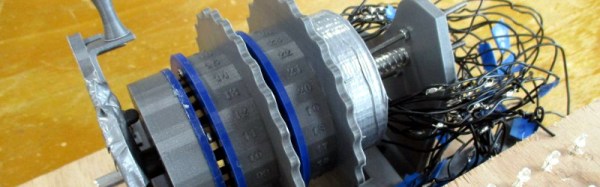
The latest Enigma project to come our way is a particularly nice one from a group of first year students at CentraleSupélec Rennes, in Northwestern France. Their Réplique Enigma is a fully mechanical Enigma replica using 3D printing techniques, and unlike so many replicas which use modern electronics it has a set of rotors just like those you would have found in the original. The rotors themselves have a 3D-printed plastic shell which houses brass contacts and the associated writing, while the keyboard and lamp board are both made from plywood. Rather than trying to replicate the original switches from the keyboard they are using modern microswitches, however the keys themselves are upright posts that resemble the original. An AZERTY layout may not have been present on the real Enigma machines, but lends a pleasing twist to the build.
It’s worth browsing all the pages for this build, as the front page does not necessarily capture the whole build. The rotors set this Enigma apart from many of the replicas we’ve featured in the past, so you may find it interesting to take a look and make a few comparisons.