A Breadboard Block For 8-Bit CPUs

Breadboard CPUs are a fantastic learning experience and require serious dedication and patience. Occasionally, CPU builders eschew their breadboards and fab their design onto a PCB. But this takes away the flexibility and some of the opportunity for learning that breadboard CPUs offer. [c0pperdragon] was doing the same sort of repetitive wiring from project to project as most 8-bit breadboard CPUs use memory, a bus, an IO controller, ROM, and a few other passive components.

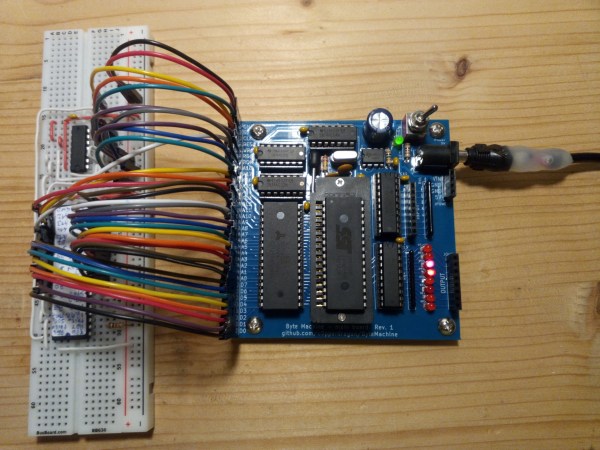
Taking a compromise approach, [c0pperdragon] built a PCB that can be used as a building block in his custom CPUs which they have titled “ByteMachine”. A single row of 34 pins offer power, clock, reset, 19 address bus lines, 8 data bus lines, and a ROM selector. This means that the CPUs can fit on a single breadboard and can run faster as the impedance of the breadboard has less effect on the circuit. With 512 KB of RAM and 512 KB of ROM, in a ZIF socket for easy reprogramming, ByteMachine has plenty of space.

One drawback is the lack of IO. There is no dedicated address space as this would require decoding logic between the RAM and the CPU. [C0pperdragon] added a simple 8-bit output register provided by a 74-series logic IC. The data is displayed on 8 red LEDs and can be accessed via pins. Input is accomplished in a similar way with just 8 bits of digital input provided.

[C0pperdragon] has built the 65C02, 65C816Z84C00, and the i8088 with the ByteMachine. Each was documented with incredible schematics, pictures, and test programs on GitHub. Next time you’re looking to build a CPU on a breadboard, maybe start with a ByteMachine. In some ways, it might improve your learning experience as it makes the incredible mass of wires we’ve seen on other projects a tad more manageable.

Thanks [Reinhard Grafl] for sending this one in!

When Are 8 Bits More Than 32?

Whenever we write up a feature on a microcontroller or microcontroller project here on Hackaday, we inevitably get two diametrically opposed opinions in the comments. If the article featured an 8-bit microcontroller, an army of ARMies post that they would do it better, faster, stronger, and using less power on a 32-bit platform. They’re usually right. On the other hand, if the article involved a 32-bit processor or a single-board computer, the 8-bitters come out of the woodwork telling you that they could get the job done with an overclocked ATtiny85 running cycle-counted assembly. And some of you probably can. (We love you all!)

redblue_pillWhen beginners walk into this briar-patch by asking where to get started, it can be a little bewildering. The Arduino recommendation is pretty easy to make, because there’s a tremendous amount of newbie-friendly material available. And Arduino doesn’t necessarily mean AVR, but when it does, that’s not a bad choice due to the relatively flexible current sourcing and sinking of the part. You’re not going to lose your job by recommending Arduino, and it’s pretty hard to get the smoke out of one.

But these days when someone new to microcontrollers asks what path they should take, I’ve started to answer back with a question: how interested are you in learning about microcontrollers themselves versus learning about making projects that happen to use them? It’s like “blue pill or red pill”: the answer to this question sets a path, and I wouldn’t recommend the same thing to people who answered differently.

For people who just want to get stuff done, a library of easy-to-use firmware and a bunch of examples to crib learn from are paramount. My guess is that people who answer “get stuff done” are the 90%. And for these folks, I wouldn’t hesitate at all to recommend an Arduino variant — because the community support is excellent, and someone has written an add-on library for nearly every gizmo you’d want to attach. This is well-trodden ground, and it’s very often plug-and-play.

Continue reading “When Are 8 Bits More Than 32?”

Making Better Noises With Dual PWM

pwm_16b_sm

Although it’s technically possible to get 16 bits of resolution on a ATMega328, most implementations of PWM on everyone’s favorite ‘mega – including just about every Arduino sketch – are limited to 8 bit PWM. This means the pins can only output 256 different values, so if you’re playing around with music made on an Arduino don’t expect very high fidelity.

There is a clever way around this: use two PWMs, and use one pin for high bytes and another for low bytes. That’s what Open Music Labs did when working on a synthesizer project that needed very high quality audio.

The basic idea behind the build is that PWM pins can be used to create audio frequencies. Using two PWM pins and adding them together means it’s possible to add extra bits of resolution. This requires using different values of resistors on each pin. For example, using the same value of resistors on two PWM pins increases the resolution by one bit. Two pins with a resistor value ratio of 1:4 increases the resolution by four bits, and so on.

There’s a great tutorial for setting up these higher resolution, dual PWM outputs on an ATMega or Arduino, as well as a distortion analysis for this dual PWM setup.

Part Arcade, Part Guitar

Finally a guitar that all of the arcade gaming geeks can jam with. [Mike Davenport] sent us his 8bit arcade based guitar for his senior project. Details are a little sparse if you intend to build you own at the moment, but he does mention the basics: such as it uses an FPGA for logic and function, the strings and joystick modify pitch, it has selectable waves and other parameters, and even includes save banks! Check out a video of him playing street fighter rocking out after the break. Continue reading “Part Arcade, Part Guitar”

Gameboy Foot Controller

[youtube=http://www.youtube.com/watch?v=lQdqudTzyBs]

[Joey] sent us a link to the newest version of his Gameboy foot controller. In the video above, you can see how he uses it to control the loops in the background while he plays his guitar through an 8-bit filter. That is an old video, using the previous version. He tells us that several gameboys were used in the construction. At one point, he had to replace the guts because the music was so loud it knocked his equipment over and destroyed it. We can’t help but feel just a tiny bit of excitement as memories of renting a NES cartridge for the weekend fill our heads when we hear these riffs. His music isn’t too bad either. There is a growing crowd of people that support “chip music”. You can see what looks like a decent sized gathering enjoying a show with a little bit of a history lesson after the break.

[This video, and the original version of the controler were posted about a year ago, good catch commenters]

Continue reading “Gameboy Foot Controller”

8 Bit Digital Sampler Kit, Bendable Too

No, it’s not flexible, its bendable. As in, you can hack it to sound different by connecting parts in random ways.  “Where’s the Party At?”, or “WTPA” for short is a bendable 8 bit sampler made by [Todd Bailey]. Still curious what it is? Watch his video showing it in action. The video is huge, 93Megs, so be patient. The overall attitude of this project is built around hacking. Consider this quote from his page ” I’ve got lots of things to poke, bend, illuminate, invoke, distrust, regulate, and otherwise get jiggy with. It’s like being 15 at the mall again! “.   Sounds like fun to us.

[via Create Digital Music]

Music And Visual Arts At The Last HOPE

[Peter Kirn] from Create Digital Music has an article up highlighting many of the great music and visual performance pieces planned for The Last HOPE on Friday night. If you are around New York and not accustomed to hacking conferences, this could be a great excuse to go check it out. Here are some of our favorite projects.

Continue reading “Music And Visual Arts At The Last HOPE”