2025 Component Abuse Challenge: Load Cell Anemometer

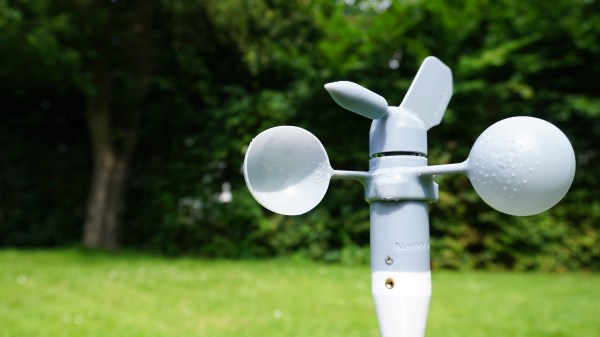
When you think anemometer, you probably don’t think “load cell” — but (statistically speaking) you probably don’t live in Hurricane Country, which is hard on wind-speed-measuring-whirligigs. When [BLANCHARD Jordan] got tired of replacing professionally-made meteorological eggbeaters, he decided he needed something without moving parts. Whatever he came up with would probably qualify for the Component Abuse Challenge, but the choice of load cells of all things to measure wind speed? Yeah, that’s not what the manufacturer intended them for.

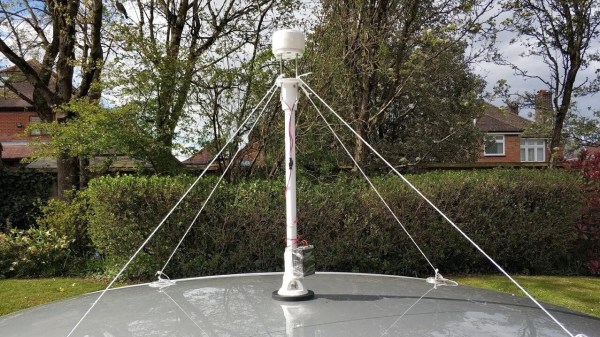
In retrospect, it’s actually a fairly obvious solution: take a plate of known area, and you’re going to get a specific force at a given air speed. The math isn’t hard, it’s just not how we normally see this particular measurement done. Of course, a single plate would have to be pivoted to face the wind for an accurate reading, which means moving parts– something specifically excluded from the design brief. [Jordan] instead uses a pair of load cells, mounted 90 degrees to one another, for his anemometer. One measures the force in a north-south axis, and the other east-west, allowing him to easily calculate both wind speed and direction. In theory, that is. Unfortunately, he vibe coded the math with ChatGPT, and it looks like it doesn’t track direction all that well. The vibe code runs on an ESP32 is responsible for polling data, tossing outliers, and zeroing out the load cells on the regular.

Continue reading “2025 Component Abuse Challenge: Load Cell Anemometer”

Making A Unique Type Of Wind Gauge For Home Assistant Use

Sometimes, it’s nice to know how windy it is outside. Knowing the direction of the wind can be a plus, too. To that end, [Sebastian Sokołowski] built himself an unusual anemometer—a wind gauge—to feed into his smart home system.

[Sebastian’s] build is able to tell both wind speed and direction—and with no moving parts! Sort of, anyway. That makes the design altogether different from the usual cup type anemometers with wind vanes that you might be used to seeing on home weather stations. [Sebastian] wanted to go a different route—he wanted a sensor that wouldn’t be so subject to physical wear over time.

The build relies on strain gauges. Basically, [Sebastian] 3D printed a sail-like structure that will flex under the influence of the wind. With multiple strain gauges mounted on the structure, it’s possible to determine the strength of the wind making it flex and in what direction. [Sebastian] explains how this is achieved, particularly involving the way the device compensates for typical expansion and contraction due to temperature changes.

It’s a really unique way to measure wind speed and direction; we’d love to learn more about how it performs in terms of precision, accuracy, and longevity—particularly with regards to regular mechanical and ultrasonic designs. We’ll be keeping a close eye on [Sebastian’s] work going forward. Video after the break.

Continue reading “Making A Unique Type Of Wind Gauge For Home Assistant Use”

3D Printed Wind Turbine Has All The Features, Just Smaller

For anyone with even the slightest bit of engineering interest, wind turbines are hard to resist. Everything about them is just so awesome, in the literal sense of the word — the size of the blades, the height of the towers, the mechanical guts that keep them pointed into the wind. And as if one turbine isn’t enough, consider the engineering implications of planting a couple of hundred of these giants in a field and getting them to operate as a unit. Simply amazing.

Unfortunately, the thing that makes wind turbines so cool — their enormity — can make them difficult to wrap your head around. To fix that, [3DprintedLife] built a working miniature wind turbine that goes a bit beyond most designs of a similar size. The big difference here is variable pitch blades, a feature the big turbines rely on to keep their output maximized over a broad range of wind conditions. The mechanism here is clever — the base of each blade rides in a bearing and has a small cap head screw that rides in a hole in a triangular swash block in the center of the hub. A small gear motor and lead screw move the block back and forth along the hub’s axis, which changes the collective pitch of the blades.

Other details of full-sized wind turbines are replicated here too, like the powered nacelle rotation and the full suite of wind speed and direction sensors. The generator is a NEMA 17 stepper; the output is a bit too anemic to actually power the turbine’s controller, but that could be fixed with gearing changes. Still, all the controls worked as planned, and there’s room for improvement, so we’ll score this a win overall.

Looking for a little more on full-size wind turbines? You’re in luck — our own [Bryan Cockfield] shared his insights into how wind farm engineers deal with ice and cold.

Continue reading “3D Printed Wind Turbine Has All The Features, Just Smaller”

An esp32 weather station with 3d printed anemometer, rain gauge and wind vane mounted on an aluminum frame sitting in an overgrown lawn

A Weather Station For Whether It Rains Or Shines

[Giovanni Aggiustatutto] creates a DIY weather station to measure rain fall, wind direction, humidity and temperature. [Giovanni] has been working on various parts of the weather station, including the rain gauge and anemometer, with the weather station build incorporating all these past projects and adding a few extra features for measurement and access.

An esp32 module connected to three level shifters inside of a grey utility junction box with a USB power connector coming in powering the ESP32 device and an external wifi antenna mounted on the outside of the junction box, all siting on a wooden table

For temperature and humidity, a DHT22 sensor is located in a 3D printed Stevensen screen, giving the sensor steady airflow while protecting the module from direct sunlight and rain. A mostly 3D printed wind vane is printed with the base attached to a ball bearing and magnet so that the four hall sensors positioned in a “plus” configuration at the base can detect direction. The 3D printed anemometer uses a hall sensor to detect the revolution speed of the device. The rain gauge uses a “tipping bucket” mechanism, with a magnet attached to it that triggers the hall sensor affixed to the frame. The rain gauge (or pluviometer if you’re fancy) needs extra calibration to adjust for how much water the buckets take on before tipping.

An ESP32, with additional level shifters and BMP180 atmospheric pressure sensor module, are placed in a junction box. The ESP32 is used to communicate with each of the sensors and allows for an external internet connection to a Home Assistant server to push collected data out.

[Giovanni] has done an excellent job of documenting each piece, including making the 3D STL files available. Weather stations are a favorite of ours with a lot of variety in what gets collected and how, from ultrasonic anemometers to solar powered weather stations, and it’s great to see [Giovanni]’s take.

Video after the break!

Continue reading “A Weather Station For Whether It Rains Or Shines”

Weather Station Predicts Air Quality

Measuring air quality at any particular location isn’t too complicated. Just a sensor or two and a small microcontroller is generally all that’s needed. Predicting the upcoming air quality is a little more complicated, though, since so many factors determine how safe it will be to breathe the air outside. Luckily, though, we don’t need to know all of these factors and their complex interactions in order to predict air quality. We can train a computer to do that for us as [kutluhan_aktar] demonstrates with a machine learning-capable air quality meter.

The build is based around an Arduino Nano 33 BLE which is connected to a small weather station outside. It specifically monitors ozone concentration as a benchmark for overall air quality but also uses an anemometer and a BMP180 precision pressure and temperature sensor to assist in training the algorithm. The weather data is sent over Bluetooth to a Raspberry Pi which is running TensorFlow. Once the neural network was trained, the model was sent back to the Arduino which is now capable of using it to make much more accurate predictions of future air quality.

The build goes into quite a bit of detail on setting up the models, training them, and then using them on the Arduino. It’s an impressive build capped off with a fun 3D-printed case that resembles an old windmill. Using machine learning to help predict the weather is starting to become more commonplace as well, as we have seen before with this weather station that can predict rainfall intensity.

An anemometer outside

DIY Anemometer For Projects Big And Small

When [Fab] needed an anemometer for his latest project, he was stymied by the limited range and relatively high prices of commercial options. Undeterred, his solution was an impressive DIY anemometer that rivals the off-the-shelf alternatives.

AnemoSens was designed from the ground up as a component for the ambitious WinDIY_2 Horizontal Axis Wind Turbine, however it’s just as suitable as part of your standard home weather station. The microcontroller unit uses RS485/Modbus connectivity, ensuring that data from the wind sensor is accessible across a variety of platforms. Serial-stream via USB and an SD cart slot are also available for recording data, the latter being particularly useful for long-term unsupervised monitoring. [Fab] also integrated an ESP32 for recording data over the air.

The MCU also features a location for the venerable BME280, which is a relatively accurate temperature, pressure and humidity sensor often deployed in DIY weather stations. This feels like a nice touch, as it means the anemometer package alone could feasibly serve as a rudimentary weather sensing station, or as a backup for more elaborate environmental monitoring.

The prototype currently uses a Hall effect sensor for measuring the wind speed, while a AS5048B magnetic rotary encoder does a decent job of measuring rotation (wind direction). Some calibration is likely necessary to improve the accuracy of this setup, but it’s a promising start.

[Fab] has already identified some shortcomings with the bearing, but has a plan for future iterations. He might want to check out this spare-parts anemometer that uses a bearing from an old hard drive.

Continue reading “DIY Anemometer For Projects Big And Small”

Open Source Ultrasonic Anemometer

Weather stations are a popular project for experimenting with various environmental sensors, and for wind speed and direction the choice is usually a simple cup anemometer and wind vane. For [Jianjia Ma]’s QingStation, he decided to build another type of wind sensor: An ultrasonic anemometer.

Ultrasonic anemometers have no moving parts but come at the cost of significantly more electronic complexity. They work by measuring the time it takes for an ultrasonic audio pulse to be reflected the receiver across a known distance. Wind direction can be calculated by taking velocity readings from two ultrasonic sensor pairs perpendicular to each other and using a bit of simple trigonometry. For an ultrasonic anemometer to work properly, it requires a carefully designed analog amplifier on the receive side and a lot of signal processing to extract the correct signal from all the noise caused by secondary echoes, multi-pathing, and the environment. The design and experimentation process is well-documented. Since [Jianjia] does not have access to a wind tunnel for testing and calibration, he improvised by mounting the anemometer on his car’s roof and going for a drive. This yielded readings that were proportional to the car’s GPS speed, but a bit higher. This might due to a calculation error, or external factors like wind, or disturbed airflow from the test car or other traffic.

Other sensors include an optical rain sensor, light sensor, lighting sensor, and a BME280 for air pressure, humidity, and temperature. [Jianjia] plans to use the QingStation on an autonomous boat, so he also included an IMU, compass, GPS, and a microphone for environmental sounds. The fact that none of the sensors have moving parts is a major advantage for this use case, and we look forward to seeing the boat project. All the hardware and software are open-source and available on GitHub.

Continue reading “Open Source Ultrasonic Anemometer”