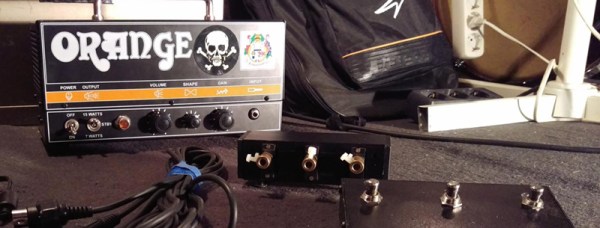
Arduino Development; There’s A Makefile For That

Hardware and software combined, Arduino does many things right. It lowers the entry level into embedded systems development with a nifty hardware abstraction layer. It aims for cross-platform compatibility by supporting Windows, Mac OSX, and Linux operation systems. It throws out the need for an external programmer to get you up-and-blinkin’ those LEDs quickly.

One thing most of us never cease to curse about, though, is the IDE. Many have cried out wildly against the Java-based text-editor for its cryptic compiling-and-linking process, its inability to accommodate bare C or C++ source files, and (shh!) its lack of Vim keybindings. Fortunately, our cries have been heard, and the like many community-based projects, the community fights back with a custom solution.

Calling all Grumpy Engineers: The Arduino-Makefile

Enter the Arduino Makefile.

What began as [Sudar’s] lightweight program to escape the IDE has become a fully-blown, feature rich Makefile that has evolved and adapted to grow with the changes of Arduino. With a community of 47 contributors, the Makefile enables you to escape from the IDE entirely by writing code in the cushy text editor of your choice and compiling with a simple incantation of make into your terminal, be you in Linux, Mac, or Windows.

Without further ado, let’s take a walking tour of the project’s highlights.

Continue reading “Arduino Development; There’s A Makefile For That”

KIM-1 Clock

Over on hackaday.io, [Arduino Enigma] posted the code for his clock that runs on a KIM Uno (the KIM-1 clone we mentioned late last year). Although the KIM Uno has a few demos preloaded (including Microchess and a scientific calculator), all of them take some interaction. The clock makes the KIM Uno a more dynamic desk display since it does something useful without any user interaction (once you set the clock, of course).

The project shows the code stored in ROM, but you can’t directly enter the program into ROM (which is really EEPROM on the host Arduino). The trick is to enter the address (that is press AD and then 0, 4, 0, 0) and then mash down the reset button for about a second. Then you can press DA and enter the hex codes provided (pressing + after each byte). Since the code is in nonvolatile storage, you can start it at any time by setting the time in RAM and executing the code at address 400.

Continue reading “KIM-1 Clock”

Demonstrating Baudot Code

Visualizing how electronic signals work can be difficult. A physical model can be darn useful in overcoming that difficulty. At a recent workshop entitled “Unboxing Black Boxes” [Julian Hespenheide’s] group created a device to show Baudot Code in operation. This amalgam of wood and Arduino they dubbed émile in honor of Émile Baudot (1845-1903).

Baudot developed his code to transmit telegraph signals from one machine to another, in contrast to Morse code which was principally for human communication. Both codes were used throughout the 20th century. For example, those big clattering, mechanical teletype machines use a minor variation of Baudot code.

Baudot is a fixed length code of 5 bits, as opposed to Morse’s variable length code. Morse has a separate code for each characters while Baudot uses “shift’ codes to change between alphabet and figure characters. For instance, a binary 11 would represent either an ‘A’ or a ‘-‘ depending on the shift state. If the shift code was missed the receiver would get gibberish.

In émile the Baudot code is sent by marbles. That’s right, marbles. There are five marbles, one for each bit in the Baudot code. Each marble rolls in a track toward the Arduino. How does the machine know which marbles to send? “Punch cards”! These are a marvelous aspect of the design.

Each card represents a code. Each position in the card has a gap to allow a marble to pass ( a set bit), or no gap to block the marble (an unset bit). The operator loads 5 marbles and a punch card and launches the marbles via a spring mechanism.

[Julian’s] really created a great visualization of Baudot code with this project! Take a look at émile in action after the break. Continue reading “Demonstrating Baudot Code”

Spinning A Pyrite Record For Art

Anyone with a record player is familiar with the concept of translating irregularities on a surface into sound. And, anyone who has ever cracked open a CD player or DVD player has seen how a laser can be used to reproduce sound digitally. Combining the two would be an interesting project in its own right, but [Dimitry Morozov] took this a couple of steps further with his pyrite disc sound object project.

DSC016533_1340_cPyrite discs, also known as pyrite suns or pyrite dollars, are a form of pyrite in which the crystallization structure forms a disc with radial striations. Pyrite discs are unique to the area around Sparta, Illinois, and are generally found in coal mines there. They have no real practical use, but are a favorite of mineral collectors because of their interesting aesthetics.

[Dmitry] received his pyrite disc from one such mineral collector in Boulder, CO, with the request that he use it for an interesting project. [Dmitry] himself specializes in art installations and unique instruments, and combined those passions in his pyrite disc sound object called Ra.

The concept itself is straightforward: spin the pyrite disc and use a laser to convert the surface striations into audio. But, as you can see in the photos and video, the execution was far from straightforward. From what we can gather, [Dimitry] used an Arduino Nano and a DIY laser pickup on a servo arm to scan the pyrite disc as it’s being spun by a stepper motor. That data is then sent to a Raspberry Pi where it’s synthesized (with various modulation and effects controls), to produce sound that is output through the single speaker attached to the object. Generating sound from unusual sources is certainly nothing new to regular readers, but the beauty of this part project is definitely something to be applauded.

Continue reading “Spinning A Pyrite Record For Art”

Air Rocket Launch Pad UI Entertains Eager Kids

Last spring [Mike] built a foam rocket launchpad which was a hit with the kids in his neighborhood. But the launch system was merely a couple of buttons so the early enthusiasm quickly wore off. He went back to the drawing board to make improvements and really hit the jackpot!

The original launch system had one button for building up air pressure with a second big red button of doom for launching the rocket. The problem was a complete lack of user feedback; all the kids could do is guess how long they needed to hold the button to achieve the highest launch. This revision adds flashing LEDs to hold the attention of the wee ones but to also function as a gauge for the new pressure control system. The visually fascinating control board also includes a removable key to prevent accidental launches.

The particulars of this are as you’d expect: it’s a bunch of plumbing to manage the air pressure, an Arduino to control it all, and additional electronics in between to make them work together.

We’re especially impressed by the leap in features and quality from the first version to this one. It’s a testament to the power of quick proofs-of-concept before committing to a more involved build. Great work [Mike]!

We’ve seen rocket launchers for adults and some neat mission control panels but [Mike’s] kid friendly launch controller really is out of this world (sorry, couldn’t resist). You’ll find a video demo of this launcher after the break.

Continue reading “Air Rocket Launch Pad UI Entertains Eager Kids”

Arduino Teaches Morse Code

You may wonder why anyone would want to learn Morse code. You don’t need it for a ham license anymore. There are, however, at least three reasons you might want to learn it anyway. First, some people actually enjoy it either for the nostalgia or the challenge of it. Another reason is that Morse code can often get through when other human-readable schemes fail. Morse code can be sent using low power, equipment built from simple materials or even using mirrors or flashlights. Finally, Morse code is a very simple way to do covert communications. If you know Morse code, you could privately talk to a concealed computer on just two I/O lines. We’ll let you imagine the uses for that.

In the old days, you usually learned Morse code from an experienced sender, by listening to the radio, or from an audio tape. The state of the art today employs a computer to randomly generate practice text. [M0TGN] wanted a device to generate practice code, so he built it around an Arduino. The device acts like an old commercial model, the Datong D70, although it can optionally accept an LCD screen, something the D70 didn’t have.

You can see the project in operation in the video below. Once you learn how to read Morse code, you might want to teach your Arduino to understand it, too. Or, you can check out some other Morse-based projects.

Continue reading “Arduino Teaches Morse Code”

Hackaday Dictionary: The ESP8266

In August of 2014, something new started showing up in the markets of Shenzhen, the hi-tech area of China where the majority of the world’s electronics components are made. This is the ESP8266, a WiFi SoC (System on a Chip) that can connect to 802.11b/g/n networks on the 2.4GHz band. It can be addressed with SPI or a serial connection, and has an AT command set that makes it behave rather like an old-style modem. Basically, it has everything you would need to connect a device to a WiFi network, with the ESP8266 chip itself handling the complicated business of finding, joining and transmitting/receiving over a WiFi network.

That’s nothing particularly new in itself: WiFi connection devices like the TI CC3000 have been around for longer, and do much the same thing. The difference was the price. While the TI solution costs about $10 if you buy several thousand of them, the ESP8266 costs less than $7 for an individual board that can plug straight into an Arduino or similar. Buy the chip in bulk, and you can get it for less than $2.

The ESP8266 is more than just a WiFi dongle, though: it is a fully fledged computer in itself, with a megabyte of flash memory and a 32-bit processor that uses a RISC architecture. This can run applications, turning the ESP8266 into a standalone module that can collect and send data over the Internet. And it can do this while drawing a reasonably low amount of power: while receiving data, it typically uses just 60mA, and sending data over an 802.11n connection uses just 145mA. That means you can drive it from a small battery or other small power source, and it will keep running for a long time.

It wasn’t an easy ship to write applications for in the early days, though: it was poorly documented and required a dedicated toolchain to work with. This made it more of a challenge than many hackers were comfortable with.  That changed earlier this year, though, when the Arduino IDE (Integrated Development Environment) was ported to the chip. This meant that you could use the much easier to write Arduino functions and libraries to write code for the chip, bringing it within reach of even the most casual hacker.

Continue reading “Hackaday Dictionary: The ESP8266”