Tiny Mouse Ring Uses Prox Sensors

A traditional computer mouse typically fits in the palm of your hand. However, with modern technology, there’s no need for mice to be so large, as demonstrated by [juskim]’s neat little mouse ring. Check it out in the video below.

The concept is simple—it’s a tiny mouse that sits neatly on the end of one of your fingers. You then get the slightly surreal experience of pointing on your computer just by moving a single finger instead of your whole hand.

The project uses a typical optical mouse sensor for movement, as you might expect. However, there are no conventional switches for the left and right mouse buttons. Instead, [juskim] realized a more compact design was possible by using proximity sensors instead. The sensors detect the presence of his fingers on either side of the ring mouse. When one of the fingers is lifted, the absence of the finger triggers a mouse click, either left or right, depending on the finger.

The build started with junk box parts, but hooking up an Arduino Pro Micro dev board and other modules proved too cumbersome to use effectively. Instead, the build relies on an ATTO board, a tiny PCB featuring the same ATmega32U4 microcontroller. Similarly, the build relies on tiny proximity sensors from STM to fit in the “ring” form factor. It’s all wrapped up in a 3D-printed enclosure that fits snugly on the user’s finger.

We’ve seen some other neat mouse rings before, too. Or, if you want something really different, grab some keychains and make a 6DOF mouse.

Continue reading “Tiny Mouse Ring Uses Prox Sensors”

A keyboard built into a commercial foot rest.

Floorboard Is A Keyboard For Your Feet

Whether you have full use of your hands or not, a foot-operated keyboard is a great addition to any setup. Of course, it has to be a lot more robust than your average finger-operated keyboard, so building a keyboard into an existing footstool is a great idea.

When [Wingletang]’s regular plastic footrest finally gave up the ghost and split in twain, they ordered a stronger replacement with a little rear compartment meant to hold the foot switches used by those typing from dictation. Settling upon modifiers like Ctrl, Alt, and Shift, they went about designing a keyboard based on the ATmega32U4, which does HID communication natively.

For the switches, [Wingletang] used the stomp switches typically found in guitar pedals, along with toppers to make them more comfortable and increase the surface area. Rather than drilling through the top of the compartment to accommodate the switches, [Wingletang] decided to 3D print a new one so they could include circuit board mounting pillars and a bit of wire management. Honestly, it looks great with the black side rails.

If you want to build something a little different, try using one of those folding stools.

A very tiny keyboard with RGB backlighting.

Tiny Custom Keyboard Gets RGB

Full-size keyboards are great for actually typing on and using for day-to-day interfacing duties. They’re less good for impressing the Internet. If you really want to show off, you gotta go really big — or really small. [juskim] went the latter route, and added RGB to boot!

This was [juskim]’s attempt to produce the world’s smallest keyboard. We can’t guarantee that, but it’s certainly very small. You could readily clasp it within a closed fist. It uses a cut down 60% key layout, but it’s still well-featured, including numbers, letters, function keys, and even +,-, and =. The build uses tiny tactile switches that are SMD mounted on a custom PCB. An ATmega32U4 is used as the microcontroller running the show, which speaks USB to act as a standard human interface device (HID). The keycaps and case are tiny 3D printed items, with six RGB LEDs installed inside for the proper gamer aesthetic. The total keyboard measures 66 mm x 21 mm.

Don’t expect to type fast on this thing. [juskim] only managed 14 words per minute. If you want to be productive, consider a more traditional design.

Continue reading “Tiny Custom Keyboard Gets RGB”

A Planck-inspired 40% ortholinear keyboard.

DIY Keyboard Can Handle Up To Three Host Devices

Here’s a story that may be familiar: [der-b] is a Linux developer who is forced two carry two laptops — one for work with unavoidable work stuff on it, and one for software development. Unfortunately this leads to keyboard confusion between the two when one is connected to an external display.

In an attempt to overcome this, [der-b] designed a keyboard that can be connected to more than one device at a time, despite ultimately thinking that this will lead to another layer of confusion. The point was to try to make something as lightweight as possible, since carrying two laptops is already a struggle. As a bonus, this project was a learning experience for soldering SMD parts.

The keyboard itself is based on the Planck and uses an ATMega32u4 running QMK firmware, so that means it’s a 40% ortholinear with 48 keys total. [der-b] used low-profile Cherry MX switches to keep things sleek.

In order to switch between different host devices, [der-b] uses shortcuts as you’ll see in the short video after the break. This is accomplished with a FSUSB36 IC on the USB connections between the ATMega and the host.

[der-b] encountered a spate of issues while building this keyboard, which you can read all about in the blog post. We love to see transparency when it comes to your write-ups, especially when the projects become learning experiences. (Aren’t they all?) But if 48 keys aren’t nearly enough for you, check out this learning-experience keyboard build.

Continue reading “DIY Keyboard Can Handle Up To Three Host Devices”

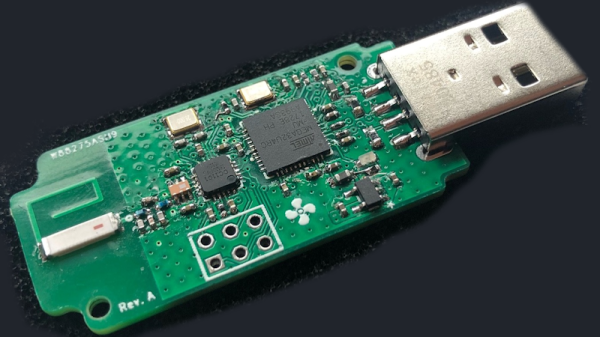
the dongle developed by Marcel, with a USB-A plug on one end and an SMD antenna on the other

Hackaday Prize 2022: House Ventilation Reverse-Engineered And Automated

[Marcel] thought – what if he had more control over his house ventilation system? You could add some nifty features, such as automatically ventilating your house in the mornings when everyone’s away, only creating noise when nobody’s around to hear it. Sadly, most ventilation systems are not automation-friendly at all – he was lucky, however, as his system came with a wireless remote. [Marcel] reverse-engineered this remote, created a USB dongle speaking the same protocol, and tied it into his Home Assistant setup!

The remote in question is Orcon R15, with an Atmel MCU talking to a CC1101 chip through SPI. He sniffed the SPI communications when pressing different buttons, figured out the protocol by comparing the recordings, and built a test setup with a spare Arduino and CC1101 module. It worked, and he set out to design a separate dongle, using an ATMega32U4. The dongle looks pretty neat, and fits a Hammond enclosure – what’s not to like?

Then he set out to develop the firmware, and didn’t disappoint on that front either. His code doesn’t just imitate the original remote perfectly in terms of control, it also has user-friendly pairing flow, keeps track of the system’s current state, and still lets the original remote be used in parallel. Eagle files for the PCB are available on the project page, with the code and a PDF schematic available in the GitHub repo. This entire journey is described in the Hackaday.io page, and we would recommend you check it out for all the insights it provides!

Ventilation systems don’t tend to be designed for automation, and it’s endearing to see hackers working on conquering this frontier. Last time we’ve seen a ventilation system hack, it had the additional challenge of being landlord-friendly, and we think the hacker nailed it!

The threeboard simulator running

Threeboard: Short On Keys, Long On Documentation

As peripherals go, few are hacked on more than keyboards. The layouts, the shapes, the sizes, materials, and even the question of what a keyboard is are all on the table for tinkering. In that vein, [TaylorConor] released his simplified keyboard called the threeboard on GitHub, having only three keys and replicating a full keyboard.

We’ve covered keyboards built with chording in mind, wrapped around coffee cups, and keyboards with joysticks for added speed. So why cover this one? What makes it different? The execution is superb and is a great example to look at next time you’re making a project you want to show off. The keyboard is just three mechanical switches, two 8-bit binary displays (16 LEDs total), three status LEDs, and three LEDs showing the current layer (four layers). The detailed user’s manual explains it all. There is a reliable Atmega32U4 microcontroller and two EEPROM chips at its heart.

Where this project shows off is the testing. It has unit tests, simulated integration tests, and simulated property tests. Since all the code is in C++, unit testing is relatively straightforward. The integration and property tests are via a simulator. Rather than recompiling the code with some new flags, he uses the simavr AVR simulator, which means it simulates the same binary file that gets flashed onto the microcontroller. This approach means the design is tested and debugged via GDB. It’s an incredible technique we’d love to see more of in hobby projects. Marketing speak might call this a “digital twin” but the idea is that you have a virtual version that’s easier to work on and has a tighter iteration loop while being as close as possible to the physical version.

[TaylorConor’s] goal was to create a from-scratch microcontroller project with easy-to-read code, fantastic documentation, and best practices. We think he nailed it. So feel free to run the simulator or jump right into building one for yourself. All the hardware is under a CERN-OHL-P license, and the firmware is under GPLv3.

Play Doom Or GTA V With Your Own Custom Controller And Xbox Emulator

[Arnov] is bringing his own custom-made controller to the party and it is sure to impress. The design appears to have been inspired by the Xbox controller layout. Two joysticks for fine control of game characters, 4 face buttons, and two shoulder buttons. He opted for all through-hole components to make the assembly easier. No messing with tiny surface mount components here. We really appreciate the detail given to the silkscreen and the homage paid to a staple of retro gaming.

We were pretty impressed with how smoothly the controller translated to the game. He mentioned that was a huge improvement over his previous design. His original design had buttons instead of joysticks, but switching to joysticks gave him much better in-game control. That could also have a lot to do with the Xbox controller emulator running the background, but still.

Given that gift-giving season is upon us, you could really impress the video game enthusiast in your life with this as a custom gift. You could even run Retro games like Doom if you hook it up to a RetroPie. That ought to get a few people’s attention.

Continue reading “Play Doom Or GTA V With Your Own Custom Controller And Xbox Emulator”