[Charles] Tears Into A Ford Fusion Battery

Any time we hear from [Charles Z. Guan], we know it’s going to be a good feature. When he’s linking us to a blog post with phrases like “If you touch the wrong spots, you will commit suicide instantly”, we know it will be a really good feature. [Charles] is no stranger to Hackaday – we’ve featured his GoKarts, Quadcopters, and scooters before. He was even generous enough to let a couple of Hackaday writers test drive ChibiKart around Maker Faire New York last year.

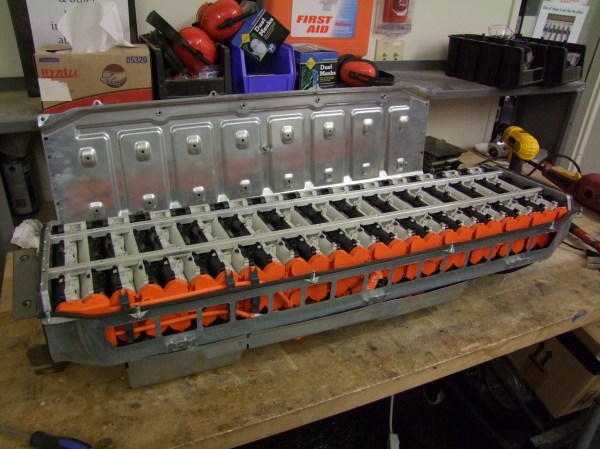
This time around, [Charles] is working on a power system for chibi-Mikuvan, his proposed entry of the Power Racing Series. He’s decided to go with a used battery from a hybrid vehicle. As these vehicles get older, the batteries are finally becoming available on the used market. [Charles] was able to pick up a 2010 Ford Fusion NiMh battery for only $300. These are not small batteries. At 20” wide by 48” long, and weighing in at 150 pounds, you’ll need 2 or 3 people to move one. They also pack quite a punch: 2.1kWh at 275V. It can’t be understated, taking apart batteries such as these gives access to un-fused lethal voltages. Electrocution, arcs, vaporized metal, fire, and worse are all possibilities. If you do decide to work with an EV or hybrid battery, don’t say we (and [Charles]) didn’t warn you.

As [Charles] began taking apart the battery, he found it was one of the most well thought out designs he’d ever seen. From the battery management computers to the hydrogen filled contactors, to the cooling fan controller, everything was easy to work on. The trick to disassembly was to pull the last module out first. Since all the modules are wired in series, removing the last module effectively splits the pack in half, making it much safer to work on. The battery itself is comprised of 28 modules. Each module contains two 4.8V strings of “D” cell sized NiMh batteries. The battery’s capacity rating is 8000 mAh, and [Charles] found they still took a full charge. Since he doesn’t need the pack just yet, [Charles] removed the final bus bars, rendering it relatively safe. Now that he has a power source, we’re waiting to see [Charles’] next stop on the road to chibi-Mikuvan.

DIY Electricity And Internet For Burning Man

bmPowerInet

Despite this being [Kenneth Finnegan’s] first Burning Man, the guy came prepared and stayed connected by setting up a beefy electricity supply and a faint yet functional internet connection. If you saw [Kenneth’s] Burning Man slideshow, you know that the desert is but a mild deterrent against power, water, and even temporary runways.

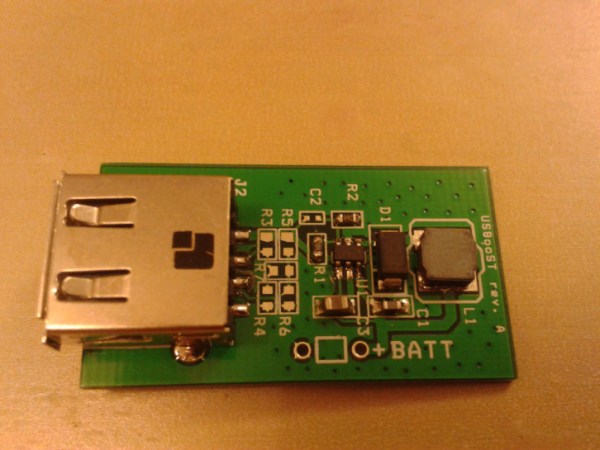
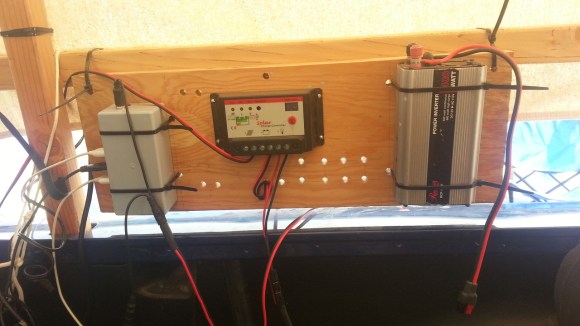
He borrowed a 20V 100W solar panel from Cal Poly and picked up a bargain-price TSMT-20A solar charge controller off eBay. The controller babysits the batteries by preventing both overcharging and over-discharging. The batteries—two Trojan-105 220Ah 6V behemoths—came limping out of a scissor lift on their last legs of life: a high internal resistance ruled out large current draws. Fortunately, the power demands were low, as the majority of devices were 12VDC or USB. [Kenneth] also had conveniently built this USB power strip earlier in the year, which he brought along to step down to 5VDC for USB charging.

Internet in the desert, however, was less reliable. A small team provides a microwave link from civilization every summer, which is shared via open access points in 3 different camps. [Kenneth] pointed his Ubiquiti NanoStation at the nearest one, which provided a host of inconvenient quirks and top speeds of 2-20kBps: enough, at least, to check emails.

Wireless Doorbell Battery Monitor

wireless-doorbell-battery-monitor

We know exactly what [Dan] is going through. We also bought a cheap wireless doorbell and are plagued by the batteries running down. When that happens, the only way you know is when people start pounding on the door because you’re not answering the bell. Well no more for [Dan]. He built a backup system which monitors the voltage of the batteries on the chime unit.

You can see the small bit of protoboard he used to house the microcontroller and the UI. It’s an ATtiny13 along with a green LED and a single push button. The idea is to use the chip’s ADC to monitor the voltage level of the pair of batteries which power the chime. When it drops below 3V the green LED will come on.

First off, we wish these things would come with better power supply circuits. For instance, we just replaced the CR2032 in an Apple TV remote and measured the voltage at 2.7V. That remote and the chime both run from a 3V source. Can’t they be made to work down to 1.8V? But we digress.

In addition to monitoring voltage [Dan’s] rig also counts the number of times the chime has rung. Every eight seconds it flashes the count in binary, unless he presses the red button to clear the count. This is shown in the video after the break. We guess he wants to know how many times this thing can be used before running the batteries down.

Seriously though, for a rarely used item like this how hard would it be to use ambient light harvesting to help save the batteries? Looking at some indoor solar harvesting numbers shows it might be impossible to only power this from PV, but what if there was a super-cap which would be topped off with a trickle from the panels but would still use the batteries when that runs down?

Continue reading “Wireless Doorbell Battery Monitor”

Motorizing This Trycicle

[Kaj] wanted to help out an aging family member by building them an electric tricycle during international Hack Day back on August 11th. He mixed in some reused parts with some new ones and ended up with bike that lets the rider troll other cyclists. Apparently when serious riders see an older man on a trike gaining on them they pedal like mad to make sure they don’t suffer the embarrassment of being passed. But there’s enough power and range to overtake the strongest of non-powered competitors.

Many of the parts came from a non-functional electric bike sold on Craig’s List. [Kaj] reports that the bike was trashed, but the motor system was mostly salvageable. He replace the batteries and charger and hooked up the motor to the rear axle. The initial install placed everything but the motor in the basket behind the rider. The weight and placement made the thing unstable when cornering. The solution was to house the batteries in a tool box and strap it below the basket. The lower center of gravity makes sure the trike is easy to handle, and now there’s still room in the basket for your groceries.

This would make a perfect platform for some road messages printed in water.

UPS With Dead Batteries Reborn As A Whole-house Power Backup

[Woodporterhouse] must deal with regular power black outs in his area. He recently converted a rack-mount uninterruptible power supply to feed a portion of his mains wiring. This one is not to be missed, since he did such a great job on the project, and  an equally remarkable job of documenting it. It’s one of the best examples we’ve seen of how to use Imgur as a project log.

The UPS still needs to have a case, but it doesn’t need room for batteries as he’s going to use a series of high-end sealed lead-acid batteries. So he cut down the enclosure to about half of the original size. That’s it mounted just above the new batteries. For this to work you need some type of transfer switch which can automatically patch between incoming line voltage, and the battery backup. He already had one of these switches in place for use with a generator, that’s it in the upper left. The entire system powers a sub-panel responsible for his essential circuits — the electronics in the home and a few lighting circuits (we’d assume this includes utilities like the refrigerator).

One really great feature that the reused UPS brings to the project is a monitoring card with a NIC. This way he can check the server to see if the UPS is being used, and how much of the 14 battery life remains.

[Thanks Ross via Reddit]

Measuring The Capacities Of Different Battery Brands

Being the smart consumer he is, [Denis] usually looks at the price per pound when comparing similar products at the grocery store. When it came time to buy a few AA batteries, he didn’t have any data to go on. To solve his little conundrum, [Denis] decided he would test several brands of batteries and see which one gives him the most bang for the buck.

After bringing home a haul of a dozen different brands of AA cells, [Denis] broke out the Arduino and starting designing a circuit. To test how much energy each brand provides, the Arduino measures the voltage across a load every second until the battery reaches 0.2V. The elapsed time, as well as the voltage, Watt hours, Joules, and ambient temperature are logged on an attached LCD screen and sent over a USB serial link to automate the data collection process.

What’s the verdict? Unsurprisingly, words like ‘super,’ ‘max,’ and ‘ultra’ didn’t connotate a better battery. The best bang for the buck came from an off-brand called RS Power Ultra. The worst battery was the Panasonic Evolta cells that came in at about $1.50 USD per watt-hour.

If you’d like to verify [Denis]’ work, all the code is up on Github along with the schematic.

Another Take On Using ‘dead’ Batteries

Here’s another circuit that can be used to squeeze the remaining potential from supposedly dead batteries. Just like the AASaver, we see this as a useful prototyping tool, providing juice for a breadboard even though it’s not reliable enough for long-term use (the batteries are just about through after all).

First off, the image above shows rechargeables instead of alkalines. We don’t recommend this as the circuit has no cutoff feature and the 0.7V input for the boost converter surely is below the recommended low-voltage limit for those cells. But that aside, we like the diminutive board which solders onto the end of a battery pack. It uses an SC120SKTRT which is a variable boost regulator capable of outputting 1.8-5V depending on resistor choices. You can leave the resistors off and it will default to 3.3V, set the output explicitly, or roll in some potentiometers and use your multimeter to tune the output.

This regulator costs more than the MCP1640 used in the AASaver, but it appears to use less passive components making for a smaller footprint. At a total of $3.50 plus the PCB (which will be a snap to etch at home) this is another great option to top off your next parts order.

[Thanks Uwe]