Rolling Your Own Long-Range IoT Sensor Network

Homebrew wireless sensors are nothing new around these parts: grab an ESP8266, hang a BME280 from the I2C pins, and you’re just a few lines of code away from joining the Internet of Things on your own terms. Builds like this are so cheap and easy that they make an excellent first project for folks looking to get into the electronics game, but what if you’re looking for something a bit more bespoke?

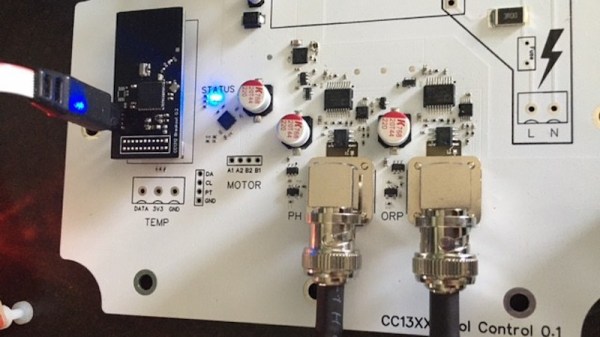
In that case, you could follow in the footsteps of [Discreet Mayor] and put together a custom modular architecture for long-range wireless sensors. The core of the system is a breakout board for the Texas Instruments SimpleLink CC1312 wireless MCU which features a simple 2×11 header connector. This allows the module to either be plugged into a larger board or have a small sensor PCB attached directly to it.

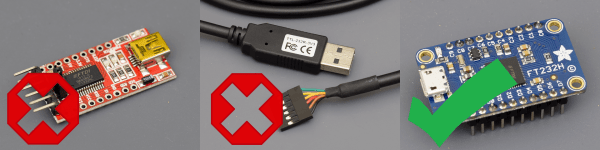
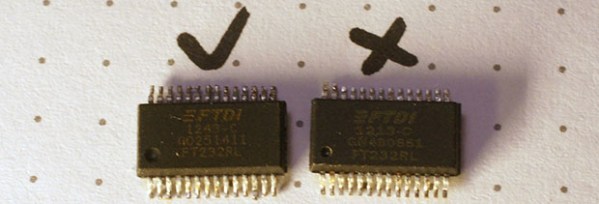
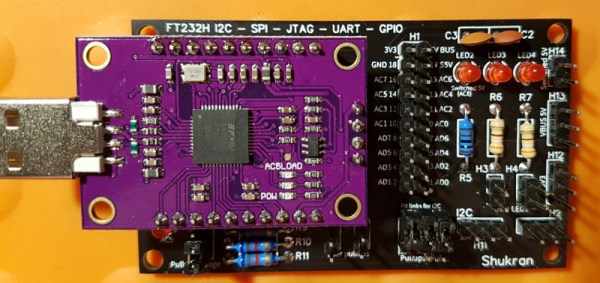
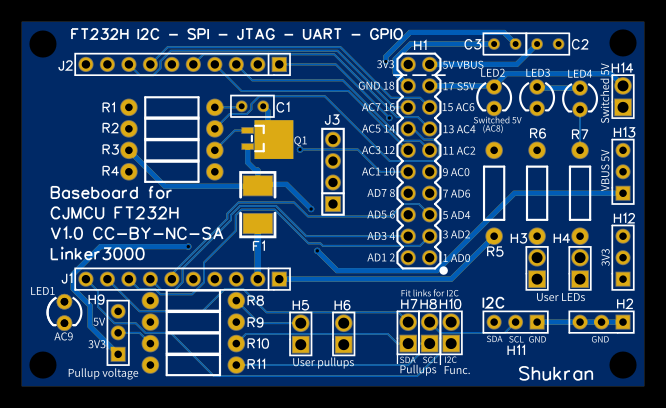
Rather than using WiFi or requiring some existing radio infrastructure, the boards automatically create a private network using the IEEE 802.15.4 standard at a range of up to 600 meters. A dedicated receiver isn’t necessary, to pull data off the network, one of the CC1312 boards simply gets connected to a computer through a simple FT232 adapter.

[Discreet Mayor] has already created a number of projects that use these custom radios for communication, from a pool monitoring system to a temperature sensor for the BBQ. That portable battery operated devices are able to use this common communications backbone just as well as mains powered static devices is a testament to the work that went into the firmware to make it as robust and efficient as possible.

Like the idea of long-range private networks, but less enthusiastic about having to come up with your own hardware? Not to worry. Over the summer, Espressif announced that they’re working on an ESP32 variant that includes support for IEEE 802.15.4. Just as soon as this chip shortage is over, we might even get to see the thing.

Slice Through Your Problems With A Shukran

We’d wager most hackers are familiar with FTDI as the manufacturer of the gold standard USB-UART interfaces. Before parts like the ultra cheap CH340 and CP2102 became common, if you needed to turn a USB cable into a TTL UART device, “an FTDI” (probably an FT232RL) was the way to make that happen. But some of the parts in the FT232* family are capable of much more. Wanting to get at more than a UART, [linker3000] designed the Shukran to unlock the full potential of the FT232H.

The FT232H is interesting because it’s an exceptionally general purpose interface device. Depending on configuration it can turn USB into UART, JTAG, SPI, I2C, and GPIO. Want to prototype the driver for a new sensor? Why bother flashing your Teensy when you can drive it directly from the development machine with an FT232H and the appropriate libraries?

The Shukran is actually a breakout for the “CJMCU FT232H” module available from many fine internet retailers. This board is a breakout that exposes a USB-A connecter on one side and standard 0.1″ headers on the other, with a QFN FT232H and all the passives in the middle. But bare 0.1″ headers (in a square!) require either further breadboarding or a nest of jumper wires to be useful. Enter the Shukran. In this arrangement, the CJMCU board is cheap and handles the SMT components, and the Shukran is easy to assemble and makes it simple to use.

The Shukran gives you LEDs, buttons and switches, and a bunch of pull up resistors (for instance, for I2C) on nicely grouped and labeled headers. But most importantly it provides a fused power supply. Ever killed the USB controller in your computer because you forgot to inline a sacrificial USB hub? This fuse should take care of that risk. If you’re interested in building one of these handy tools, sources and detailed BOM as well as usage instructions are available in the GitHub repo linked at the top.

Silicon Bugs In The FTDI FT232R, And A Tidy RF VCO Project

[Scott Harden] wrote in to tell us of some success he’s having using the FT232 chip to speak SPI directly from his laptop to a AD98850 digital signal generator. At least that was his destination. But as so often in life, more than half the fun was getting there, finding some still-unsolved silicon bugs, and (after simply swapping chips for one that works) potting it with hot glue, putting it in a nice box, and putting it up on the shelf.

In principle, the FTDI FT232 series of chips has a bit-bang mode that allows you to control the individual pins from a fairly simple API on your target computer, using their drivers and without installing anything on basically any platform. We wrote this feature up way back in 2009, and [Scott] was asking himself why he doesn’t see more hacks taking advantage of bit-bang mode.

“Square” waves

Then he answered his own question the hard way, by spending hours “debugging” his code until he stumbled on the FTDI errata note (PDF), where they admit that bit-bang mode doesn’t get timings right at all on the FT232R and FT232RL parts. FTDI has made claims that they fixed the bug in subsequent chip revisions, but the community has not been able to confirm it. If you want to use bit-bang mode, which is plenty cool, steer clear of the FT232R chips — the ones found in the ever-popular FTDI cables and many adapter dongles.

The good news here is twofold. First, now you know. Second, bit-bang mode is tremendously useful and it works with other chips from the vendor. Particularly, the FT232H and FT230X chips work just fine, among others. And [Scott] got his command-line controlled digital VCO up and running. All’s well that ends well?

We’ll wrap up with questions for the comment section. Do other manufacturers’ cheap USB-serial chips have an easily accessible bit-bang mode? Are any of you using USB bit-bang anyway? If so, what for?

Driving A 7 Segment LED Display From An FT232

Sometimes, a good hack is about using less rather than more. That’s the case with this neat tutorial from [Rahul.S] on driving a 7-segment LED display with an FT232. By using this cheap USB to serial controller, [Rahul.S] was able to drive the display directly without using a microcontroller, which keeps the component cost down.

He’s bit banging an octal buffer connected to the display. You may be surprised to find that the FT232 chips do have enough outputs to make this work. Rather than send serial data number to the display and have a controller convert this into a set of signals that make the number, this conversion is done by the PC, which then sends a signal that directly illuminates the appropriate parts of the LED. By using all of the available output lines of the FT232 (including ones like the RTS/CTS line that are usually used for signalling), [Rahul.S] was able to drive all seven of the elements and the decimal point.

Of course, cynics may argue that it would be simpler to use a cheap serial LCD display. That is true, but there is always something to be said for knowing how to do something yourself rather than letting others do it for you… Continue reading “Driving A 7 Segment LED Display From An FT232”

FTDI Screws Up, Backs Down

A few days ago we learned chip maker FTDI was doing some rather shady things with a new driver released on Windows Update. The new driver worked perfectly for real FTDI chips, but for counterfeit chips – and there are a lot of them – the USB PID was set to 0, rendering them inoperable with any computer. Now, a few days later, we know exactly what happened, and FTDI is backing down; the driver has been removed from Windows Update, and an updated driver will be released next week. A PC won’t be able to communicate with a counterfeit chip with the new driver, but at least it won’t soft-brick the chip.

Microsoft has since released a statement and rolled back two versions of the FTDI driver to prevent counterfeit chips from being bricked. The affected versions of the FTDI driver are 2.11.0 and 2.12.0, released on August 26, 2014. The latest version of the driver that does not have this chip bricking functionality is 2.10.0.0, released on January 27th. If you’re affected by the latest driver, rolling back the driver through the Device Manager to 2.10.0.0 will prevent counterfeit chips from being bricked. You might want to find a copy of the 2.10.0 driver; this will likely be the last version of the FTDI driver to work with counterfeit chips.

Thanks to the efforts of [marcan] over on the EEVblog forums, we know exactly how the earlier FTDI driver worked to brick counterfeit devices:

ftdi_evil

[marcan] disassembled the FTDI driver and found the source of the brick and some clever coding. The coding exploits  differences found in the silicon of counterfeit chips compared to the legit ones. In the small snippet of code decompiled by [marcan], the FTDI driver does nothing for legit chips, but writes 0 and value to make the EEPROM checksum match to counterfeit chips. It’s an extremely clever bit of code, but also clear evidence FTDI is intentionally bricking counterfeit devices.

A new FTDI driver, presumably one that will tell you a chip is fake without bricking it, will be released next week. While not an ideal outcome for everyone, at least the problem of drivers intentionally bricking devices is behind us.

Watch That Windows Update: FTDI Drivers Are Killing Fake Chips

The FTDI FT232 chip is found in thousands of electronic baubles, from Arduinos to test equipment, and more than a few bits of consumer electronics. It’s a simple chip, converting USB to a serial port, but very useful and probably one of the most cloned pieces of silicon on Earth. Thanks to a recent Windows update, all those fake FTDI chips are at risk of being bricked. This isn’t a case where fake FTDI chips won’t work if plugged into a machine running the newest FTDI driver; the latest driver bricks the fake chips, rendering them inoperable with any computer.

Reports of problems with FTDI chips surfaced early this month, with an explanation of the behavior showing up in an EEVblog forum thread. The new driver for these chips from FTDI, delivered through a recent Windows update, reprograms the USB PID to 0, something Windows, Linux, and OS X don’t like. This renders the chip inaccessible from any OS, effectively bricking any device that happens to have one of these fake FTDI serial chips.

Because the FTDI USB to UART chip is so incredibly common,  the market is flooded with clones and counterfeits. it’s very hard to tell the difference between the real and fake versions by looking at the package, but a look at the silicon reveals vast differences. The new driver for the FT232 exploits these differences, reprogramming it so it won’t work with existing drivers. It’s a bold strategy to cut down on silicon counterfeiters on the part of FTDI. A reasonable company would go after the manufacturers of fake chips, not the consumers who are most likely unaware they have a fake chip.

The workaround for this driver update is to download the FT232 config tool from the FTDI website on a WinXP or Linux box, change the PID of the fake chip, and never using the new driver on a modern Windows system. There will surely be an automated tool to fix these chips automatically, but until then, take a good look at what Windows Update is installing – it’s very hard to tell if your devices have a fake FTDI chip by just looking at them.

FT232RL: Real Or Fake?

Above are two FTDI FT232RL chips, an extremely common chip used to add a USB serial port to projects, builds, and products. The one on the left is a genuine part, while the chip on the right was purchased from a shady supplier and won’t work with the current FTDI drivers. Can you tell the difference?

[Zeptobars], the folks behind those great die shots of various ICs took a look at both versions of the FT232 and the differences are staggering. Compared to the real chip, the fake chip has two types of SRAM etched in the silicon – evidence this chip was pieced together from different layouts.

The conclusion [Zeptobars] reached indicated the fake chip is really just a microcontroller made protocol compatable with the addition of a mask ROM. If you’re wondering if the FTDI chips in your part drawers are genuine, the real chips have laser engraved markings, while the clone markings are usually printed.