Stellaris Launchpad Shield Shows Good Fabrication Technique

launchpad-shield-with-great-fabrication

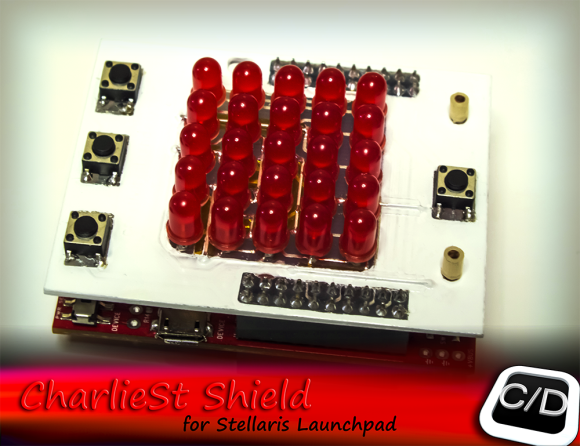
Here’s an LED and Button shield for the Stellaris Launchpad (translated) which you can fabricate at home. It gives you access to a 5×5 matrix of LEDs, and adds four more buttons. In order to cut down on the number of I/O pins required to operate the lights [Cosimo] is using the concept of Charlieplexing. This lets him get away with just six driver pins and four button pins.

It’s not just the finished product that interests us here. The fabrication itself is worth clicking through to his project post. What initially caught our eye is the use of Kapton tape as an insulator so that clipped off LEDs could be used as jumpers flat against the top side of the board before populating the LEDs themselves. After those are soldered in place he masks them off, as well as the button footprints, and uses spray paint to protect the top side of the board. The final look is more polished than most at-home project boards.

Update: Androcade 2.0

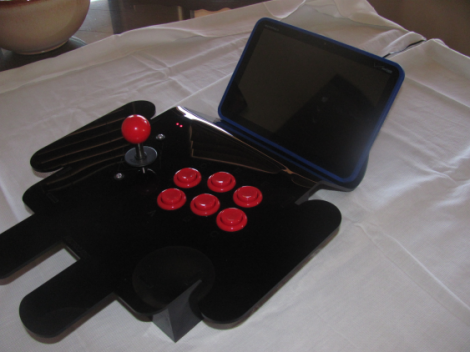
[Chris] has been going about his business, letting his interest guide him as it will. But always in the back of his mind is his Androcade project, and he’s spent the last year making improvements. It’s an arcade controller for playing games on an Android tablet. It connects to the device via Bluetooth, and includes a built-in stand.

His original version was featured here last year. It was made from wood (with a nice Android green finish) and included three buttons and a joystick. This time around he moved to some black laser-cut acrylic for the case, and has doubled up on the buttons. It also now enumerates as an HID Bluetooth device, whereas before it was pushing serial data over the BT connection.

He’s had enough interest from his friends to also create an iPad version all in white. It connects and works just the same as the Android flavor. Check out a bit of Donkey Kong gameplay after the break.

Continue reading “Update: Androcade 2.0”

Arcade Controller Will Give You Button Envy

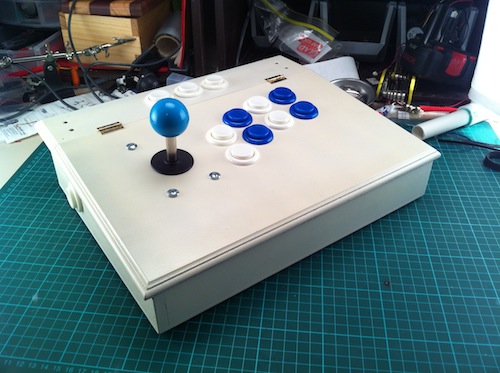
[Aaron’s] arcade controller really makes us want to put in a button order. There aren’t any secrets hidden in his design or fabrication, but he did a remarkably clean job of putting it together.

The housing is a writing box he bought at the hardware store (but he also shows off an emtpy Xbox 360 case hosting the same control layout). It has a hinged cover which is perfect for getting at the components inside, and is also at a nice angle for your wrists during long gaming session.

An Xbox 360 controller provides the connectivity for the device. Obviously it will work with the Microsoft hardware, but all modern operating systems have methods available for interfacing with these controllers as well. In the video after the break you can see [Aaron] gut the controller, soldering wires to all of the button pads and connecting those to some terminal strips. This makes the wire organization inside quite clean. He uses crimp connectors to jumper the buttons and joy stick to the other side of the terminals. Add  a nice paint job and you’ve got a controller that will look right at home in your living room.

Continue reading “Arcade Controller Will Give You Button Envy”

Parts: 4×4 RGB Button Pad Controller SPI

cover

We covered SparkFun’s new RGB button pad controller a few weeks ago. This is a full-color clone of the monome interface; a 4×4 grid of buttons with tri-color LEDs underneath. Each LED has 24bits of color control, for more than 16million color combinations. Up to 10 panels can be chained together to create huge button grids, like SparkFun’s Tetris table. We previously used a smaller version in our RGB combination lock.

We asked SparkFun to send us the SPI version of the button controller to test. This is a new product developed in-house at SparkFun, with open source hardware and software. Read about our experience interfacing this board below.

Continue reading “Parts: 4×4 RGB Button Pad Controller SPI”

Parts: Tactile Switches For Your Next Project

Electronics parts can be a pain to choose. It’s often hard to tell from manufacturers’ datasheets if a part will fit your design. We auditioned six different tactile switches to find a cheap button to use in upcoming projects. A tactile switch, also called a momentary button or push-to-make switch, is commonly used for input and microcontroller resets. This type of button creates a temporary electrical connection when pressed.

Footprints for most of these buttons are available in the Cadsoft Eagle library switch-tac, or in the Sparkfun parts library under TAC_SWITCH. Buttons in the image above are discussed from left to right. Continue reading “Parts: Tactile Switches For Your Next Project”

Xbox 360 Controller Remixed For Optimized FPS Play


[F00 f00] of Acidmods was not satisfied with his first-person shooter gaming experience, so he modded an Xbox 360 controller so that A, B, X and Y buttons are on the underside of the controller, on the inside edges of the wings where the player’s fingertips usually go. He also moved the right thumbstick up a bit so that it would be level with the left one. He designed it to improve his ability to play first person shooters, but the advantages go beyond one genre of game. The right thumb is free to remain on the right thumbstick, and the colored buttons can be pressed by four fingers instead of just the right thumb. We love this mod for it’s simplicity and effectiveness, and we’re eagerly awaiting the internal photos he promised.

[via BB Gadgets]

Tips On Picking The Right Case


Finding the right enclosure to house your latest project can be tricky, so Sparkfun wrote up some handy tips on the how to pick the right one.

The most important tip is to have your components measured before acquiring a case; even being a few milimeters too small can put you back at square one. To do this right, it’s useful to look at the dimensional drawings of prospective cases to get a sense for the size. These typically include recommended shapes for PCBs too.

You may find a case that meets your dimensional needs but doesn’t have the appropriate mounting bosses. To get the placement right, screw some plastic standoffs to the PCB, then use super glue to attach them firmly to the case.

Tips on button choices, hole drilling, and other typical issues with case modification can also be found in this guide. If this is something that’s been stumping you, give it a look.