Steampunk IMacs With Real Turning Gears

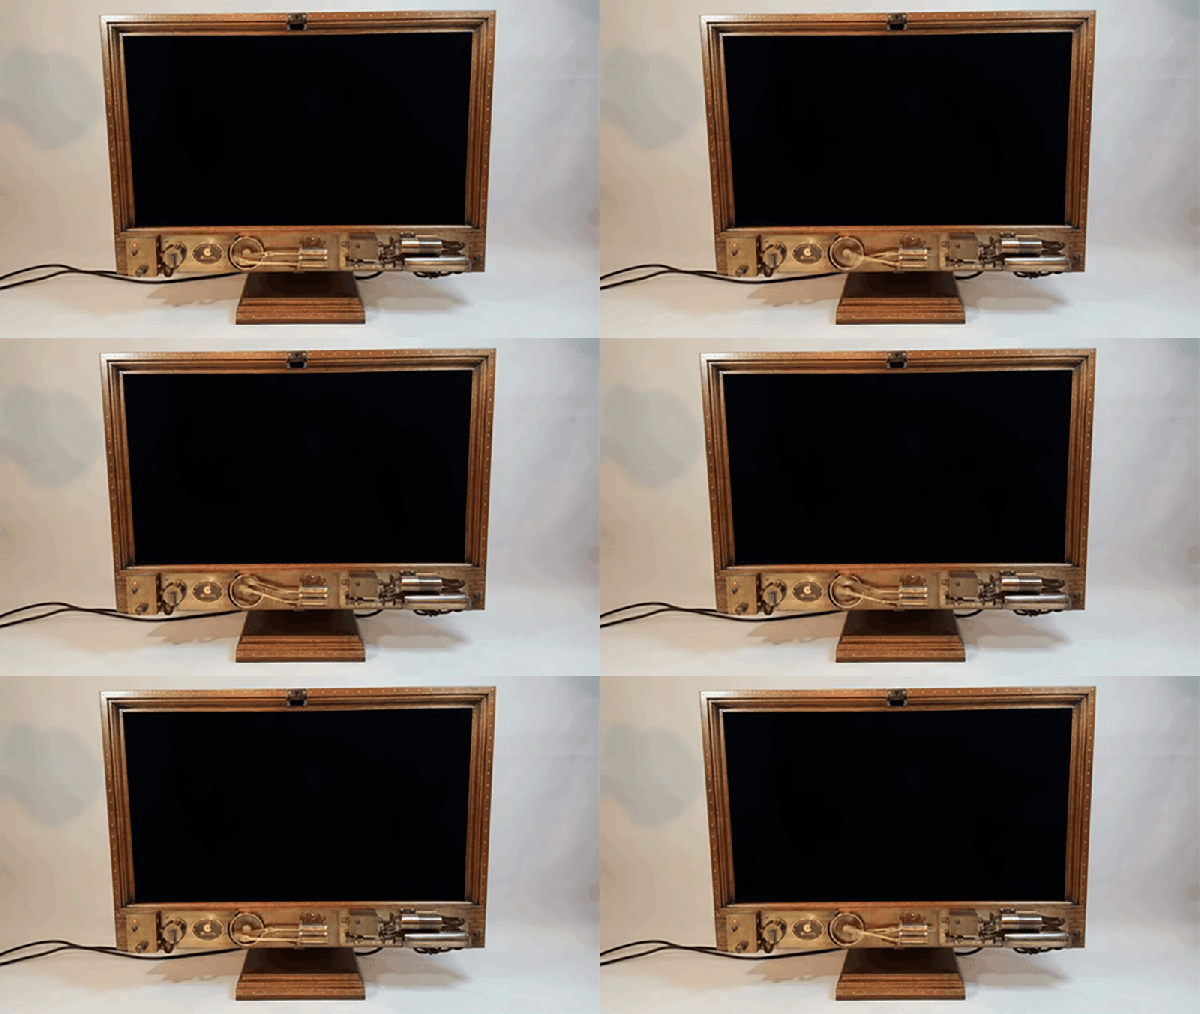
Macs have always been favorites of case modders, with projects ranging from turning a Mac Plus into an aquarium to retrofuturistic machines that look like they came from the set of [Terry Gilliam]’s Brazil. Some of these casemods are of the steampunk variety, an aesthetic that usually means gluing gears to wood. [Valeriy] and [Cyrill] are bucking that trend with a beautiful iMac crafted from wood, brass, and leather (Russian, Google Translate)

The machine in question is a late-model, impossibly thin iMac. Unlike the old all-in-one computers with clunky CRTs, there’s not much space to dig around inside this iMac, and doing so would probably ruin the machine, anyway. Instead of a complete disassembly a wooden frame was constructed around the display, the aluminum base was covered in veneer, and the back of the iMac was covered in leather.

This is a steampunk computer, though, and that means gears. In this case, the gears and steam elements actually do something. The front of the computer is adorned with a decent replica of the drivetrain of a locomotive that spins with the help of an electric motor. There’s a USB port attached to the front, ensconced in a cylindrical enclosure that opens when a switch is flipped.

If a complete reworking of a modern iMac isn’t enough, the build also included the steampunkification of the Apple Bluetooth keyboard. That in itself is an amazing build, but to see the entire thing in action, you’ll have to check out the video below.

Continue reading “Steampunk IMacs With Real Turning Gears”

NES Reborn As Nexus Player And NES

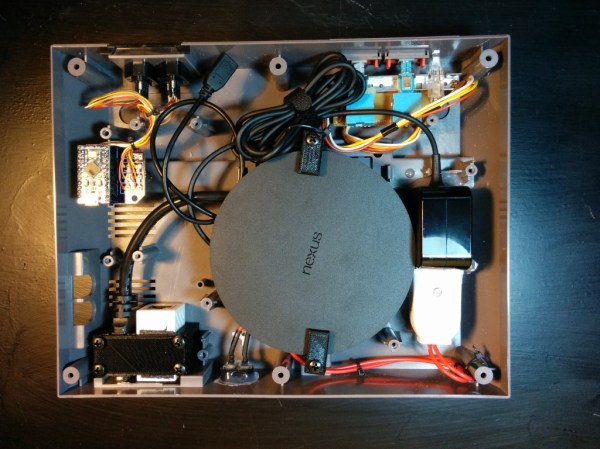
Anyone who has a Raspberry Pi and an old Nintendo has had the same thought. “Maybe I could shove the Pi in here?” This ran through [Adam’s] head, but instead of doing the same old Raspberry Pi build he decided to put a Nexus Player inside of this old video game console, with great success. Not only does it bring the power of a modern media player, it still works as an NES.

If you haven’t seen the Nexus Player yet, it’s Google’s venture into the low-cost home media center craze. It has some of the same features of the original Chromecast, but runs Android and is generally much more powerful. Knowing this, [Adam] realized it would surpass the capabilities of the Pi and would even be able to run NES emulators.

[Adam] went a little beyond a simple case mod. He used a custom PCB and an Arduino Pro Micro to interface the original controllers to the Nexus Player. 3D printed brackets make sure everything fits inside the NES case perfectly, rather than using zip ties and hot glue. He then details how to install all of the peripherals and how to set up the Player to run your favorite game ROMs. The end result is exceptionally professional, and brings to mind some other classic case mods we’ve seen before.

Hackaday Links Column Banner

Hackaday Links: June 14, 2015

You know we’re running this gigantic contest to build hardware and send someone to space, right? We’re doing community voting right now. If you’re on Hackaday.io, head over there and pick the best project. We’re giving away t-shirts and $1000 gift cards to people who vote. The drawing for this round is next Friday.

MicroPython is a pretty interesting development in the area of interpreted languages running on microcontrollers. It’s Python, the BASIC of the modern era, and now it’s being funded by the ESA. Great news, there’s going to be a port to SPARC, and it looks like MicroPython is going to be in a few satellites.

[EloquentlyMawkishBunny]’s calculator stopped working on the morning of his AP Physics test. It was the ribbon cable for the display. What did he do? He grabbed some magnet wire and made it work. If I’m reading this right, he did this the day of his AP test. Wow.

[Will] has made a name for himself by building roller coasters in his backyard. He’s also worked on the ProtoPalette, and now he’s building a hackerspace in Concord, California.

[Josh] needed to drill some very large holes with his mill. He decided a hole saw was the easiest way to do this, but his hole saw has a hex shank. He ended up chopping the shank of a hole saw extension, basically turning it into a hex to round adapter.

Did you know the Arduino IDE on Raspbian is stuck at version 1.0.5? The newest version is 1.6.4, and there’s useful stuff like autosave in the IDE now. Amazing. [CRImier] got the latest Arduino IDE working on the Raspberry Pi 2. Yes, there’s an issue up but if for some reason you’re programming Arduinos on the Pi, you should probably do this yourself.

Oooohhhh, case modding. The Intel NUC is a pretty interesting platform for case modding; it’s small, and I shouldn’t have to remind anyone of all the cool case mods that were created when the Mini-ITX format gained popularity in the early ‘aughts. [Femke] got herself an Intel NUC, made a case, and the results are amazing. How’d she get that metal bowl? Metal spinning. Very cool.

Fix A Broken DS By Removing A Screen

There are apparently a lot of broken Nintendo DS Lites out and about on eBay, and [Fede] has gotten his hands on one. His idea was to essentially turn one of these DS Lites into a SS (single screen?) (.es, Google translate) by modding the case, and he’s done it with pretty spectacular results.

If you’re going to do a case mod, you should go all out. To that end, [Fede] started by taking everything out of the DS and tossing the original 1000 mAh battery in favor of a 4000 mAh battery. From there he is able to shoehorn the two PCBs into the case with the speaker in between, which he notes doesn’t sound as nice as the original but works well enough.

After reshaping the plastic case in a few subtle ways and putting a few layers of paint on it, [Fede] now has a single-screen Nintendo DS for €2 plus parts and paint. While we’ve seen similar mods before, we’d be interested to see this one in action; some DS games don’t utilize the second screen as much as others, so perhaps this wouldn’t play every DS game perfectly, but for the price it can’t be beat.

RetroPie Turned Game Gear

Running vintage console emulators on a Raspberry Pi seems to be the thing all the cool kids are doing. The coolest RetroPie builds take a vintage console – usually of the Nintendo genus – stuff a Raspi in there somehow, and Bob’s your uncle. [Phil Herlihy] over at Adafruit is throwing his hat into the ring with a similar build. For this one, though, he’s using Sega’s oft-maligned Game Gear. He might actually get more than a few hours out of the battery with this one, and the battery is rechargeable, too. You can’t beat that.

The build begins with tearing down an old Game Gear, chopping up the PCB to save the button contact, and starting to fit all the components in there. The display is completely replaced with a 3.5″ composite display, a bit larger than the 3.2″ display found in a stock Game Gear. That’s not a problem, there’s a surprising amount of space behind the bezel, and if you’re good enough with an xacto blade and a file, it will look stock.

The rest of the components include an amplifier board, battery charge regulator, a 2500mAh LiPo, and a Teensy to read the buttons. There are a few modifications required for the Pi, but the finished device presents a USB port to the outside world; keep a keyboard by your side, and this is a portable Pi in every respect.

Hackintosh

Hackintosh Project Looks Like A Mac, Smells Like A Mac…

It’s not often that you find a Macintosh dumped out on the side of the road. [GrandpaSquarepants] was one of the lucky individuals that did. Being the good friend that he is, he made his roomy carry the 50 lb behemoth back to their apartment. Not surprisingly, the machine didn’t boot up and ended up sitting around the apartment for a few years.

HackintoshFast forward from 2012 to present day and [G.S.] decided it was time to do something with that G5. That “something” wasn’t about fixing it. Instead, it was gutted to turn it into a Macintosh-cased Hackintosh. If you’re unfamiliar with Hackintosh, it’s a term used to describe a project that gets Mac OS to run on non-Apple hardware.

[G.S.] could have just crammed everything into the G5 case and called it a day but he decided to spend the time to make it look supremely presentable. The case was significantly modified to fit the non-Apple computer components, including the addition of a custom rear panel made from aluminum to mount the power supply, cooling fan and to allow access to the motherboard connectors. Take a close look; there are two CPU coolers in there. It was such a close fit that there is only 2.6mm (.1 inch) of clearance between the cooler and the case.

Two Dell U2415 monitors and an Apple wireless keyboard and mouse make up the rest of the setup. Overall, [G.S.] is happy with the final outcome of his project, well… except for the Apple mouse. He says that has got to go!

[via reddit]

Box Fan Computer Case

Fan-tastic Box Fan Computer Fan

Sure, it’s a great idea to keep your computer components cool…. but why? PC components consume energy and in doing so they generate heat. That heat can reduce overall system performance or even damage specific parts. You’ve certainly noticed those huge aluminum finned heatsinks covering critical components in your PC. They are there for a reason, to keep things cool. Most PC’s have at least one fan, if not several, usually only a few inches in diameter. If a small fan does an okay job at cooling a PC, how would a large fan do….. we’re talking a really large fan? [Envador] wanted to find out and made a PC case with the largest fan possible.

Looking at the photo it is pretty obvious that PC case frame is fabricated from standard PVC piping. The side of the case is hinged to allow access to the internal components. That huge set of blades started out as an off-the-shelf box fan. It was taken apart and mounted directly to the PVC case door. It wouldn’t make too much sense to have side panels on this case since the fan is so large. So, instead of solid sides [Envador] used chrome-plated plastic grills that are usually reserved for fluorescent ceiling lights. Perforated metal strapping holds all the drives, power supply and mother board in place.

Unfortunately, [Envador] doesn’t give any before/after temperature data but states that the PC tops out at 95°F and he hasn’t had any problems with computer performance.