YouTube As Infinite File Storage

Anyone who was lucky enough to secure a Gmail invite back in early 2004 would have gasped in wonder at the storage on offer, a whole gigabyte! Nearly two decades later there’s more storage to be had for free from Google and its competitors, but it’s still relatively easy to hit the paid tier. Consider this though, how about YouTube as an infinite cloud storage medium?

The proof of concept code from [DvorakDwarf] works by encoding binary files into video files which can then be uploaded to the video sharing service. It’s hardly a new idea as there were clever boxes back in the 16-bit era that would do the same with a VHS video recorder, but it seems that for the moment it does what it says, and turns YouTube into an infinite cloud file store.

The README goes into a bit of detail about how the code tries to avoid the effects of YouTube’s compression algorithm. It eschews RGB colour for black and white pixels, and each displayed pixel in the video is made of a block of the real pixels. The final video comes in at around four times the size of the original file, and looks like noise on the screen. There’s an example video, which we’ve placed below the break.

Whether this is against YouTube’s TOS is probably open for interpretation, but we’re guessing that the video site could spot these uploads with relative ease and apply a stronger compression algorithm which would corrupt them. As an alternate approach, we recommend hiding all your important data in podcast episodes.

Continue reading “YouTube As Infinite File Storage”

Building A NAS That Really Looks Like A NAS

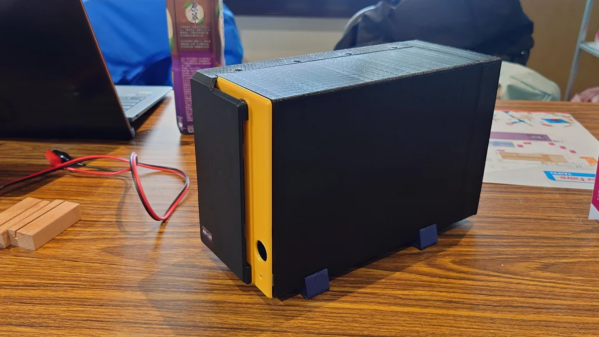
Building your own network attached storage (NAS) for personal use isn’t all that difficult. A single board computer, a hard disk and a power supply in an enclosure is all the hardware you need. Then, choose from one of several open source NAS software solutions and you’re up and running. [tobychui] decided to notch things up by designing a NAS that really looks like a NAS. It’s tailored to his specific requirements and looks like a professional product to boot. The design features dual 3.5 inch HDD bays, a small footprint, is low cost, compatible with a variety of single board computers, and can handle high data transfer speeds by using RAM and SD card for buffering.

Not only has he done a great job with the hardware design, but he’s also developed a companion software for the NAS. “ArozOS” is a web desktop operating system that provides full-fledged desktop experience within a browser. ArozOS has a great user interface and features a lot of networking, file, disk management and security functions. He has also developed a launcher application to enable over-the-air (OTA) software updates.

Assembling the device will need some planning and preparation, even though most of the hardware is off the shelf. You will need a SATA to USB 2.0 adapter, a SBC (Orange Pi Zero, Raspberry Pi 4, Orange Pi Zero 2, etc) , three buck converters — one each to provide 12 V to the two hard disks and a third to provide 5 V to the SBC. You’ll also need a 12 V / 6 A or 24 V / 3 A external power brick, or a USB-C 65 W GaN charger with a triggering module to set the desired voltage and current.

There is also one custom power distribution board which is essentially a carrier board to mount the buck converters and connectors for power and USB data. For the 3D prints, [tobychui] recommends printing at the highest resolution for a nice finish.

The off the shelf SATA to USB adapter will need to be taken apart before it can be fixed to the 3D printed SATA adapter plate and might pose the most challenge during construction, but the rest of the assembly is fairly straightforward. Once assembly is complete, [tobychui] walks you through installation of the ArozOZ software, mounting the drives and making them accessible over the network.

Have you got your data backup act in order ? If not, it’s still not too late to make it a new Year’s resolution. And if you need help figuring things out, check out New Year Habits – What Do You Do For Data Storage?

Continue reading “Building A NAS That Really Looks Like A NAS”

Back Up Encrypted ZFS Data Without Decrypting It, Even If TrueNAS Doesn’t Approve

[Michael Lynch] recently replaced his Synology NAS with a self-built solution built on ZFS, a filesystem with a neat feature: the ability to back up encrypted data without having to decrypt it first. The only glitch is that [Michael] is using TrueNAS, and TrueNAS only wants to back up unencrypted ZFS data to another TrueNAS system. Fortunately, there’s a way around this that isn’t particularly complicated, but definitely requires leveraging the right tools. It also provides an educational walkthrough for how ZFS handles these things.

The solution is a small handful of shell scripts to manage full and incremental backups and restores of encrypted datasets, without having to decrypt the data first. As mentioned, this is something TrueNAS will handle by default, but only if the destination is also a TrueNAS system. Now, [Michael] can send that backup to off-site cloud storage with only a little extra work.

There’s one additional trick [Michael] uses to monitor his backups. He leverages a paid (but with a free tier) service called Cronitor. It’s not very obvious from the site’s features, but there is a way to implement cron job monitoring that doesn’t require adding any software whatsoever. Here’s how that part works: Cronitor provides a custom, unique URL. If that URL isn’t visited regularly (for example, because the cron job fails), then the user is notified. By integrating this into an existing cron job, one can be notified. Such an integration would look like this:

0 0 3 * * monthly-job && curl --silent https://cronitor.link/p/<API-KEY>/monthly-job?state=complete

In short, if the cron job runs successfully, curl checks in by visiting the custom URL. If that doesn’t happen, the user gets a notification. No added software, just a simple leveraging of a free service for some added peace of mind.

Backups are easy to neglect, so maybe it’s time to take a few moments to consider what you do for data storage, including how you’d recover from disaster.

Linux Fu: Keep In Sync

Once upon a time, computers were very expensive and you were lucky to have shared access to one computer. While that might seem to be a problem, it did have one big advantage: all of your files were on that computer.

Today, we all probably have at least a desktop and one laptop. Your phone is probably a pretty good computer by most standards. You might have multiple computers and a smattering of tablets. So what do you do to keep your files accessible everywhere? Why not run your own peer-to-peer synchronization service? Your files are always under your control and encrypted in motion. There’s no central point of failure. You can do it with one very slick piece of Open Source software called syncthing. It runs on Windows, Linux, Mac, BSD, and Solaris. There are also Android clients. We haven’t tested it, but one caveat is that the unofficial iOS support sounds a little spotty.

The joke about the cloud — that it’s just other people’s servers — is on point here. Some people don’t like their files sitting on a third-party server. Even if your files are encrypted or you don’t care, you still have the problem of what happens if you can’t reach the server — may be on an airplane with no WiFi — or the server goes down. Sure, Google and Microsoft don’t go dark very often, but they can and do. Even if you build your own cloud, it runs on your servers. Syncthing is serverless: it simply makes sure that all files are up-to-date on all your end devices. Continue reading “Linux Fu: Keep In Sync”

Breadboard Circuit of a Funduino, a DS18B20 Temperature Sensor, and an ESP8266 module.

Keep An Eye On Your Fermenting Beer With BrewMonitor

The art of brewing beer is as old as civilization itself. Many people enjoy brewing their own beer at home. Numerous steps must be taken before you can take a swig, but fermentation is one of the most critical. [Martin Kennedy] took up the hobby with his friends, and wanted a convenient way to monitor the fermentation temperature remotely. He started working on the BrewMonitor, a cloud-based homebrewing controller powered by an Arduino clone.

His goal was to create something cheap, convenient, and easy to set up. Traditional fermentation monitoring equipment is very expensive. The typical open-source alternative will set you back 80 euros (roughly $101), using the Arduino-sensor with a Raspberry Pi gateway via the BrewPi webserver. [Martin] did not want to go through the hassle of viewing BrewPi remotely, since it requires a home network and all of the configuration that would entail. Instead, he coupled an Arduino clone with a DS18B20 temperature sensor while using an ESP8266 module for wireless communication, all for less than 18 euros ($23). This connects to a simple webpage based on Scotch.io with a PHP backend (Laravel with RESTful API), a MySQL database, and an AngularJS frontend to display the graph. Once the sensor is placed into the fermenter bucket’s thermowell, the temperature is transmitted once a minute to the REST API. You can see the temperature over time (in Celsius). The design files are available on GitHub.

[Martin] would like to expand the functionality of BrewMonitor, such as adding the ability to adjust the temperature remotely by controlling a heater or fridge, and lowering its cost by single boarding it. Since the information is stored on the cloud, upgrading the system is much easier than using a separate gateway device. He doesn’t rule out crowdfunding campaigns for the future. We would like to see this developed further, since different yeast species and beer styles require very stringent conditions, especially during the weeks-long fermentation process; a 5-degree Celsius difference can ruin an entire brew! Cloud-based temperature adjustment seems like the next big goal for BrewMonitor. DIY brewers salute you, [Martin]!

[via Dangerous Prototypes]


Self-waking Computer For DIY Cloud Storage

self-waking-cloud-storage

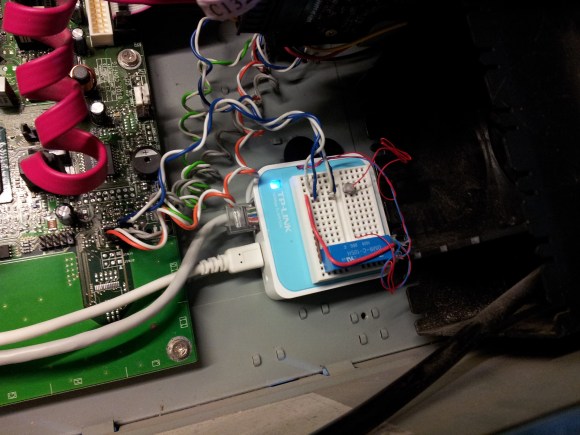
[Dominic] decided to take control of his cloud storage by switching to OwnCloud. Unlike most cloud storage solutions, this isn’t a company offering you free space. It’s an open source software package which your run on your own machine. [Dom] didn’t want to leave his box running 24/7 as it would be unused the majority of the time. So he hacked this router to switch on the computer whenever he tries to access the storage.

Obviously this is a Wake-On-Lan type of situation, but the hardware he has chosen to use doesn’t include those features. Since he already had this TP-Link 703n on hand he decided to use it as a controller for the computer. His method is quite clever. The router is running a script that monitors the computer and the bandwidth it’s using. When traffic from the network stops, the router will issue a shutdown command within just a few minutes. It then assigns itself the computer’s IP address so that it can listen for incoming requests and use the relay on that breadboard to turn the box back on. Obviously running the embedded system is much more efficient than having an entire computer turned on all the time, and it’s WiFi capabilities mean no cords to run to the home network.

A Look At The (now Patched) Security Of [Kim Dotcom’s] MEGA Cloud Storage Service

mega-cloud-storage-security

MEGA is a new, encrypted cloud storage system founded by [Kim Dotcom] of MegaUpload fame. They’re selling privacy in that the company won’t have the means to decrypt the data stored by users of its service. As with any software project, their developers are rapidly making improvements to the user interface and secure underpinnings. But it’s fun when we get some insight about possible security problems. It sounds like the issue [Marcan] wrote about has been fixed, but we still had a great time reading his post.

The article focuses on the hashes that the website uses to validate data being sucked in from non-SSL sources using some JavaScript. Those insecure sources are a CDN so this type of verification is necessary to make sure that the third-party network hasn’t been compromised as part of an attack on the MEGA site. The particular security issue came when the hashes were generated using CBC-MAC. [Marcan] asserts that this protocol is not adequate for the application it’s being used for and goes on to post a proof-of-concept on how the messages can be forged while retaining a hash that will validate as authentic.

[Thanks Christian]