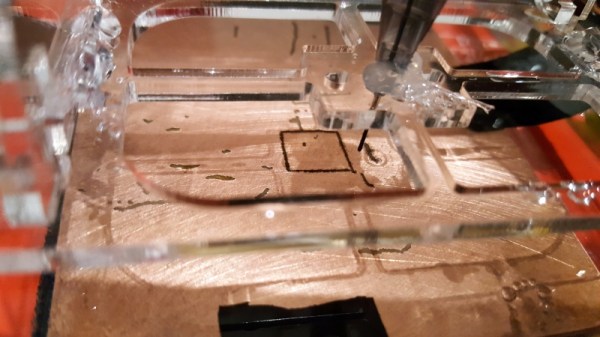
Prototyping PCBs With Electrical Discharge Machining

Here at Hackaday, we thought we’d seen every method of making PCBs: CNC machining, masking and etching with a variety of chemicals, laser engraving, or even the crude but effective method of scratching away the copper with a utility knife. Whatever works is fine with us, really, but there still does seem to be room for improvement in the DIY PCB field. To whit, we present rapid PCB prototyping with electrical discharge machining.

Using an electric arc to selectively ablate the copper cladding on a PCB seems like a great idea. At least that’s how it seemed to [Jake Wachlin] when he realized that the old trick of cutting a sheet of aluminum foil using a nine-volt battery and a pencil lead is really just a form of EDM, and that the layer of copper on a PCB is not a million miles different from foil. A few experiments with a bench power supply and a mechanical pencil lead showed that it’s relatively easy to blast the copper from a blank board, so [Jake] took the next logical step and rigged up an old 3D-printer to move the tool. The video below shows the setup and some early tests; it’s not perfect by a long shot, but it has a lot of promise. If he can control the arc better, this homebrew EDM looks like it could very rapidly produce prototype boards.

[Jake] posted this project in its current state in the hopes of stimulating a discussion and further experimentation. That’s commendable, and we’d really love to see this one move along rapidly. You might start your brainstorming by looking at this somewhat sketchy mains-powered EDM, or look into the whole field in a little more detail.

Continue reading “Prototyping PCBs With Electrical Discharge Machining”

Modular CNC Build Gets You Both A Mill And A Laser Cutter

CNC builds come in all shapes and sizes. There’s delta manipulators, experimental polar rigs, and all manner of cartesian builds, large and small. After completing their first CNC build, [jtaggard] took what they learned and applied it in the development of a new machine.

It’s a desk-sized cartesian design, with a frame built from V-slot extrusion cut to size by circular saw. This is a great way to get quality extrusion for a custom build, and is readily available and easy to work with. The gantry rides on wheels, with the X and Y axes being belt driven, plus a screw drive for Z. A couple of NEMA 17s and a NEMA 23 provide motive power, and an Arduino Uno with stepper drivers is the brains of the operation. 1/4″ thick PLA plates are used to assemble everything, and while [jtaggard] intended to replace these with aluminium down the track, so far the plastic has proved plenty rigid enough for early tests of both machining and engraving wood.

It’s a great entry-level CNC build, which has proved usable with both a 500W spindle and a 2.5W laser for engraving. Being modular in nature, it would be easy to add other tools, such as a pen plotter or vinyl cutting blade for further versatility.

DIY CNC builds are always popular, as you end up with a useful tool as a reward for your hard work. Video after the break.

Continue reading “Modular CNC Build Gets You Both A Mill And A Laser Cutter”

Hackaday Links Column Banner

Hackaday Links: May 5, 2019

Simulacra and simulation and Kickstarter videos. The Amigo Robot is a 4-wheeled omnibot robot on Kickstarter. It does STEM or STEAM or whatever. Oh neat, injection molded magnetic pogo pins, that’s cool. Watch the video for this Kickstarter, it is a work of postmodern horror. We live in a post-reality world, and this is beyond parody.  You have the ubiquitous cheerful whistling, a ukulele, tambourine and a glockenspiel. You’ve got a narrator that falls squarely into the uncanny valley and a cadence that could have only been generated by a computer. You’ve got grammar that is very much correct, but somehow wrong; ‘It is the key to interact with family pets’. This is really, really bad.

Who is Satoshi? The creator of Bitcoin, a person or persons known as Satoshi Nakamoto, has been an open question for years now, with many people claiming they are the one that invented Bitcoin (with the implication that they’re in control of the first coins and therefore a multi-Billionaire). Newsweek found someone named Dorian Nakamoto, but that guy didn’t make Bitcoin. Wired magazine used back-dated blog posts to identify the creator of Bitcoin. Needless to say, the creator of Bitcoin has not been identified yet. Now, there’s an unveiling of sorts coming up. gotsatoshi.com has a live countdown and doesn’t use Rockapella as a house band. This bears repeating, again: there is exactly one way to prove the identity of Satoshi Nakamoto. To prove you are Satoshi, all you need to do is move some of the first Bitcoins. That’s it, that’s all you need to do, and it’s not going to happen when the gotsatoshi.com countdown hits zero.

CNC machines controlled by a Pi abound, but here’s a word of warning about buying a ‘bargain’ CNC machine from China from [Rob] via our tips line:

In the “homebrew” community, I know some people have their own CNC machines – I’ve seen a hundred and one projects using Raspberry Pis to run homemade CNCs and so on, so I guess there is a good supply of open-source/freeware to software to control them with.
However, some people, like a mate at work, might be tempted by a good “bargain” from China.  No names, no pack drill, but just before last Christmas, my mate bought a “cheap” CNC system from China – It was about three or four thousand Euros, if I remember rightly.  It has been working well and he done some work for our work as well. No problems.
Last week, our firm was contacted by Siemens. They claimed that someone at our firm has been using unlicensed Siemens software.  At first no-one knew what they were on about.  Someone thought it might be about some CAD system or other – we had been trialing a few to see which suited us best, but we had stuck well within the restrictions for the trials.
Then we found out it was the software on his CNC machine.  Because he had used his work laptop with it, the system had “phoned home” and alerted Siemens that an unlicensed version was being used.  Siemens then demanded EUR 32,000 – yes, thirty two THOUSAND Euros to license the software.  That was something like EUR 27,000 for the commercial license and EUR 5 000 for the second one.  It was explained that he had bought the CNC system from where-ever and had a license issued by the manufacturer.  I license that Siemens do not acknowledge.  They have now accepted that he bought and used it in good faith that it was fully legit, so they waived the commercial license and are now demanding “only” EUR 5,000, but that still comes with the threat – pay up or we take you to court…

We’re all very familiar that Dassault Systems will start hitting you up for that Solidworks license you didn’t pay for, but this is effectively firmware for a CNC machine that is phoning home through a laptop. In effect it’s a reverse Stuxnet, brought to you by a cheap Chinese CNC machine.

Here’s a hot tip for anyone who wants to do something people want. Direct to garment printers (DTG printers) are pretty much inkjet printers modified to print on t-shirts. ‘dtg printer’ is one of Hackaday’s perennial top search terms, most likely because of a post we did ten years ago. If you want to join the cool kids club and do something people desperately want, find a cheap inkjet and turn it into a DTG printer.

Red Hat has changed its logo. Red Hat, the company that somehow makes money on Open Source software, changed their logo this week. The branding for Red Hat hasn’t been very good since 2016 or thereabouts, and the branding for the Fedora project has been taking hits for just as long, m’lady. Beyond that, customer surveys revealed that the old ‘Shadowman’ logo evoked feelings like, ‘sinister, secretive, evil, and sneaky’. The new logo removes the shadowman entirely, and makes the hat the focus of attention. There is now official confirmation that there is a black band around the crown of the hat (in the Shadowman logo, this band could be confused for a shadow), and the crown is sharper. The jury is still out on the fedora vs. trilby argument, and indeed the argument is even more divisive now: the difference between a trilby and a fedora is in how they are worn, and by removing the Shadowman from the logo we now have fewer context clues to make the determination. Bet you didn’t think you were going to read two hundred words about the Red Hat logo today, did you?

Utterly Precise Light Painting, Thanks To CNC And Stop Motion

Light painting is the process of moving a light while taking a long-exposure photograph, which creates a sort of drawing from the path of the light source. It’s been done in one way or another since at least the early-to-mid 1900s, but modern hardware and methods have allowed for all kinds of new spins on this old idea. [Josh Sheldon] demonstrates just how true this is with the light painting he did for a gum ad, showing what’s possible with a single multicolor LED under CNC control combined with stop-motion animation techniques. The rest of the magic comes from the software. [Josh] designs the animations in Blender, and the paths are then exported and used as the instructions for his self-made Light Painting Machine. The machine therefore recreates the original animation with lights and camera and not a single computer-generated graphic.

[Josh] is no stranger to light painting in this way. We’ve seen his fantastic machine at work before and we’re glad he shared the details behind his latest work. Embedded below is a concise video that shows the whole process, but if you’re in a hurry and just want to see the end product, here’s a shortcut to the results.

For those of you who would like to know more, there are plenty of details on [Josh]’s Light Painting Machine on GitHub along with a more in-depth description of the workflow and software, so check it out.

Continue reading “Utterly Precise Light Painting, Thanks To CNC And Stop Motion”

Build A Plotter Using Scrap DVD Drives

Building your own CNC machine can present a series of varied challenges. There are the software considerations, but also the mechanical side of things – motors, shafts, screws and slides all need to be addressed in a working design. Of course, you can always outsource some of the work – and that’s precisely what [Daniele Tartaglia] did with this pen plotter build (Youtube link, embedded below).

It’s a capable plotter, able to nicely reproduce both graphics and text.

The build gains X and Y axes by virtue of two salvaged DVD drives. The tray mechanisms come ready to go with stepper motors and lead screws already assembled, and make a great basis for a compact plotter. A wooden frame is constructed to hold everything together. The pen is held against the paper with a rubber band which helps the ballpoint to draw a nice dark line, with a servo used as a pen retract mechanism. An Arduino Uno with a stepper driver shield is then employed to run the show.

It’s a tidy build, with neat cable management and smart design choices giving it a pleasing aesthetic. The CNC fundamentals are good, too – with minimal backlash and slop, the plotter is able to draw quite effectively. Old optical drives are a popular choice for plotter builds, as it turns out. Video after the break.

Continue reading “Build A Plotter Using Scrap DVD Drives”

How Much Wood Can A Woodpecker Chuck?

It’s probably clear to a Hackaday reader that we live in a golden era for hobbyist tool accessibility. Cheap single board computers can be bought at any neighborhood RadioShack or Maplin. 3D printers sell fully assembled and ready to run for less than $200. Even the humble CNC mill has come down the price curve, though as you might expect at the low end things can get pretty rough. Like a cheap 3D printer, a cheap mill tends to be missing some basic features you’d expect any reasonable machine to have. If you get your hands on one of these little wonders, [Shahada Abubakar] has a pair of great blog posts on the basic set of upgrades you’ll probably want to perform right out of the box.

Which cheap CNC mills are we talking about? They go by a few names. Last year our own [Kristina Panos] put together a review of a shockingly inexpensive “1610” type sold by Linksprite (go take a read if you’re already considering a purchase!). The “1610” class, so named for it’s 16 cm x 10 cm bed size, is pretty common under a wide variety of manufacturer names. You can find them in this size made of 8020 like [Kristina] did or as “upgraded” versions cut from 1/4″ mystery plastic (often referred to in the listings as Bakelite, but your guess is as good as ours as to the true material). 1610 is the smallest size but basically the same machine exists as an 1810, 2418, or 3018. Each has a 775 size spindle and a single PCBA that handles stepper drive and runs grbl.

So what’s the problem? Well for one none of these machines have limit switches, though the controllers support them. [Shahada]’s guide has handy instructions for what kind to buy, how to wire them, and where they can be attached. Plus an overview of the G-code instructions to send the controller in order to home and configure everything properly. The controllers also like to be driven continuously over serial (though some sellers seem to offer a separate board to drive them). This is fine if you have a computer handy, but like a 3D printer it can be nice to bolt a Pi Zero or similar onto the unit and control it over the network. [Shahada]’s second post has a link to a mounting plate you can print for exactly that setup, as well as some suggestions for configuring CNC.js to drive everything.

Do you have one of these machines? Done any upgrades? Tell us in the comments! We’re always looking for ways to upgrade our home shop.

Reviving A Casio Scientific Calculator, With A CNC Router

Before Wolfram Alpha, before the Internet, before even PCs, calculations more complex than what could be accomplished with a “four banger” required some kind of programmable calculator. There were many to choose from, if you had the means, and as time passed they became more and more sophisticated. Some even added offline storage so your painstakingly written and tediously entered programs didn’t evaporate when the calculator was turned off.

One such programmable calculator, a Casio PRO fx-1 with magnetic card storage, came across [amen]’s bench recently. Sadly, it didn’t come with any cards, so [amen] reverse engineered the card reader and brought the machine back to its 1970s glory. The oddball mag cards for it are no longer available, so [amen] had to make do with. He found some blank cards of approximately the right size for cheap, but somehow had to replicate the band of vertical stripes adjacent to the magnetic strip on the card. Reasoning that they provide an optical synchronization signal, he decided to use a CNC router to cut a series of fine-pitched slots in the plastic card. It took a little effort to get working, including tapping the optical sensor and reading the signal on an oscilloscope, but as the video below shows, the hacked cards work fine with the vintage calculator.

Kudos to [amen] for reviving this retro-cool calculator. Now that it’s back in action, it might be fun to visualize domains on the magnetic strip. A flatbed scanner can be used for that job.

Continue reading “Reviving A Casio Scientific Calculator, With A CNC Router”