Add An Ant To Your Desk For Some Compact PCB Manufacturing

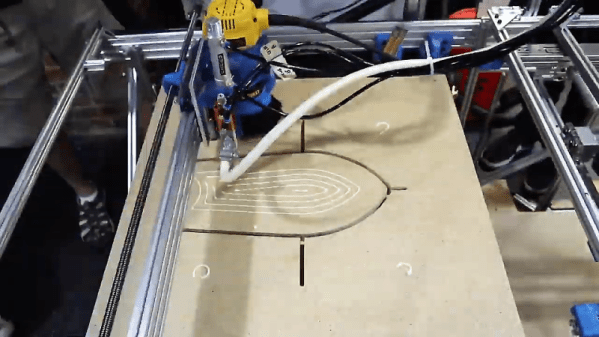
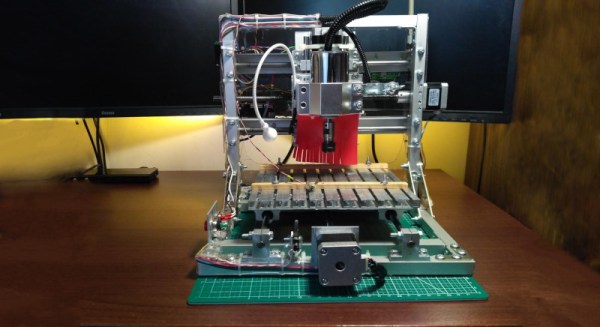
Usually when one thinks of using a CNC machine for producing PCBs, one thinks of those big, bulky CNC machines that pretty much fill an entire desk. But what if a CNC machine could be small enough to fit on a desk without getting in the way, yet still be useful enough to make single- and double-sided PCBs? This was the idea behind The Ant, the compact PCB manufacturing machine which [Mattia] and [Angelo] designed and open sourced.

In addition to the above linked Bitbucket repository for the project, the ‘Ant Team’ has a YouTube channel on which they have a range of rather professionally edited videos on the project, ranging from constructing the little machine, to various updates and more  Also see the video that is attached after the link for a visual introduction to the project.

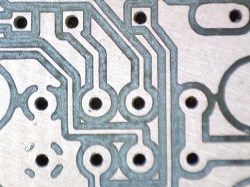
Support and community interaction is mostly performed via the Reddit group for the project, where the diminutive machine finds a welcoming community as it continues to evolve. The machine itself is specified at this point as being able to built from commercially available and 3D printed parts, requiring no further tools for cutting or shaping. The precision is about 0.2 mm trace spacing.

Optical alignment for double-sided boards is achieved using a USB micro camera and the bCNC software, while the cost for materials is said to be quite inexpensive when compared with commercial solutions

Honestly, after seeing the machine in action, wouldn’t you want to have a CNC machine that’s so small and good-looking on your desk? If there’s one thing one might want to add, it’s probably a way to deal with the copper dust that’s produced while creating PCBs. Having to clean that off the desk after each PCB manufacturing session would get a bit cumbersome, we imagine.

Continue reading “Add An Ant To Your Desk For Some Compact PCB Manufacturing”

3D Printer Meets CNC Router To Make Wood Prints

We’ve seen plenty of plywood 3D printers before; after all, many early hobbyist machines were made from laser-cut plywood. But this plywood 3D-printer isn’t made from plywood – it prints plywood. Well, sort of.

Yes, we know – that’s not plywood the printer is using, but rather particleboard, the same material that fills the flatpack warehouse of every IKEA store. And calling it a printer is a bit of a stretch, too. This creation, by [Shane Whigton] and his Formlabs Hackathon team, is more of a hybrid additive-subtractive CNC machine. A gantry-mounted router carves each layer of the print from a fresh square of material – which could just as easily be plywood as particleboard. Once a layer is cut, the gantry applies glue to it, puts a fresh sheet of material on top, and clamps it down tight. The router then carves the next layer, and so on up the stack. The layer height is limited to the thickness of the material – a nominal 3/4″ (19 mm) in this case – and there’s a remarkable amount of waste, but that’s not really the point. Check out the printer in action and the resulting giant Benchy in the video below.

Seeing all that particleboard dust and glue got us thinking: what about a 3D-printer that extrudes a paste of sawdust mixed with glue? We imagine that would be a bit like those giant printers that extrude concrete to build houses.
Continue reading “3D Printer Meets CNC Router To Make Wood Prints”

Desk-Sized CNC Engraver Does The Job

CNC machine tools are highly useful for when you want to take a CAD design and make real parts as quickly and as easily as possible. Typically, they’re employed in large-scale industrial settings, but CNC machines come in all shapes and sizes. It’s possible to build a useful machine that’s just right to sit on your desk, as [More Than User] demonstrates.

The holes pictured were made with a 0.5mm tool, showing off the precision and accuracy of the machine.

The build consists of an aluminium-framed CNC engraver, designed primarily for the production of PCBs. However, it can also handle plastic jobs, and aluminium if run slowly enough. Like most garage CNC projects, it runs with a combination of stepper motors and an Arduino. The cutting area is 16 cm x 16cm – more than enough for most hobby PCBs.

There are plenty of interesting details, such as the T-slot bed made from U-section steel bolted together, and the simple probe made from a microswitch. Perhaps most impressive though is the tight precision of the cuts. This is particularly important for PCB work, where otherwise minor issues could cause short or open circuits and make the resulting parts useless.

It’s a project that we’re sure will come in handy for [More Than User]’s future projects, and there’s nothing quite like making your own tools. If you’re new to CNC as a whole, consider picking up some design tips before you get started.

Project Egress: A Bracket And A Bell Crank For The Latches

Put yourself in [This Old Tony]’s shoes: you get an email out of the blue asking you to take part in making a replica of a 50-year-old spacecraft. Would you believe it? He didn’t, at least not at first, but in the end it proved to be true enough that he made these two assemblies for Project Egress in his own unique style.

If you haven’t heard of Project Egress, check out our coverage of the initial announcement. The idea is to build a replica of the crew hatch from the Apollo 11 Command Module Columbia, as part of the 50th anniversary of the Apollo 11 landing next week. [Adam Savage] at Tested has enlisted 44 hackers and makers to help, spreading the work out among the group and letting everyone work in whatever materials and with whatever methods they feel like. [Old Tony], perhaps unsurprisingly, chose mainly Apollo-era dehydrated space-grade aluminum, machined using a combination of manual and CNC machining. We really like the finish he chose – a combination of sandblasting and manual distressing to give it a mission-worn look.

As for exactly what the parts themselves are, the best [Old Tony] could come up with to call them is a bracket and a bell crank. From the original hatch drawings, it looks like there were two bell cranks, which will transmit force around the hatch to the latches that [Fran Blanche], [Joel] and [Bob], and no doubt others have contributed to the build.

We’re eagerly anticipating the final assembly, to be executed by [Adam] live at the Smithsonian’s National Air and Space Museum on July 18. Project Egress is as much a celebration of the maker movement as it is a commemoration of Apollo, and we’re pleased that people will get a chance to see the fruits of the labors of all these hackers in so public a forum.

Continue reading “Project Egress: A Bracket And A Bell Crank For The Latches”

Project Egress: [Fran] Makes A Latch

[Fran Blanche] is on the team of elite hackers that has been offered a chance to contribute to [Adam Savage]’s Project Egress, a celebration of the engineering that got humanity to the Moon 50 years ago this month. By the luck of the draw, she landed a great assignment: building a replica of one of the fifteen latches that kept the Apollo Command Module hatch dogged down against the vacuum of space, and she’s doing a great job documenting her build with some interesting videos.

The first video below is mostly her talking through her design process, materials choices, and ideas about fabricating the somewhat intricate pieces of the latch. All 44 makers involved in the project get to choose what materials and methods they’ll use to make their parts, and [Fran] decided to use wood. Her first inclination was to use oak and brass, a nice combination with an 80s vibe, but in the second video, which covers more of the initial fabrication, she explains her switch to walnut. Unfortunately, the only CNC option she has is a Shaper Origin, which presents some difficulties; the handheld tool requires some complicated fixturing to safely machine the small parts needed, and its inability to read STL files means that [Fran] is stuck with a complicated software toolchain to drive the tool.

There are more videos to come as [Fran] gets further into the build, and we’re looking forward to seeing how her part and the rest of the makers’ builds come out.

Continue reading “Project Egress: [Fran] Makes A Latch”

Building A Googie-Style Sign With The Help Of CNC

The Googie style was a major architectural trend of the post-war period in the United States. It remains popular to throwback to this style, and [Wesley Treat] got the job to create a sign in this vein for a local trailer motel (Youtube link, embedded below).

CNC tools make just about any job easier, and this one is no exception. The smooth curves of the sign were carved out of several sections of PVC sheet, and stacked up to form the body of the sign. These were then sanded, coated in putty, and given a lick of  paint. Steps like these could likely be skipped in the interest of saving time, especially given that few will see those parts once the sign is installed. However, [Wesley] takes pride in his work, and the final piece is all the better for it. It’s also important for the piece to impress the client, not just the public.

The front of the sign is also produced in PVC sheet, and given a coat of paint with brush techniques used to create a faux-wood finish. Vinyl is then applied to the textual and graphical elements in order to create a colored backlit effect. The sign is lit with off-the-shelf LED strips, and the whole assembly is weather sealed to protect it from the elements.

The final product is a beautiful piece, harking back to the classic Googie aesthetic and serving as a testament to [Wesley]’s skills. It’s a great example of how easy it is to create great work with the right tools and the proper attention to detail. It also goes to show how great LEDs are for signage, whether you’re at the beach or the lab. Video after the break.

Continue reading “Building A Googie-Style Sign With The Help Of CNC”

Wire Bender Aims To Take Circuit Sculptures To The Next Level

It doesn’t seem as though bending wire would be much of a chore, but when you’re making art from your circuits, it can be everything. Just the right angle in just the right place can make the difference between a circuit sculpture that draws gasps and one that’s only “Meh.”

[Jiří Praus] creates circuit sculptures that are about as far away from the “Meh” end of the spectrum as possible. And to help him make them even more spectacular, he has started prototyping a wire-bending machine to add precision to his bends. There’s no build log at the moment, but the video below shows progress to date. All the parts are 3D-printed, with two NEMA 17 steppers taking care of both wire feed and moving the bending head. It appears that the head has multiple slots for tools of different shapes. For now, the wire is rotated around its long axis manually, but another stepper could be added to take care of that job.

[Jiří] tells us that while he loves making circuit sculptures like his amazing mechanical tulip, he hates repeating himself. He hopes this bender will make repeat jobs a little less tedious and a lot more precise, and we hope he goes forward with the build so we get to see both it and more of his wonderful works of circuit art.

Continue reading “Wire Bender Aims To Take Circuit Sculptures To The Next Level”