Adding Screws To A DIY CNC Machine

When it comes to CNC machines, your SureFine has screws on its axes, and the Bodgeport does too. A shopbot has an amazing rack gear system, but when you start to dig into the small CNC routers available for under $2,000, you’ll only find belts moving a router back and forth. This isn’t to say belts won’t work — you can create a fine CNC machine with bits of rubber. However, belts stretch, they wear out, and if you want more precision screws and racks are the way to go.

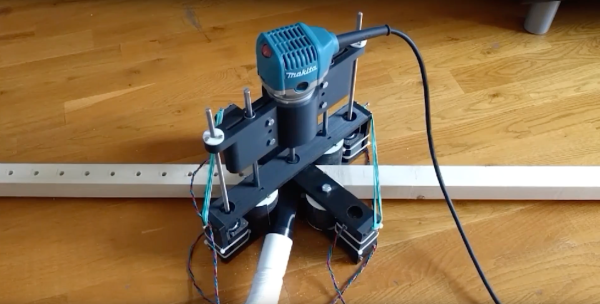
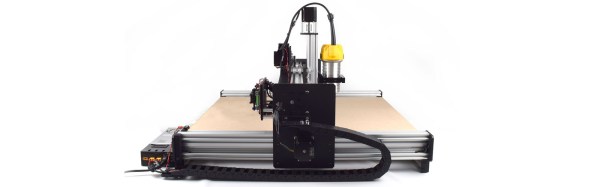
The WorkBee CNC machine is the first desktop CNC router we’ve seen that uses screws instead of belts. It’s a project on OpenBuilds, and a reasonably well-configured machine is now available from ooznest for about £1,700 ($2,200 USD), or just a bit more than other CNC routers that consist of a Dewalt router and some aluminum extrusion.

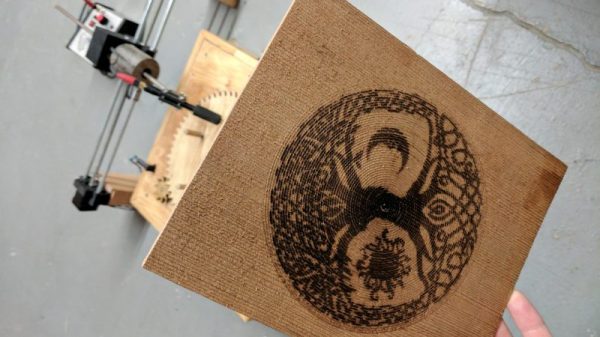
The WorkBee CNC is based on the OX CNC machine, another cartesian router machine built around the OpenBuilds aluminum extrusion. The OX, while a fine machine for DIY tinkerers, uses belts. The WorkBee trades them out for screws, and should gain better accuracy, much lower maintenance, and deeper cuts. Screws are slower, yes, but do you really need that much acceleration when routing a thick piece of wood?

Hackaday Prize Entry: TooWheels, The Open Source Wheelchair

The Assistive Technology challenge of the Hackaday Prize received a large number of projects addressing many socially relevant problems. Mobility and transportation needs are a big challenge for those with limb disabilities. Not every country has proper, state-subsidised health care systems, and for many people in third world countries, devices such as wheel chairs are just not affordable. [Alessio Fabrizio] and his team developed TooWheels — an Open Source DIY wheelchair which can be customized and built using low-cost, local materials around the world and is one of the winners of the Assistive Technologies challenge round.

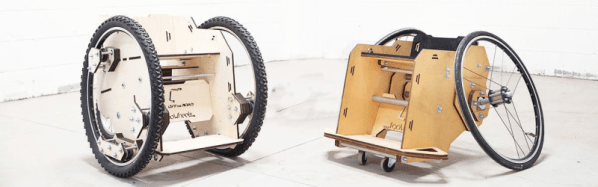
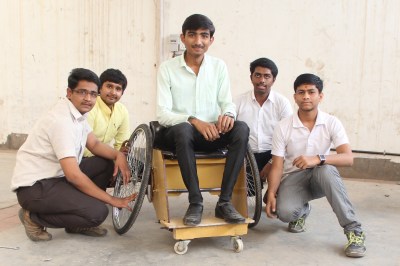
Originally conceived as a sport wheelchair, it has now evolved to answer different needs, due to feedback from the users and the community involved in the project. [Alessio] designed the project to be built from materials and resources easily available to any DIY maker at today’s Fab Labs and Makerspaces. The team have provided a detailed BOM to help procure all the required materials, instruction manual and drawings for assembly, and all the CAD files with customization instructions. Already, teams in Ecuador, India and Italy have replicated and built their own version of the TooWheel wheelchair. This confirms that the project is well documented and allows anyone around the world to download the plans and follow instructions to build their own wheelchair.

The wheelchair is built from CNC cut plywood sheets, aluminum pipes and bicycle parts and wheels. This makes it substantially cheaper compared to commercial wheelchairs, making it especially relevant for people in third world areas or where health care is not subsidised. The ease of customization allows fabrication of different wheelchair designs for sports, off-road or city use. The team is looking to bring this low-cost design to people around the world and are keen to collaborate with teams around the world to make it happen.

BeamCNC: Computer-Controlled Construction System Mill

Need to make something quick and dirty out of wooden beams, and want to use elements you know will work together? BeamCNC is a mobile assembly of stepper-controlled rollers and a router that sucks a 2×2 through it and drills the holes in pre-programmed intervals. Currently being developed as part of an Indiegogo campaign currently in preview, its creator [Vladislav Lunachev] has declared it open source hardware. It’s essentially a CNC mill that makes Grid Beam, a classic DIY building set that resembles Meccano, Erector, and other classic sets, only made full-scale for larger projects. While BeamCNC is not affiliated with Grid Beam, it takes the same general idea and automates it.

Continue reading “BeamCNC: Computer-Controlled Construction System Mill”

Better Stepping With 8-Bit Micros

The electronics for motion control systems, routers, and 3D printers are split into two camps. The first is 8-bit microcontrollers, usually AVRs, and are regarded as being slower and incapable of cool acceleration features. The second camp consists of 32-bit microcontrollers, and these are able to drive a lot of steppers very quickly and very smoothly. While 32-bit micros are obviously the future, there are a few very clever people squeezing the last drops out of 8-bit platforms. That’s what the Buildbotics team did with their ATxmega chip — they’re using a clever application of DMA as counters to drive steppers.

The usual way of driving steppers quickly with an ATMega or other 8-bit microcontroller is abusing the hardware timers. It’s quick, but there is a downside. It takes time for these timers to start and stop, and if you’re doing it two hundred times per second with four stepper motors, that clock jitter will ruin your CNC machine. The solution is to use a DMA channel to count down, with each count sending out a pulse to a stepper. It’s a clever abuse of the hardware, and the only drawback is the micro can’t send more than 2¹⁶ pulses per any 5ms period. That’s not really an issue because that would mean some very, very fast acceleration.

The Buildbotics team currently has a Kickstarter running for their four-axis CNC controller using this technique. It’s designed for Taig mills, 6040 routers, K40 lasers, and other various homebrew robots. It’s an interesting solution to the apparent end of the of the age of 8-bit microcontrollers in CNC machines and certainly worth checking out.

Rolling Around A 4th Axis

[Perry] was interested in adding a 4th axis to his CNC machine, but not very excited at the prospect of spending hundreds of dollars on the parts and electronics to make it work. There is a very clever and very inexpensive way to add a 4th axis to a CNC machine, though, and after a bit of fabrication, he was able to add a ‘rolling’ 4th axis to his machine.

[Bob]’s ‘rolling’ 4th axis.
The idea for this build comes from [Bob] over on the CNC Shark forums. Instead of adding a motor to rotate a work piece around, [Bob]’s build simply mounts it between two jaws, and rolls everything around against the bed of the CNC router. Don’t have a clue what that means? Check out the picture to the right, and you’ll see brilliance built in Delrin and HDPE.  By mounting two rack gears to the bed and two geared jaws to the carriage of the machine, moving the router in the Y axis also rotates the 4th axis. This is far, far too clever; it doesn’t require any additional electronics and the only software tweaks are a bit of G-code hacking.

[Perry] took one look at [Bob]’s project and decided this would be the perfect build to get him a 4th axis. The parts for this build were fabricated out of black HDPE, with the only real change to the design being a ‘variable length’ 4th axis. Instead of two rack gears mounted to the bed of the machine, [Perry]’s build only uses one rack, with the other end simply rolling on the bed.

There are a lot of clever inventions that don’t work, so what’s the verdict with this CNC hack? It actually looks pretty good. [Perry] was able to turn some square stock into round stock, and able to engrave a spiral around a cylinder. You can check out those videos below.

Continue reading “Rolling Around A 4th Axis”

Hackaday Prize Entry: A Manual, CNC Pick And Place Machine

Everyone who wants a 3D printer probably already has one, and even laser cutters and CNC machines are making their way into garages and basements ’round the world. Pick and place machines are the next great frontier of personal manufacturing, and even though that’s a long way off, [Tegwyn]’s project for this year’s Hackaday Prize is bringing us that much closer to popping down 0201 LEDs reliably.

This project is a manual pick and place machine — otherwise known as ‘tweezers’. It’s a bit more complicated than that, because the entire idea behind [Tegwyn]’s build is to decouple a human’s fine motor skills from the ability to place components on a board. To do that, this project is using an off-the-shelf, blue light special CNC machine. There’s not much to it, just a bit of aluminum extrusion and some threaded rods. However, with the addition of a vacuum pump, a hollow needle, and a few manual controls to move the axes around, the operator has very fine control over where a resistor, cap, or LED goes.

There are a few neat additions to the, ‘put a vacuum pump on a CNC machine’ idea. This is a 4 axis machine, giving the user the ability to rotate the part around a pad. There’s also a microscope hooked up to a small monitor mounted to the machine. If you’re assembling hundreds of boards, this is not the machine you want. If, however, you only need a handful, don’t mind spending a few hours placing parts, and don’t want to go insane with tiny QFN packages, this is a great build and a great entry for the Hackaday Prize.

Continue reading “Hackaday Prize Entry: A Manual, CNC Pick And Place Machine”

Turning And Burning With A CNC Pyrography Machine

With CNC machines, generally the more axes the better. Three-axis machines with a vertical quill over a rectangular workspace are de rigueur, and adding an axis or two can really step up the flexibility of a machine. But can only two axes be of any use? Sure can, as witnessed by this two-axis CNC wood burning machine.

As [tuckershannon] tells the tale, this was a newbie build aided by the local hackerspace. Axis one is a rotary table of laser-cut wood gears powered by a stepper. Axis two is just a stepper and lead screw sitting on a couple of blocks of wood. A Raspberry Pi under the hood controls the motors and cycles the pyrography pen on and off as it scans across a piece of wood on the rotary table, burning a spiral pattern that makes for some interesting art. Hats off to [tuckershannon] for figuring out the math needed to adapt to the changing speed of the pen over the wood as the diameter gets bigger.

We love this build, can’t help but wonder if some clever gearing could eliminate the need for the second stepper. And perhaps an upgrade from the standard resistive wood burner to an arc lighter pyrography pen would improve resolution. Still, it’s hard to argue with results, and this is a great hack.

[via r/raspberrypi]

Thanks to [Liz] for the tip!