Completely Owning The Dreamcast Add-on You Never Had

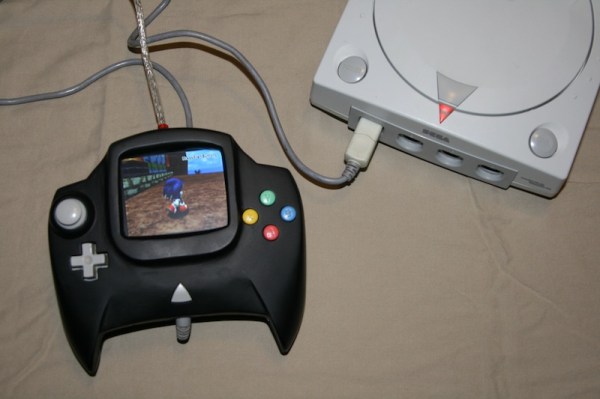
If you’ve got a SEGA Dreamcast kicking around in a closet somewhere, and you still have the underutilized add-on Visual Memory Unit (VMU), you’re in for a treat today. If not, but you enjoy incredibly detailed hacks into the depths of slightly aged silicon, you’ll be even more excited. Because [Dmitry Grinberg] has a VMU hack that will awe you with its completeness. With all the bits in place, the hacking tally is a new MAME emulator, an IDA plugin, a never-before ROM dump, and an emulator for an ARM chip that doesn’t exist, running Flappy Bird. All in a month’s work!

The VMU was a Dreamcast add-on that primarily stored game data in its flash memory, but it also had a small LCD display, a D-pad, and inter-VMU communications functions. It also had room for a standalone game which could interact with the main Dreamcast games in limited ways. [Dmitry] wanted to see what else he could do with it. Basically everything.

We can’t do this hack justice in a short write-up, but the outline is that he starts out with the datasheet for the VMU’s CPU, and goes looking for interesting instructions. Then he started reverse engineering the ROM that comes with the SDK, which was only trivially obfuscated. Along the way, he wrote his own IDA plugin for the chip. Discovery of two ROP gadgets allowed him to dump the ROM to flash, where it could be easily read out. Those of you in the VMU community will appreciate the first-ever ROM dump.

On to doing something useful with the device! [Dmitry]’s definition of useful is to have it emulate a modern CPU so that it’s a lot easier to program for. Of course, nobody writes an emulator for modern hardware directly on obsolete hardware — you emulate the obsolete hardware on your laptop to get a debug environment first. So [Dmitry] ported the emulator for the VMU’s CPU that he found in MAME from C++ to C (for reasons that we understand) and customized it for the VMU’s hardware.

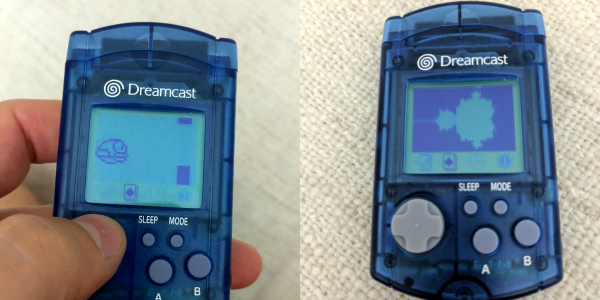
Within the emulated VMU, [Dmitry] then wrote the ARM Cortex emulator that it would soon run. But what ARM Cortex to emulate? The Cortex-M0 would have been good enough, but it lacked some instructions that [Dmitry] liked, so he ended up writing an emulator of the not-available-in-silicon Cortex-M23, which had the features he wanted. Load up the Cortex emulator in the VMU, and you can write games for it in C. [Dmitry] provides two demos, naturally: a Mandlebrot set grapher, and Flappy Bird.

Amazed? Yeah, we were as well. But then this is the same guy emulated an ARM chip on the AVR architecture, just to run Linux on an ATMega1284p.

Surfing Like It’s 1998, The Dreamcast’s Still Got It!

If you were a keen console gamer at the end of the 1990s, the chances are you lusted after a Sega Dreamcast. Here was a console that promised to be like no other, a compact machine with built-in PowerVR 3D acceleration (heavy stuff back then!), the ability to run Windows CE in some form, and for the first time, built-in Internet connectivity. Games would no longer be plastic cartridges as they had been on previous Sega consoles, instead they would come on a proprietary DVD-like Sega disc format.

It was a shame then that the Dreamcast never really succeeded in capitalizing on its promise. Everyone was talking about the upcoming Sony Playstation 2, and disappointing Dreamcast sales led Sega to withdraw both the console, and themselves from the hardware market entirely.

There remains a hard core of Dreamcast enthusiasts though, and they continue to push the platform forward.The folks at the Dreamcast Junkyard decided to go backwards a little when they resurrected the console’s dial-up modem to see whether a platform from nearly twenty years ago could still cut it in 2017. This isn’t as easy a task as you’d imagine, because, well, who uses dial-up these days? Certainly in the UK where they’re based it’s almost unheard of. They were able to find a pay-as-you go dial-up provider though, and arming themselves with the most recent Dreamkey V3.0 browser disc were able to get online.

As you might expect, the results are hilariously awful for the most part. Modern web sites that rely on CSS fail to render or even indeed to load, but retro sites like those in the Dreamcast community appear as they should. There is a video we’ve put below the break showing the rather tortuous process, though sadly they didn’t think to load the Hackaday Retro Edition. It does however feature the rarely-seen keyboard and mouse accessories.

Continue reading “Surfing Like It’s 1998, The Dreamcast’s Still Got It!”

Dreamcast Controller

A SEGA Dreamcast Controller With A Built-in Screen

[Fibbef] was hard at work on a project for a build-off competition when he accidentally fried the circuit board. Not one to give up easily, he opted to start a new project with only two days left in the competition. He managed to modify a SEGA Dreamcast controller to hold a color screen in that short amount of time.

The Dreamcast controller’s shape is somewhat conducive to this type of mod. It already has a small window to ensure the view of the visual memory card is not obstructed. Unfortunately [Fibbef’s] screen was a bit too large for this window. That meant he would have to expand the controller and the circuit board.

After taking the controller apart, he desoldered the memory card connectors. He then cut the circuit board cleanly in half vertically. He had to re-wire all of the traces back together by hand. It turned out initially that he had messed something up and accidentally fried the right half of the controller. To fix it, he cut a second controller in half and soldered the two boards together.

With some more horizontal space to work with on the PCB side of things, [Fibbef] now needed to expand the controller’s housing. He cut the controller into several pieces, making sure to keep the start button centered for aesthetics. He then used duct tape to hold popsicle sticks in place to make up for the missing pieces of the case. All of the sticks were then covered with a thick layer of ABS cement to make for a more rigid enclosure. All of this ended up being covered in Bondo, a common trick in video game console mods. It was then sanded smooth and painted with black primer to make for a surprisingly nice finish.

The screen itself still needed a way to get power and a video signal. [Fibbef] built an adapter box to take both of these signals and pass them to the controller via a single cable. The box as a USB-A connector for power input, and a composite connector for video. There’s also a USB-B connector for the output signals. [Fibbef] uses a standard printer USB cable to send power and video signals to the controller. The end result looks great and serves to make the Dreamcast slightly more portable. Check out the demo video below to see it in action. Continue reading “A SEGA Dreamcast Controller With A Built-in Screen”

GD-ROM Drive Emulated To Use SD Cards Instead

This board is the prototype which [Deunan] has been working on in order to use an SD card in place of a GD-ROM drive. The idea is to fully implement the hardware protocol used by a GD-ROM drive so that it can be completely replaced. The end goal is to do away with the optical drive on a Dreamcast game console.

As these game systems age, the optical drive is the most likely part to fail first as it involves moving parts and a lens that may degrade over time (we’re basing that assumption on our experience with DVD-ROM and RW). This may sound like a way to play pirated games, but [Deunan] makes it clear in his question and answer post that the firmware for his prototype is written to only play proper disc images and will probably not play the rips which are found in the darker recesses of the interwebs.

He’s been at this for quite a while. Here’s an earlier project he did that uses an FPGA board for the hardware.

[Thanks Walt]

Simple Fixes Breathe New Life Into Aging Game Consoles

dreamcast_repair

While the Sega Dreamcast has long been out of production, there is an avid fanbase that loves the console dearly. As with many CD/DVD-based consoles, the Dreamcast can sometimes run into issues reading discs, at which point all games are unplayable.

Instructables user [Andrew] got his hands on a pair of the consoles and found that one could not read CDs, while the other suffered from a fried controller interface board, the result of a controller wiring mix-up on his part. Determined to get the consoles up and running again, he disassembled them and got to work, sharing his fixes with us.

The CD drive fix is a pretty standard one. He first needed to locate the potentiometer that regulates the laser. Once he did, a slight counter-clockwise turn is all it required in order to increase the laser’s voltage. Once he did this, he popped in a game to see if it worked. No longer greeted with a disc read error when he powered on his Dreamcast, he reassembled the console and began work on the other one.

To fix his controller issues, [Andrew] had to remove the entire controller board from the console. He eventually located a resistor that had been damaged by his wiring mishap, and replaced it. The console was tested and seeing that the controllers worked again, he put everything back together.

While this pair of fixes is not incredibly complex, it’s nice to see people sharing their tips for bringing these consoles back to life.

Dreamcast VMU, Meet IPod

We’d bet you never had a Dreamcast Visual Memory Unit, but if you can find one now it can be turned into an iPod (translated). The VMU was originally a memory card for the not-so-popular gaming console that put an LCD screen right in your controller. When you weren’t at home you could take it with you and play mini-games. This version lacks its original guts, which have been replaced with a 6th generation iPod nano. The screen is just a bit small for the opening so a frame of white tape was applied as a bezel. The sleep button has been extended through the cover for the VMU connector. It seems there’s a gaping hole in the back of the case, but after seeing the ultrasonic knife used to cut away the plastic we don’t care. We’ve embedded video of that tool after the break.

Continue reading “Dreamcast VMU, Meet IPod”

[techknott]’s Portable Dreamcast

[youtube=http://www.youtube.com/watch?v=FOZvlEOZaCg]

[Sydney] sent in this fantastic portable Dreamcast, built by [techknott], in response to the one we posted yesterday. While we agree, this one is much more polished, we want to point out why the post yesterday is more Hack A Day material. Sure, it looks more “hackish”, but that’s not what we are referring to. What we want to draw your attention to, is the lack of information. Yesterday, there was a build log. Today, there is not. Sure the other one could have had much much more information and we’re not commenting on which one is “better”. We’re just reminding you to please please please document your projects. Oh, and also, this thing is awesome.