Educational Breadboard Synth Module

Synth designers [Erica Synths] have devised a very cool, approachable way to get started with DIY synth hacking. Designed around a breadboard, the EDU DIY LABOR is a synth module with everything you need to get started. The Basic version comes with potentiometers, switches, and jack sockets, and is aimed more at those who likely already have a decent supply of parts on hand for experimentation. The Full kit comes with all that, plus a supply of resistors, capacitors, ICs and transistors so you can get up to speed, even as a beginner.

The device is supplied as a semi-DIY kit, with some soldering and assembly required. The kit was designed in collaboration with Dr. Shalom D. Ruben, a teaching professor of engineering at the University of Colorado. So it should be approachable for those with some soldering experience under their belt. Labor includes a multi-voltage power supply which supplies all Eurorack voltages, an oscillator section for both audible ranges and LFO, a full envelope control section, an output amplifier and more! Once assembled you can quickly start making bloops, beeps, and bzzts. You can easily design filters, oscillators, amplifiers, sequencers, and whatever else you can dream up!

However, the kit is designed to be more than just a synth playground – the idea was also to create an environment where you could learn the basics of electronics at the same time, in an approachable, fun way. This is reflected in the excellent user manual, which goes beyond just assembling the device and gives some example circuits, complete with wave diagrams and detailed working explanations. Great for beginners and experienced hackers who want to learn more about fundamentals and audio synthesis!

Continue reading “Educational Breadboard Synth Module”

CH32V003 Makes For Dirt Cheap RISC-V Computer

These days, when most folks think of a computer they imagine a machine with multiple CPUs, several gigabytes of RAM,  and a few terabytes of non-volatile storage for good measure. With such modern expectations, it can be difficult to see something like a microcontroller as little more than a toy. But if said MCU has a keyboard, is hooked up to a display, and lets you run basic productivity and development software, doesn’t that qualify it as a computer? It certainly would have in the 1980s.

With that in mind, [Olimex] has teased the RVPC, which they’re calling the “world lowest cost Open Source Hardware All-in-one educational RISC-V computer” (say that three times fast). The tiny board features the SOIC-8 variant of the CH32V003 and…well, not a whole lot else. You’ve got a handful of passives, a buzzer, an LED, and the connectors for a PS/2 keyboard, a power supply, and a VGA display. The idea is to offer this as a beginner’s soldering kit in the future, so most most of the components are through-hole.

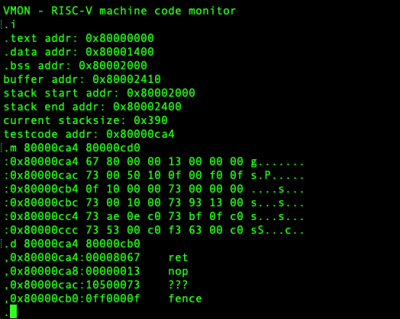
On the software side, the post references things like the ch32v003fun development stack, and the PicoRVD programmer as examples of open source tools that can get your CH32V computer up and running. There’s even a selection of retro-style games out there that would be playable on the platform. But what [Olimex] really has their eye on is a port of VMON, a RISC-V monitor program.

When paired with the 320×200 VGA text mode that they figure the hardware is capable of, you’ve got yourself the makings of an educational tool that would be great for learning assembly and playing around with bare metal programming.

It might not have the timeless style of the Voja4, but at least you can fit it in a normal sized pocket.

Thanks to [PPJ] for the tip.

Git Good, By Playing A Gamified Version Of Git

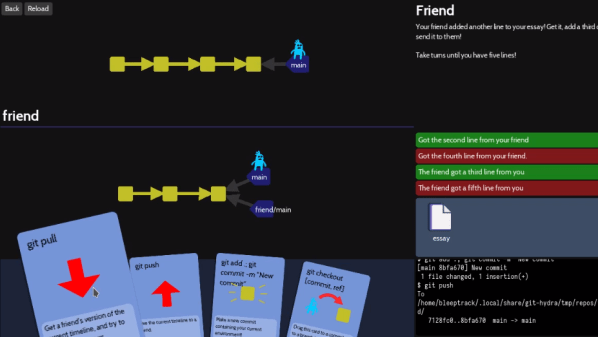
What better way to learn to use Git than a gamified interface that visualizes every change? That’s the idea behind Oh My Git! which aims to teach players all about the popular version control system that underpins so many modern software projects.

Git good, with a gameified git interface.

Sometimes the downside to a tool being so ubiquitous is that it tends to be taken for granted that everyone already knows how to use it, and those starting entirely from scratch can be left unsure where to begin. That’s what creators [bleeptrack] and [blinry] had in mind with Oh My Git! which is freely available for Linux, Windows, and macOS.

The idea is to use a fun playing-card interface to not only teach players the different features, but also to build intuitive familiarity for operations like merging and rebasing by visualizing in real-time the changes a player’s actions make.

The game is made with beginners in mind, with the first two (short) levels establishing that managing multiple versions of a file can quickly become unwieldy without help. Enter git — which the game explains is essentially a time machine — and it’s off to the races.

It might be aimed at beginners, but more advanced users can learn a helpful trick or two. The game isn’t some weird pseudo-git simulator, either. The back end uses real git repositories, with a real shell and git interface behind it all. Prefer to type commands in directly instead of using the playing card interface? Go right ahead!

Oh My Git! uses the free and open-source Godot game engine (not to be confused with the Godot machine, a chaos-based random number generator.)

Patching Together Logic Gates

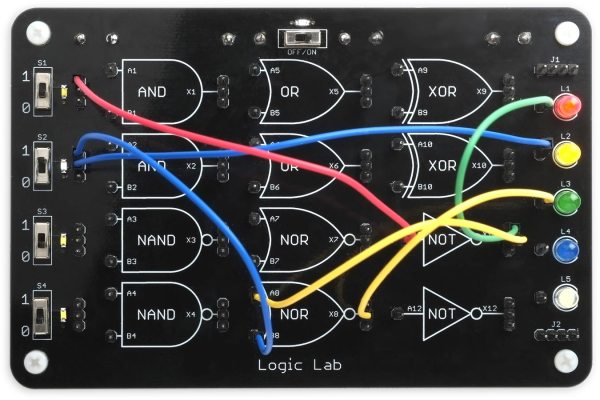
The digital world offers many advantages over its analog relatives, the use of boolean logic among them. Some of the functions, like NOT, OR, and AND are fairly straightforward and line up nicely with their linguistic counterparts. Others are more elusive, like XOR and NAND. For those just getting their start in digital logic, this teaching tool allows different logic gates to be wired together with patch cables.

While [David] first thought to use 74-series logic circuits directly, a much more versatile solution was to use configurable custom logic — a feature found in AVR DA-series microcontrollers that allows for the creation of custom logic circuits without the need for external hardware or complex programming. He went with an ATmega4809 which is capable of supporting twelve gates which are depicted graphically on the board, where the patch cables can be connected between inputs and outputs from a set of switches on the left to another set of LEDs on the right. The microcontroller continually polls for connections, applies the correct logic via a lookup table, and lights the appropriate LED.

Even with only twelve gates, the amount of real-world analogs that can be created with this teaching tool are numerous and varied, from simple things like displaying traffic light patterns in the correct order to implementing a binary adder. It’s an excellent way to get started in digital logic or understanding gates, and much simpler than dealing with 74-series chips on a breadboard like many of us might have done, but those logic chips can be powerful tools to have on hand even in the modern world of microcontrollers.

A New Educational Robotics Platform

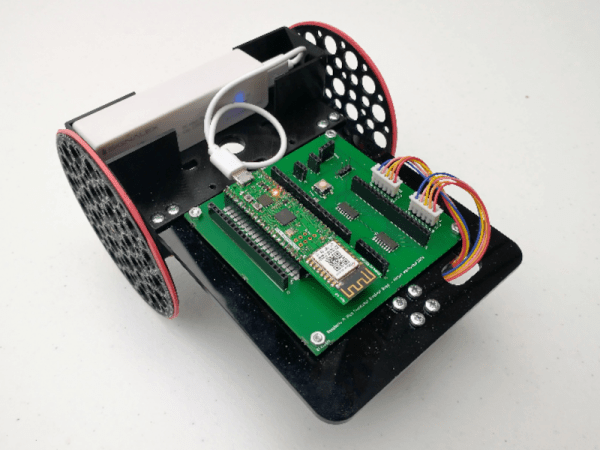
When looking for electronics projects to use in educational settings, there is no shortage of simple, lightweight, and easily-accessible systems to choose from. From robotic arms, drones, walking robots, and wheeled robots, there is a vast array of options. But as technology marches on, the robotics platforms need to keep up as well. This turtle-style wheeled robot called the Trundlebot uses the latest in affordable microcontrollers on a relatively simple, expandable platform for the most up-to-date educational experience.

The robot is built around a Raspberry Pi Pico, with two low-cost stepper motors to drive the wheeled platform. The chassis can be built out of any material that can be cut in a laser cutter, but for anyone without this sort of tool it is also fairly easy to cut the shapes out by hand. The robot’s functionality can be controlled through Python code, and it is compatible with the WizFi360-EVB-Pico which allows it to be remote controlled through a web application. The web interface allows easy programming of commands for the Trundlebot, including a drag-and-drop feature for controlling the robot.

With all of these features, wireless connectivity, and a modern microcontroller at the core, it is an excellent platform for educational robotics. From here it wouldn’t be too hard to develop line-follower robots, obstacle-avoiding robots, or maze-solving robots. Other components can easily be installed to facilitate these designs as well. If you’re looking for a different style robot, although not expressly for educational purposes this robotic arm can be produced for under $60.

Hackaday Prize 2023: Scratch Made 8-Bit Educational Computer

To demonstrate the functionality of an 8-bit computer processor at a very basic level,  [Mazen Gomaa] assembled a Homemade 8-Bit Educational Computer using common CMOS logic chips, a handful of prototyping boards, and an impressive number of carefully connected wires. [Mazen] was inspired by Ben Eater’s 8-bit TTL Breadboard Computer but opted to solder the chips and other components onto proto boards instead of using solderless breadboards.

The 8-Bit computer is based on the Simple-As-Possible (SAP) computer architecture described in the book “Digital Computer Electronics” by [Paul Malvino] and [Jerald Brown]. These useful educational examples demonstrate data, computer logic, and even programming in the context of basic electronic components. Tinkering with such simple computers provides a real “zeros and ones” exposure to computation.

[Mazen] added some additional features and functionality to his computer, including an instruction keypad, an address keypad, a dot matrix memory data viewer, a Schottky diode matrix ROM, and a boot loader that initializes the RAM with data stored in ROM. With clock speeds up to 100 Hz, the computer consumes around 300-500 mA of current.

Future plans include expanding the memory and instruction set from the present 128-bit (8×16) RAM, 64-bit (8×8) ROM, and a set of ten instructions.  Already, this project is a great addition to an ever-growing catalog of homemade solderless breadboard computers, LCD snake games, and VGA video cards.

Continue reading “Hackaday Prize 2023: Scratch Made 8-Bit Educational Computer”

The Voltaic Pile: Building The First Battery

In the technologically-underpinned modern world, most of us interact with a battery of some sort every day. Whether that’s the starter battery in a car, the lithium battery in a phone, or even just the coin cell battery in a wrist watch, batteries underpin a lot of what makes society possible now. Not so in the early 1800s when chemists and physicists were first building and experimenting with batteries. And those batteries were enormous, non-rechargable, and fairly fragile to boot. Not something suited for powering much of anything, but if you want to explore what it would have been like to use one of these devices, follow along with [Christopher]’s build of a voltaic pile. Continue reading “The Voltaic Pile: Building The First Battery”