Yo Dawg, We Heard You Like Retrocomputers

The idea of having software translation programs around to do things like emulate a Super Nintendo on your $3000 gaming computer or, more practically, run x86 software on a new M1 Mac, seems pretty modern since it is so prevalent in the computer world today. The idea of using software like this is in fact much older and easily traces back into the 80s during the era of Commodore and Atari personal computers. Their hardware was actually not too dissimilar, and with a little bit of patience and know-how it’s possible to compile the Commodore 64 kernel on an Atari, with some limitations.

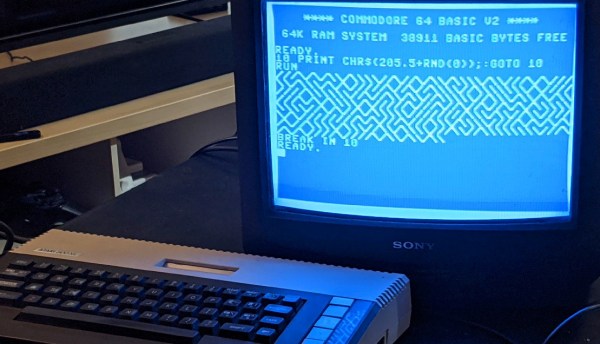
This project comes to us from [unbibium] and was inspired by a recent video he saw where the original Apple computer was emulated on Commodore 64. He took it in a different direction for this build though. The first step was to reformat the C64 code so it would compile on the Atari, which was largely accomplished with a Python script and some manual tweaking. From there he started working on making sure the ROMs would actually run. The memory setups of these two machines are remarkably similar which made this slightly easier, but he needed a few workarounds for a few speed bumps. Finally the cursor and HMIs were configured, and once a few other things were straightened out he has a working system running C64 software on an 8-bit Atari.

Unsurprisingly, there are a few things that aren’t working. There’s no IO besides the keyboard and mouse, and saving and loading programs is not yet possible. However, [unbibium] has made all of his code available on his GitHub page if anyone wants to expand on his work and may also improve upon this project in future builds. If you’re looking for a much easier point-of-entry for emulating Commodore software in the modern era, though, there is a project available to run a C64 from a Raspberry Pi.

Thanks to [Cprossu] for the tip!

Making Ferroelectric Solar Cells Better

Researchers claim that using several very thin layers of ferroelectric crystals can lead to significantly better ferroelectric solar cell efficiency. But don’t pull the panels off your roof yet. Conventional cells are still much more efficient than ferroelectric devices — at least, for now.

Unlike conventional silicon-based solar cells, ferroelectric cells don’t depend on a PN junction and — in theory — can be cheaper and easier to produce. However, they typically don’t absorb as much sunlight as other materials.

Continue reading “Making Ferroelectric Solar Cells Better”

3D Printed Smart Glasses Put Linux In Your Face

Unimpressed by DIY wearables powered by dinky microcontrollers, [Teemu Laurila] has been working on a 3D printed head-mounted computer that puts a full-fledged Linux desktop in your field of view. It might not be as slim and ergonomic as Google Glass, but it more than makes up for it in terms of raw potential.

Featuring an overclocked Raspberry Pi Zero W, a ST7789VW 240×240 IPS display running at 60 Hz, and a front-mounted camera, the wearable makes a great low-cost platform for augmented reality experiments. [Teemu] has already put together an impressive hand tracking demonstration that can pick out the position of all ten fingers in near real-time. The processing has to be done on his desktop computer as the Zero isn’t quite up to the task, but as you can see in the video below, the whole thing works pretty well.

Precision optics, courtesy of a hacksaw

Structurally, the head-mounted unit is made up of nine 3D printed parts that clip onto a standard pair of glasses. [Teemu] says the parts will probably need to be tweaked to fit your specific frames, but the design is modular enough that it shouldn’t take too much effort. He’s using 0.6 mm PETG plastic for the front reflector, and the main lens was pulled from a cheap pair of VR goggles and manually cut down into a rectangle.

The evolution of the build has been documented in several videos, and it’s interesting to see how far the hardware has progressed in a relatively short time. The original version made [Teemu] look like he was cosplaying as a Borg drone from Star Trek, but the latest build appears to be far more practical. We still wouldn’t try to wear it on an airplane, but it would hardly look out of place at a hacker con.

Continue reading “3D Printed Smart Glasses Put Linux In Your Face”

The Zeloof Z2 Intergrated Circuit Has 100 Transistors

Back in 2018 we reported on the first silicon integrated circuit to be produced in a homemade chip fab. It was the work of [Sam Zeloof], and his Z1 chip was a modest six-transistor amplifier. Not one to rest on his laurels, he’s back with another chip, this time the Z2 is a hundred-transistor array. The Z2 occupies about a quarter of the area of the previous chip and uses a 10µm polysilicon gate process as opposed to the Z1’s metal gates. It won’t solve the global chip shortage, but this is a major step forward for anyone interested in building their own semiconductors.

The transistors themselves are FETs, and [Sam] is pleased with their consistency and characteristics. He’s not measured his yield on all samples, but of the twelve chips made he says he has one fully functional chip and a few others with at least 80% functionality. The surprise is that his process is less complex than one might expect, which he attributes to careful selection of a wafer pre-treated with the appropriate oxide layer.

You can see more about the Z2 in the video below the break. Meanwhile, should you wish to learn more about the Z1 you can see [Sam’s] Hackaday Superconference talk on the subject. We’re looking forward to the Z3 when it eventually arrives, with bated breath!

Continue reading “The Zeloof Z2 Intergrated Circuit Has 100 Transistors”

Surplus Syringes Make Satisfactory Tuner For Amateur Radio Experimentation

Amateur Radio as a hobby has a long history of encouraging experimentation using whatever one might have on hand. When [Tom Essenpreis] wanted to use his 14 MHz antenna outside of its designed frequency range, he knew he’d need an impedance matching circuit. The most common type is an L-Match circuit which uses a variable capacitor and a variable inductor to adjust the usable frequency range (resonance) of an antenna. While inefficient in some specific configurations, they excel at bridging the gap between the 50 ohm impedance of the radio and the unknown impedance of an antenna.

No doubt raiding his junk box for parts, [Tom] hacked together a variable capacitor and inductor using ferrite rods from AM radios, hot glue, magnet wire, copper tape, and some surplus 60ml syringes. You can see that he ground out the center of the plunger to make room for ferrite rods. Winding the outside of the syringe with magnet wire, the alignment of the ferrite can be adjusted via the plunger, changing the characteristics of the element to tune the circuit. [Tom] reports that he was able to make an on-air contact using his newly made tuner, and we’re sure he enjoyed putting his improvised equipment to use.

If Amateur Radio isn’t your thing, then maybe we can entice you with this syringe based rocket, syringe actuated 3D printed drill press, or vacuum syringe powered dragster. Have your own hack to share? By all means, submit it to the Tip Line!

Goals And Goalposts

In the winter, I hatched a vague plan to learn some of the modern unmanned aerial vehicle tech. Everybody needs an autonomous vehicle, and we’ve got some good flying fields within walking distance, so it seemed like it could work. Being me, that meant buying the cheapest gear that could possibly work, building up the plane by myself, and generally figuring out as much as possible along the way. I learn more by making my own mistakes anyway. Sounds like a good summer project.

Fast-forward to August, and the plane is built, controller installed, and I’ve spent most of the last month trying to make them work well together. (The firmware expects a plane with ailerons, and mine doesn’t have them, but apparently I’d rather tweak PID values than simply add a couple wing servos.) But it’s working well enough that it’s launching, flying autonomous waypoint missions, and coming home without any intervention. So, mission accomplished, right?

Destination: that furthest red roof

Nope. When I’m enjoying a project, I have a way of moving the goalposts on myself. I mean, I don’t really want to be done anyway. When a friend asked me a couple weeks ago what I was planning to do with the plane, I said “take nice aerial videos of that farm over there.” Now I see flight opportunities everywhere, and need to work on my skills. The plane needed an OLED display. It probably still needs Bluetooth for local configuration as well. Maybe a better long-range data link…

This is creeping featurism and moving-the-goalposts in the best of ways. And if this were a project with a deadline, or one that I weren’t simply enjoying, it would be a problem. Instead, having relatively low-key goals, meeting them, and letting them inspire me to set the next ones has been a blast. It makes me think of Donald Papp’s great article on creating hacking “win” projects. There he suggests creating simple goals to keep yourself inspired. I don’t think I could have planned out an “optimal” set of goals to begin with — I’ve learned too much along the way that the next goal isn’t obvious until I know what new capabilities I have. Creeping is the only way.

What about you? Do you plan your hobby projects completely in advance? Not at all? Or do you have some kind of hybrid, moving-the-goalposts sort of strategy?

Reverse Engineering A Topfield VFD Front Panel

Hackers love the warm glow of a vacuum fluorescent display (VFD), and there’s no shortage of dead consumer electronics from which they can be pulled to keep our collective parts bins nicely stocked. Unfortunately, figuring out how to actually drive these salvaged modules can be tricky. But thanks to the efforts of [Lauri Pirttiaho], we now have a wealth of information about a VFD-equipped front panel used in several models of Topfield personal video recorders.

The board in question is powered by a Hynix HMS99C52S microcontroller and includes five buttons, a small four character 14-segment display, a larger eight character field, and an array of media-playback related icons. There’s also a real-time clock module onboard, as well as an IR receiver. [Lauri] tells us this same board is used in at least a half-dozen Topfield models, which should make it relatively easy to track one down.

After determining what goes where in the 6-pin connector that links the module with the recorder, a bit of poking with a logic analyzer revealed that they communicate over UART. With the commands decoded, [Lauri] was able to write a simple Python tool that lets you drive the front panel with nothing more exotic than a USB-to-serial adapter. Though keep in mind, you’ll need to provide 17 VDC on the appropriate pin of the connector to fire up the VFD.

What’s that? You don’t need the whole front panel, and just want to pull the VFD itself off the board? Not a problem. Our man [Lauri] was kind enough to document how data is passed from the Hynix microcontroller to the display itself; critical information should you want to liberate the screen from its PVR trappings.

If you manage to get your hands on one of these modules, it would be an ideal addition to a custom media streamer. Though we suppose simply turning it into a network-controlled clock would be a suitable alternative if you’re looking for something a bit easier.

Continue reading “Reverse Engineering A Topfield VFD Front Panel”