Ask Hackaday: Google Beat Go; Bellwether Or Hype?

We wake up this morning to the news that Google’s deep-search neural network project called AlphaGo has beaten the second ranked world Go master (who happens to be a human being). This is the first of five matches between the two adversaries that will play out this week.

On one hand, this is a sign of maturing technology. It has been almost twenty years since Deep Blue beat Gary Kasparov, the reigning chess world champion at the time. Although there are still four games to play against Lee Sedol, it was recently reported that AlphaGo beat European Go champion Fan Hui in five games straight. Go is generally considered a more difficult game for machine minds to play than chess. This is because Go has a much larger pool of possible moves at any given time.

Does This Matter?

Okay, the news part of this event has been covered: machine beats man. Does it matter? Will this affect your life and how? We want to hear what you think in the comments below. But I’m going to keep going with some of my thoughts on the topic.

You're still better at Ms. Pacman [Source: DeepMind paper in Nature]
You’re still better at Ms. Pacman [Source: DeepMind paper in Nature]
Let’s look first at what AlphaGo did to win. At its core, the game of Go is won by figuring out where your opponent will likely make a low-percentage move and then capitalizing on that choice. Know Your Enemy has been a tenet of strategy for a few millennia now and it holds true in the digital age. In addition to the rules of the game, AlphaGo was fed a healthy diet of 30 million positions from expert games. This builds behavior recognition into the system. Not just what moves can be made, but what moves are most likely to be made.

DeepMind, the company behind AlphaGo which was acquired by Google in 2014, has published a paper in Nature about their approach. They were even nice enough to let us read without dealing with a paywall. The secret sauce is the learning process which at its core tries to mimic how living entities learn: observe repetitively while assigning values to outcomes. This is key as it leads past “intellect”, to “intelligence” (the “I” in AI that everyone seems to be waiting for). But this is a bastardized version of “intelligence”. AlphaGo is able to recognize and predict behavior, then make choices that lead to a desired outcome. This is more than intellect as it does value the purpose of an opponent’s decisions. But it falls short of intelligence as AlphaGo doesn’t consciously understand the purpose it has detected. In my mind this is exactly what we need. Truly successful machine learning will be able to make sense out of sometimes irrational input.

The paper from Nature doesn’t go into details about Go, but it explains the approach of the learning system applied to Atari 2600. The algorithm was given 210×160 color video at 60Hz as an input and then told it could use a joystick with one button. From there it taught itself to play 49 games. It was not told the purpose or the rules of the games, but it was given examples of scores from human performance and rewarded for its own quality performances. The chart above shows that it learned to play 29 of them at or above human skill levels.

Continue reading “Ask Hackaday: Google Beat Go; Bellwether Or Hype?”

Polyhedrone

[Brainsmoke] had a simple plan. Make a quadcopter with lots of addressable LEDs.

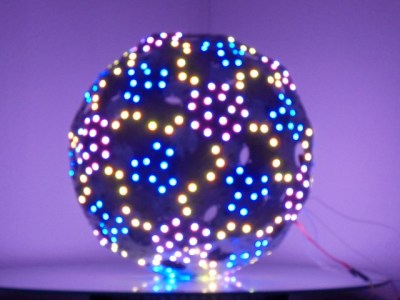
Not just a normal quadcopter with ugly festoons of LED tape though. [Brainsmoke] wanted to put his LEDs in a ball. Thus was born the polyhedrone, the idea of a flying deltoidal hexecontahedron covered as you might expect with all those addressable LEDs.

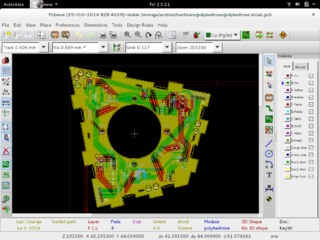
polyhedrone-PCB-kicadA Catalan solid makes a good choice for the homebrew polyhedron builder because its faces are all identical. Thus if you are making PCBs to carry LEDs, for example, you need only create a single PCB design to use on all faces. A bit of work in KiCAD, and a single face design with interlocking edges was ready. The boards were tested, a wiring layout was worked out, and the polyhedron was assembled.

But [Brainsmoke] didn’t stop there. He produced a flight case for the polyhedron, in the form of a larger polyhedron from what looks like lasercut thin ply.

Having a finished polyhedron, the next thing was to hook up a Raspberry Pi and write some software. First in Python, then in Go.

polyhedrone-light-1The results are simply stunning. If the mathematics and construction of a polyhedron were not enough to make this project worth a second look, then the gallery of images should be enough. You’ll notice that this is ostensibly a quadcopter project, yet no mention of flying has been made on this page. That’s because this is still a work in progress at Tech Inc Amsterdam, and there is more to come. But it honestly doesn’t matter if this project never moves a millimeter off the ground, as far as we are concerned [Brainsmoke] has created a superbly built thing of beauty in its own right, and we like that.
As you might expect, this is just the latest of many projects featured here that have involved addressable LEDs or quadcopters. Of note among them is this LED polyhedron that cleverly closes in all its bits, and this LED-equipped quadcopter that generates very pleasing patterns with a hi-res cross of pixels.

1768 LEDs, Because 96 Just Wasn’t Enough

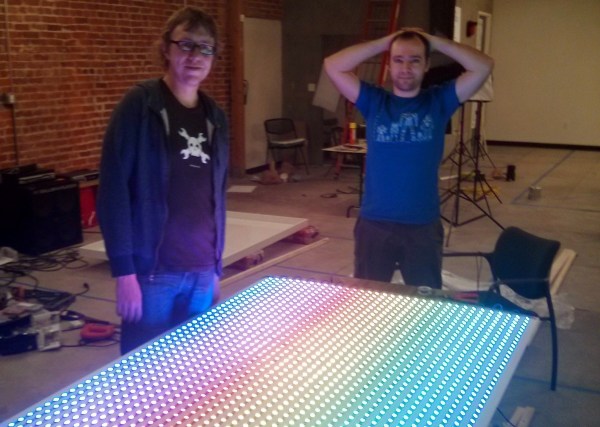
Some people would look at a massive 6’x4′ LED matrix hanging on the wall playing animations and be happy with the outcome. But [Ben] just isn’t one of those people. The original FLED (Fantastic LED thingy) was eight rows of twelve addressable LEDs for a total of 96 pixels. This spring he upped his game and retrofitted the display with 1768 LEDs.

It wasn’t simply an issue of restlessness, the original build suffered from LEDs dying. We actually featured it for that reason as a Fail of the Week.  This is not strictly a hobby project, it’s hanging on the wall in the Supplyframe offices, so pulling it down frequently to fix broken parts is not ideal.

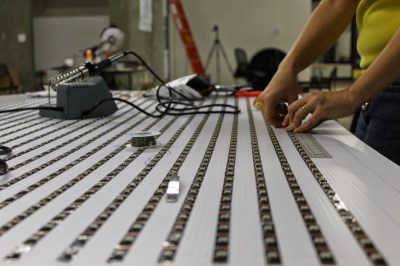
fled-reborn-LED-layoutTo make FLED more reliable [Ben] sourced strips of the new APA102 LEDs which we looked at back in December. They use an SPI bus instead of the bizarre timing scheme of the WS2812. At first glance you’d think this would mean easier assembly compared to soldering both sides of each of the original 96-pixels. These do come in strips, but laying out 52×34 still means soldering to the ends of each row.
A lot of love went into making sure those rows were laid out perfectly. A sheet of white foamed PVC serves as the substrate. There is grounding braid on either end of the rows, one is the voltage bus, the other is ground. It fits the original enclosure which is acrylic and does a great job of diffusing the light. I’ve seen it in person and it looks pretty much perfect!

It’s not just the physical layout of this many pixels that is a challenge. Pushing the data to all of them is much harder than it was with 96. [Ben] transitioned away from RaspberryPi. He considered using a Teensy 3.1 and ESP8266 but the WiFi of these cheap modules is far too slow to push frame information from a remote box. In the end it’s a BeagleBone Black that drives the reborn display. This is a great choice since there’s plenty of power under the hood and a traditional (and much faster) WiFi dongle can be used.

Don’t miss the animation demos found after the break.

Continue reading “1768 LEDs, Because 96 Just Wasn’t Enough”

Raspberry Pi Driven Polargraph Exhibits High Precision Drawing Ability

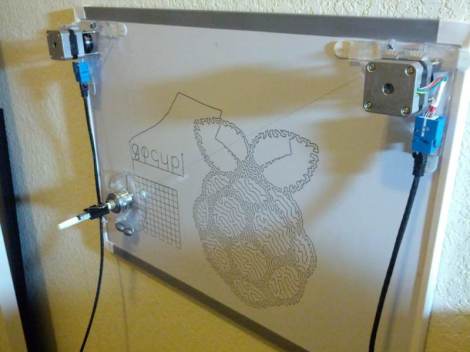
This polar graph draws some amazing shapes on a dry erase board. Part of that is due to the mounting brackets used for the two stepper motors and the stylus. But credit is also due for the code which takes velocity into account in order to plan for the next set of movements.

The Go language is used to translate data into step commands for the two motors. This stream of commands is fed over a serial connection between the RPi board and an Arduino. The Arduino simply pushes the steps to the motor controllers. The inclusion of the RPi provides the horsepower needed to make such smooth designs. This is explained in the second half of [Brandon Green’s] post. The technique uses constant acceleration, speed, and deceleration for most cases which prevents any kind of oscillation in the hanging stylus. But there are also contingencies used when there is not enough room to accelerate or decelerate smoothly.

You can catch a very short clip of the hardware drawing a tight spiral in the video embedded after the break.

Continue reading “Raspberry Pi Driven Polargraph Exhibits High Precision Drawing Ability”

Building A Game Clock For Go Or Chess

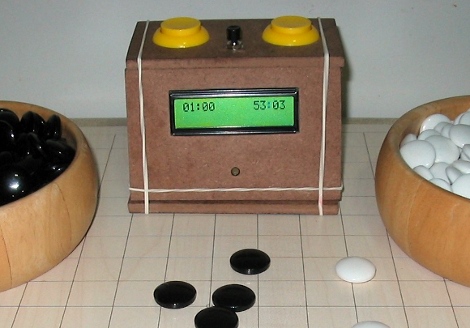
[Matias] is just getting into hobby electronics and decided to push the limits of his skill by building this game clock (site dead try Internet Archive). He comes from a software design background and that really shows through in the UI design seen in the video after the break. We enjoy the journey through his prototyping process which started with an Arduino and a breadboard, and ended with this standalone timer.

After building the first working prototype with four buttons and a character LCD, he migrated to a plastic ice cream container as an enclosure. This worked well enough, but the flimsy case needed an upgrade. As he looked toward the next version he decided to move to an Arduino Nano board to save on space. The rest of the components were soldered to some protoboard, with a pair of pin headers to receive the Nano. The finished board is the same length as the Nano and only about twice as wide.

The box was modeled on the computer (it looks like SketchUp to us be we could be wrong) then cut from pieces of Masonite. It hosts the character LCD with a pair of arcade buttons for each player to shift the time burden to his or her opponent. The middle button pauses the game, and there’s a trimpot on the back to adjust the screen contrast. [Matias] managed to include a surprising number of settings which will make this little box useful for a wide range of game types.

Continue reading “Building A Game Clock For Go Or Chess”

PSP Go Gets Butchered (teardown)

Dx1CSXo13YF3NYBa

Not due to be released until the beginning of October, a PSP Go demo unit (shipped to G4TV) has already earned itself a teardown from [iFixit]. Among what was discovered:

– Once a few screws are removed, the battery is user replaceable (as-in: no soldering iron required)

– Wireless connectivity is only supplied through a 802.11b chip (no update to ‘n’, or even ‘g’, by Sony)

– Almost all chips are EMI-shielded (making them a bit more annoying to get to)

With a cheaper version of the PS3 ready to hit shelves, one can only wonder whether the relatively high price tag on this new PSP is worth it.

Update: It seems as though no party involved wanted the info leaked this early, which explains why the video and picture gallaries (up courtesy of Google) have been removed.

Update 2: The article (linked above) and video are now available. An explanation on why Sony had them remove the items for quite some time (plus some repair manuals) was posted by iFixit.

The GO Sequencer

go_seq

[Guy John] sent in this cool sequencer project. He’s using the game Go as the input. A web camera pics up the location of the pieces on the grid and plots them in his sequencing software. You can see that it is still very much in progress, but it is coming along nicely. He openly admits that it may never be completely practical. There is still so much to be improved to get it even comfortably usable, such as motion detection to remove his hand from the mix when re locating the Go pieces. This project is very similar to the Skittles interface that we posted back in July.  It would be kind of interesting, though probably repetitive, to actually play a game of go and listen to the variations in the music while you play.