Polarization Camera Views The Invisible

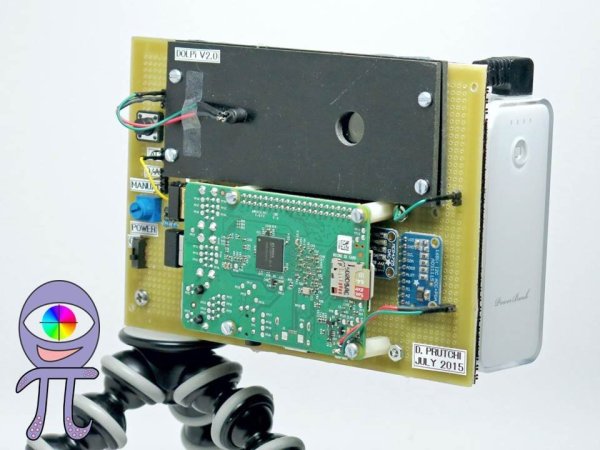
Light polarization is an interesting phenomenon that is extremely useful in many situations… but human eyes are blind to detecting any polarization. Luckily, [David] has built a polarization-sensitive camera using a Raspberry Pi and a few off-the-shelf components that allows anyone to view polarization. [David] lists the applications as:

A polarimetric imager to detect invisible pollutants, locate landmines, identify cancerous tissues, and maybe even observe cloaked UFOs!

The build uses a standard Raspberry Pi 2 and a 5 megapixel camera which sits behind a software-controlled electro-optic polarization modulator that was scavenged from an auto-darkening welding mask. The mask is essentially a specialized LCD screen, which is easily electronically controlled. [David] whipped up some scripts on the Pi that control the screen, which is how the camera is able to view various polarizations of light. Since the polarization modulator is software-controlled, light from essentially any angle can be analyzed in any way via the computer.

There is a huge amount of information about this project on the project site, as well as on the project’s official blog. There have been other projects that use polarized light for specific applications, but this is the first we’ve seen of a software-controlled polarizing camera intended for general use that could be made by pretty much anyone.

The 2015 Hackaday Prize is sponsored by:

Astronaut Or Astronot: The Final Round Is Over

For the last few months, we’ve been asking the Hackaday.io community for their thoughts on what the best projects are in the 2015 Hackaday Prize. We’ve also been giving away some fabulous prizes to people who have voted, and we just wrapped up the last round of voting? Did anyone win? Check out the video below.

Continue reading “Astronaut Or Astronot: The Final Round Is Over”

Hackaday Prize Entry: 3D Printed Modular Keyboard

There is a big community of people creating all kinds of synthesizers, but until now no one has attempted to make a keyboard controller like the one [Tim] created. Not only has he created the keyboard synthesizer, but he’s developed one that is modular and 3D printed so you can just expand on the synth you have rather than go out and buy or build a new one.

The design has a lot useful features. Since the design is modular, you can 3D print extra octaves of keys if you need, and simply build off of the existing keyboard. The interior has mounts that allow circuit boards to be screwed down, and the exterior has plenty of available places to put knobs or sliders. Anything that could possibly be built into a synthesizer is possible with this system, and if you decide you want to start small, that’s possible too!

All of the design files are available from Pinshape if you want to get started. The great thing about this controller is that you could use a 555-based synth in this keyboard controller, or a SID synth, or any other synth you could think of!

The 2015 Hackaday Prize is sponsored by:

Non-Invasive Smart Electricity Meter

There are a lot of ways to measure energy usage in the home, but most of them involve handling mains voltage. Not only that, but sometimes they require handling mains voltage before it gets through a breaker panel or fuse box, meaning that if you make a mistake there are a lot of bad things that can happen. [Yonas] has been working on this problem, and has come up with a non-invasive, safer way to monitor electricity consumption without having to work directly on live wires.

Please note that you should still not be working on mains voltage without proper training, but if you have the required know-how then the installation should be pretty straightforward. The project is based on the Spark Core, and uses clamp-on current sensors to measure energy use. The sensors wrap around the mains cable, meaning you don’t have to disconnect anything to hook them up. The backend runs on a LAMP server which could be a Raspberry Pi if you have one. [Yonas] runs it on a hosted server as a matter of preference.

All of the source code for this is available, and assuming you can get your hands on the current sensors this could be a great way to get started monitoring your energy usage in the house. Be sure to check out the video below for a demonstration of the operation of this device. Of course, if you have a gas line you’ll need this energy monitoring setup too.

Continue reading “Non-Invasive Smart Electricity Meter”

Busted Wah Pedal Becomes New Synth Tool

Sometimes we get lucky and find a part we need for a project in our parts drawer. [Scissorfeind] got even luckier and found a part for his project lying around in the street. It was a Crybaby Wah pedal, a classic effects pedal typically used for a guitar. Since it was somewhat damaged, [Scissorfeind] got to work creating a control voltage (CV) and volume circuit for his Korg synthesizer.

For those who aren’t synthesizer aficionados, CV is a method of controlling the pitch of a tone. A higher voltage creates a higher tone and vice-versa. The wah pedal has a rocker on it that allows one’s foot to control the effect, but this particular one has been modified for CV instead of the wah-wah sound these pedals normally make. [Scissorfeind] built in a switch that will allow it to control volume as well, which makes this pedal quite unique in the effects world.

[Scissorfeind] built the custom circuit out of other parts he had lying around (presumably not in the street) and put the entire thing together on perfboard, then fit it all back together in the pedal. Now he has a great control voltage pedal for the vintage Korg synthesizer he recently restored! [Scissorfeind] knows his way around a synth, but if you’re looking to get started on a synthesizer project we have a great tutorial for you!

We Just Gave Away $1000 To A Voter

Last week we issued a challenge to everyone on Hackaday: vote in the Hackaday Prize Community Voting, and someone is going to with a $1000 gift card for the Hackaday Store. How is this going to work? I’m going to find a random person on Hackaday.io, and if they have voted, they win a thousand dollar gift card. If they have not voted, I pick a random person from the set of people who have voted. Too complex? Here’s the video:

The winner of the $1000 Hackaday Prize gift card is [Nolan Moore]. He voted for the most Amazingly Engineered project, and the bits aligned to award him a great gift for participating. The other guy? The other guy should have voted.

A NEW ROUND

Thought this would stop when we finally gave away a thousand dollar gift card? Nope. Right now there’s a new round of community voting. The theme is ‘Best Documented’. All you have to do is choose the project presented to you that is Best Documented. We’re going to let this round stew for a while but on July 17th, at around 2200 UTC, I’m going pick a random person on Hackaday.io. If that person has voted, they get a $1000 gift card. The next time I do this, there won’t be a guaranteed winner; we’re only giving out a gift card if the random person selected has voted. There will, like the other rounds of community voting, be a few consolation prizes distributed to people who have voted if no one snatches the big prize.

So what do you have to do for a chance at winning a $1000 gift card? Click here and vote. Do it now.

Optics Laboratory Made From LEGO

16A lot of engineers, scientists, builders, makers, and hackers got their start as children with LEGO. Putting those bricks together, whether following the instructions or not, really brings out the imagination. It’s not surprising that some people grow up and still use LEGO in their projects, like [Steve] who has used LEGO to build an optics lab with a laser beam splitter.

[Steve] started this project by salvaging parts from a broken computer projector. Some of the parts were scorched beyond repair, but he did find some lenses and mirrors and a mystery glass cube. It turns out that this cube is a dichroic prism which is used for combining images from the different LCD screens in the projector, but with the right LEGO bricks it can also be used for splitting a laser beam.

The cube was set on a LEGO rotating piece to demonstrate how it can split the laser at certain angles. LEGO purists might be upset at the Erector set that was snuck into this project, but this was necessary to hold up the laser pointer. This is a great use of these building blocks though, and [Steve] finally has his optics lab that he’s wanted to build for a while. If that doesn’t scratch your LEGO itch, we’ve also featured this LEGO lab which was built to measure the Planck constant.