Bluetooth HID Gamepad And HC-05 Serial Hack

“Which came first, the chicken or the egg?” Don’t bother us with stupid questions, they both co-evolved into the forms that we now serve up in tasty sandwiches or omelets, respectively. “Which came first, the HC-05 serial-flash-hack, or the wireless Bluetooth Gamepad?” Our guess is that [mitxela] wanted to play around with the dirt-cheap Bluetooth modules, and that building the wireless controller was an afterthought. But for that, it’s a well-done afterthought! (Video below the break.)

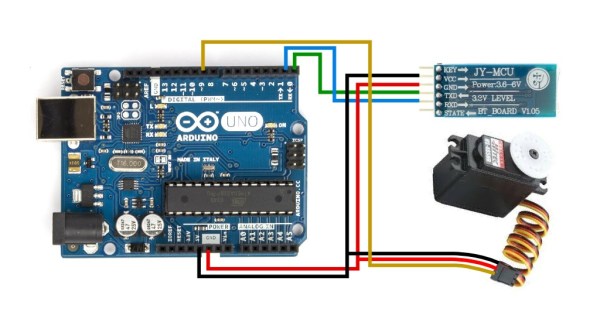
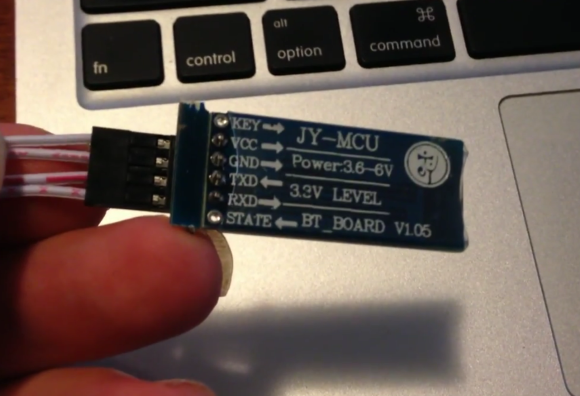
It all starts with the HC-05 Bluetooth module, which is meant to transfer serial data, but which can be converted into a general-purpose device costing ten times as much with a simple Flash ROM replacement. The usual way around this requires bit-banging over a parallel port, but hackers have worked out a way to do the same thing in bit-bang mode using a normal USB/Serial adapter. The first part of [mitxela]’s post describes this odyssey.

Continue reading “Bluetooth HID Gamepad And HC-05 Serial Hack”

A Power Switch For The Chromecast

Chromecasts are fantastic little products, they’re basically little HDMI sticks you can plug into any monitor or TV, and then stream content using your phone or computer as the controller. They are powered by a micro USB port in the back, and if you’re lucky, your TV has a port you can suck the juice off. But what if you want to turn it off while you use a different input on your TV so that your monitor will auto-sleep? You might have to build a power switch.

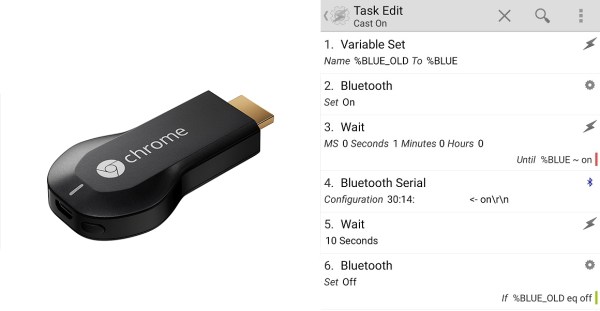
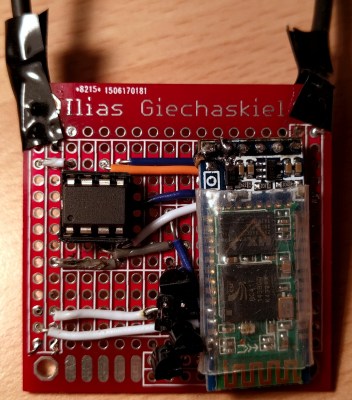
Now in all honesty, the Chromecast gets hot but the amount of power it draws when not in use is still pretty negligible compared to the draw of your TV. Every watt counts, and [Ilias] took this as an opportunity to refine his skills and combine a system using an Arduino, Bluetooth, and Android to create a robust power switch solution for the Chromecast.

The setup is rather simple. An HC-05 Bluetooth module is connected to an Attiny85, with some transistors to control a 5V power output. The Arduino takes care of a bluetooth connection and uses a serial input to control the transistor output. Finally, this is all controlled by a Tasker plugin on the Android phone, which sends serial messages via Bluetooth.

All the information you’ll need to make one yourself is available at [Ilias’] GitHub repository. For more information on the Chromecast, why not check out our review from almost three years ago — it’s getting old!

Hello RAMPS, Meet ESP8266

The proliferation of  DIY 3D printers has been helped in large measure by the awesome open-source RepRap project. A major part of this project is the RAMPS board – a single control board / shield to which all of the other parts of the printer can be easily hooked up. A USB connection to a computer is the usual link of choice, unless the RAMPS board has the SD-Card option to allow the 3D printer to operate untethered. [Chetan Patil] from CreatorBot built a breakout board to help attach either the ESP8266 WiFi or the HC-05 Bluetooth module to the Aux-1 header on the RAMPS board. This lets him stream G-code to the printer and allow remote control and monitoring.

While the cheap ESP8266 modules are the current flavor of the season with Hackers, getting them to work can be quite a hair tearing exercise. So [Chetan] did some hacking to figure out the tool chain for developing on the ESP module and found that LUA API from NodeMcu would be a good start. The breakout board is nothing more than a few headers for the ESP8266, the HC-05 and the Aux-1 connections, with a few resistors, a switch to set boot loader mode and a 3.3V regulator. If you’re new to the ESP8266, use this quick, handy, guide by [Peter Jennings] to get started with the NodeMCU and Lualoader. [Chetan]’s code for flashing on the ESP8266, along with the Eagle board design files are available via his Github repo. Just flash the code to the ESP8266 and you’re ready to go.

One gotcha to be aware of is to plug in the ESP module after the printer has booted up. Otherwise the initial communication from the ESP module causes the printer to lock up. We are sure this is something that can be taken care of with an improved breakout board design. Maybe use a digital signal from the Arduino Mega on the RAMPS board to keep the ESP module disabled for a while during start up, perhaps? The video after the break gives a short overview of the hack.

Continue reading “Hello RAMPS, Meet ESP8266”

ShakeIt – An Interactive Light Game

Learning becomes interesting when you make it fun, interactive and entertaining. [Arkadi] built ShakeIt – an interactive game for the Mini MakerFaire in Jerusalem to demonstrate to kids and grownups how light colors are mixed. It is a follow up to his earlier project – Smart juggling balls which we featured earlier.

The juggling balls consist of a 6 dof sensor (MPU 6050), a micro controller, transmitter (NRF24L01+), some addressable RGB LED’s and a LiPo battery. An external magnet activates a reed switch inside the balls and triggers them in to action. The ShakeIt light fixture consists of an Arduino Nano clone, NRF24L01+ with SMA Antenna, buck converter, 74 addressable RGB LED’s, and a bluetooth module. The bluetooth module connects to a smartphone app.

[Arkadi] starts out by handing three juggling balls, each with a predefined color (Red, Green, Blue). When the ball is shaken, the light inside the ball becomes stronger. The ShakeIt light fixture is used as a mixer. It communicates with the balls and receives the value of how strong the light inside each of the smart balls is, mixing them up, and generating the mixed color.

The fun starts when the interactive game mode is enabled. Instead of just mixing the light, the Light fixture generates patterns based on how strong the balls are shaken. At first the light fixture shows all three colors filling up the central ball. The three contenders then fight out to get their color to fill up the sphere completely until only one color remains and the winner is declared.

The kids might be learning some color theory here, but it seems the adults are having a “ball” playing the crazy game. If you’d like to build your own shoulder dislocating ShakeIt game, head over to [Arkadi]’s github repository for the ShakeIt and the Juggling Balls. Check the video below to see the adults having fun.

Continue reading “ShakeIt – An Interactive Light Game”

OK Google, Open Sesame

There are a myriad of modern ways to lock and unlock doors. Keypads, Fingerprint scanners, smart card readers, to name just a few. Quite often, adding any of these methods to an old door may require replacing the existing locking mechanism. Donning his Bollé sunglasses allowed [Dheera] to come up with a slightly novel idea to unlock doors without having to change his door latch. Using simple, off the shelf hardware, a Smartwatch, some code crunching and a Google Now app, he was able to yell “OK Google, Open Sesame” at his Android Wear smartwatch to get his apartment  door to open up.

The hardware, in his own words, is trivial. An Arduino, an HC-05 bluetooth module and a servo. The servo is attached to his door latch using simple hardware that looks sourced from the closest hardware store. The code is split in to two parts. The HC-05 listens for a trigger signal, and informs the Arduino over serial. The Arduino in turn activates the servo to open the door. The other part is the Google Now app. Do note that the code, as he clearly points out, is “barebones”. If you really want to implement this technique, it would be wise to add in authentication to prevent all and sundry from opening up your apartment door and stealing your precious funky Sunglasses. Watch a video of how he put it all together after the break. And if you’re interested, here are a few other door lock hacks we’ve featured in the past.

Continue reading “OK Google, Open Sesame”

Automatic Bluetooth Module Programmer

automatic-bluetooth-programming

Before we dive in don’t be confused by the title. This doesn’t flash firmware to the device. But it does automate the process of setting up the Bluetooth to serial module for use in your projects.

We’re often confused by the lack of a standard way of describing these inexpensive modules. We would look at this can call it an HC-05, but we’re not sure if that’s right or not. [James Daniel] calls it a JY-MCU board. If you have a handle on the differences (or lack of) please let us know in the comments. Either way we know that these boards can be frustrating to work with. They can be found with a wide variety of different firmwares, which can make the configuration process a bit different for each.

[James’] solution connects the device to an Arduino running a sketch that he wrote. Connect the device, launch the terminal monitor in the Arduino IDE, then give it your desired settings. The sketch will poll the Bluetooth module to see what speed it is set to run at. It will then establish which firmware version the board is running, displaying this info in the terminal. It then uses that information to program the board with your desired settings.

In this case [James] is using one of the modules to drive his 3D printer without being tethered to his laptop.

Continue reading “Automatic Bluetooth Module Programmer”

Two-way Bluetooth Communication Made Easy

It’s hard to imagine an easier way to set up communications between an Android device and an Arduino using Bluetooth than by following this guide. In the center of the breadboard you can see the cheap and ubiquitous HC-05 Bluetooth module. Having picked up one of these ourselves we can attest that after opening the package and holding one in your hand you may be struck with a “where do I start?” conundrum. If you’ve got an Android handset and an Arduino you start right here, then methodically replace one side of the equation at a time until your own project has a Bluetooth component and you actually understand how it works.

Hardware for the project comes in a couple of parts. The Bluetooth module wants 3.3v logic levels so that is taken into account. The image above shows a buffer chip doing the conversion, but the Fritzing schematic on the post uses a voltage divider. The software end of things consists of an Arduino sketch and an Android app. Check out all the controls on that screen. With bi-directional communications and a slew of already-configured commands this should get you up and running quickly on pretty much any possible project.

One thing to note is that there are different firmwares for these HC-05 units. For more on that see this project.

Continue reading “Two-way Bluetooth Communication Made Easy”