ESP8266 Keeps Tabs On Wood Stove Temperature

Wood heat offers unique advantages compared to more modern heating systems, especially in remote areas. But it also comes with its own challenges, namely, keeping the fire going at the optimum temperature. If it’s too cold you risk buildup in the chimney, but if you’ve got it stoked up more than necessary, you’ll end up burning through your wood faster.

To keep the fire in that sweet spot, [Jay] decided to put an ESP8266 and a thermocouple to work. Now, this might seem like an easy enough job at first, but things are complicated by the fact that the flue temperature above the stove lags considerably behind the temperature inside the stove. There’s also the fact that the top of the chimney will end up being much colder than the bottom.

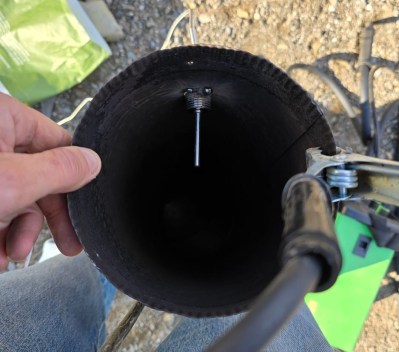
Mounting the thermocouple in the flue pipe.

In an effort to get a more complete view of what’s happening, [Jay] plans on putting at least two thermocouples in the chimney. But as getting on the roof in December isn’t his idea of fun, for now, he’s starting with the lower one that’s mounted right above the stove. He popped a hole in the pipe to screw in a standard K-type probe, and tapped it a few times with the welder to make sure it wasn’t going anywhere.

From there, the thermocople connects to a MAX6675 amplifier, and then to the WeMos D1 Mini development board that’s been flashed with ESPHome. [Jay] provides the configuration file that will get the flue temperature into Home Assistant, as well as set up notifications for various temperature events. The whole thing goes into a 3D printed box, and gets mounted behind the stove.

This project is a great example on how you can get some real-world data into Home Assistant quickly and easily. In the future, [Jay] not only wants to add that second thermocouple, but also look into manipulating the stove’s air controls with a linear actuator. Here’s hoping we get an update as his woodstove learns some new tricks.

ESP32 Powers DIY Smart Energy Meter

Energy is expensive these days. There’s no getting around it. If, like [Giovanni], you want to keep better track of your usage, you might find value in his DIY energy meter build.

[Giovanni] built his energy meter to monitor energy usage in his whole home. An ESP32 serves as the heart of this build. It’s hooked up with a JSY-MK-194G energy metering module, which uses a current clamp and transformer in order to accurately monitor the amount of energy passing through the mains connection to his home. With this setup, it’s possible to track voltage, current, frequency, and power factor, so you can really nerd out over the electrical specifics of what’s going on. Results are then shared with Home Assistant via the ESPHome plugin and the ESP32’s WiFi connection. This allows [Giovanni] to see plots of live and historical data from the power meter via his smartphone.

A project like this one is a great way to explore saving energy, particularly if you live somewhere without a smart meter or any other sort of accessible usage tracking. We’ve featured some of [Giovanni]’s neat projects before, too.
Continue reading “ESP32 Powers DIY Smart Energy Meter”

E-Ink Screen Combined With Analog Dial Is Epic Win

Analog dials used to be a pretty common way of displaying information on test equipment and in industrial applications. They fell out of favor as more advanced display technologies became cheaper. However, if you combine an analog dial with a modern e-ink display, it turns out you get something truly fantastic indeed.

This build comes to us from [Arne]. The concept is simple—get an e-ink display, and draw a dial on it using whatever graphics and scale you choose. Then, put it behind a traditional coil-driven analog dial in place of the more traditional paper scale. Now, you have an analog dial that can display any quantity you desire. Just update the screen to display a different scale as needed. Meanwhile, if you don’t need to change the display, the e-ink display will draw zero power and still display the same thing.

[Arne] explains how it all works in the writeup. It’s basically a LilyGo T5 ESP32 board with an e-ink screen attached, and it’s combined with a MF-110A multimeter. It’s super easy to buy that stuff and start tinkering with the concept yourself. [Arne] uses it with Home Assistant, which is as good an idea as any.

You get all the benefits of a redrawable display, with the wonderful visual tactility of a real analog dial. It’s a build that smashes old and new together in the best way possible. It doesn’t heart that [Arne] chose a great retro font for the dial, either. Applause all around!

Keeping Tabs On An Undergraduate Projects Lab’s Door Status

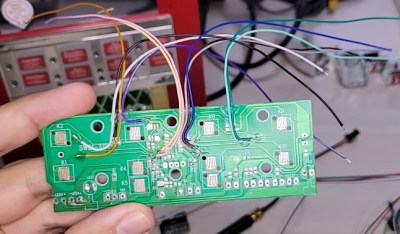
Over at the University of Wisconsin’s Undergraduate Projects Lab (UPL) there’s been a way to check whether this room is open for general use by CS undergraduates and others practically for most of the decades that it has existed. Most recently [Andrew Moses] gave improving on the then latest, machine vision-based iteration a shot. Starting off with a historical retrospective, the 1990s version saw a $15 camera combined with a Mac IIcx running a video grabber, an FTP server and an HP workstation that’d try to fetch the latest FTP image.

As the accuracy of this system means the difference between standing all forlorn in front of a closed UPL door and happily waddling into the room to work on some projects, it’s obvious that any new system had to be as robust as possible. The machine vision based version that got installed previously seemed fancy: it used a Logitech C920 webcam, a YOLOv7 MV model to count humanoids and a tie into Discord to report the results. The problem here was that this would sometimes count items like chairs as people, and there was the slight issue that people in the room didn’t equate an open door, as the room may be used for a meeting.

Thus the solution was changed to keeping track of whether the door was open, using a sensor on the two doors into the room. Sadly, the captive-portal-and-login-based WiFi made the straightforward approach with a reed sensor, a magnet and an ESP32 too much of a liability. Instead the sensor would have to communicate with a device in the room that’d be easier to be updated, ergo a Zigbee-using door sensor, Raspberry Pi with Zigbee dongle and Home Assistant (HA) was used.

One last wrinkle was the need to use a Cloudflare-based tunnel add-on to expose the HA API from the outside, but now at long last the UPL door status can be checked with absolute certainty that it is correct. Probably.

Featured image: The machine vision-based room occupancy system at UoW’s UPL. (Credit: UPL, University of Wisconsin)

Home Automation Panel Looks Industrial

Modern tech is great, but we have to admit that we sometimes miss when electronic things looked complicated. A modern computer looks dull compared to, say, an IBM 360. Control rooms now look no different than a stock trading room, instead of being full of indicators, knobs, and buzzers. [BorisDigital] must have some of those same feelings. He built a very cool control panel for his Home Assistant setup. He based it somewhat on a jet cockpit and a little on a nuclear plant control room, and the result, as you can see in the video below, is great.

This is less of a how-to video and more of an inspirational one. After all, you won’t have the same setup, but there are many details about how it was constructed with a Raspberry Pi, 3D printing, and control of the Home Assistant via web services.

Continue reading “Home Automation Panel Looks Industrial”

Home Automation Terminal Has Great Post-Apocalyptic Look

If you use home automation these days, you’re probably used to using smart speakers, your smartphone, or those tabletop touchscreen devices. If you wanted something cooler and more personal, you could try building something like [Rick] did.

A Raspberry Pi 400 is the basis for the machine, and it still uses the original keyboard. It’s paired with a 3D-printed shell with a 7″ Waveshare HDMI touch display in it. The LCD is placed behind a Fresnel lens which provides some magnification. It displays a glowing blue command line which accepts text commands. It’s hooked up to the OpenAI API, so it’s a little smarter than just any old regular terminal. It’s hooked up to [Rick’s] home automation system, so he can use natural language queries to control lighting, music, and all the rest. Think Alexa or Siri, but in text form.

The design of the case, with its rounded edges, vents, and thick bezels gives it a strong retro-futuristic look, reminiscent of something out of Fallout. [Rick’s] neat application of weathering techniques helped a lot, too.

It reminds us of some of the cooler Pip Boy builds we’ve seen. Meanwhile, if you’ve got your own creative terminal build in the works, don’t hesitate to drop us a line!

Garage Door Automation With No Extra Hardware

Home automation projects have been popular as long as microcontrollers have been available to the general public. Building computers to handle minutiae so we don’t have to is one of life’s great joys. Among the more popular is adding some sort of system to a garage door. Besides adding Internet-connected remote control to the action of opening and closing, it’s also helpful to have an indicator of the garage door state for peace-of-mind. Most add some sensors and other hardware to accomplish this task but this project doesn’t use any extra sensors or wiring at all.

In fact, the only thing added to the garage door for this build besides some wiring is the microcontroller itself. After getting the cover of the opener off, which took some effort, a Shelly Uni was added and powered by the 12V supply from the opener itself. The garage door opener, perhaps unsurprisingly, has its own way of detecting when the door is fully open or closed, so some additional wire was added to these sensors to let the microcontroller know the current state. Shelly Uni platforms have a WiFi module included as well, so nothing else was needed for this to function as a complete garage door automation platform.

[Stephen] uses Home Assistant as the basis for his home automation, and he includes all of the code for getting this platform up and running there. It wouldn’t be too hard to get it running on other openers or even on other microcontroller platforms; the real key to this build is to recognize that sometimes it’s not necessary to reinvent the wheel with extra sensors, limit switches, or even power supplies when it’s possible to find those already in the hardware you’re modifying. This isn’t always possible, though, especially with more modern devices that might already be Internet-connected but probably don’t have great security.