Recreating Unobtainium Weather Station Sensors

Imagine you own a weather station. Then imagine that after some years have passed, you’ve had to replace one of the sensors multiple times. Your new problem is that the sensor is no longer available. What does a hacker like [Luca] do? Build a custom solution, of course!

[Luca]’s work concerns the La Crosse WS-9257F-IT weather station, and the repeat failures of the TX44DTH-IT external sensor. Thankfully, [Luca] found that the weather station’s communication protocol had been thoroughly reverse-engineered by [Fred], among others. He then set about creating a bridge to take humidity and temperature data from Zigbee sensors hooked up to his Home Assistant hub, and send it to the La Crosse weather station. This was achieved with the aid of a SX1276 LoRa module on a TTGO LoRa board. Details are on GitHub for the curious.

Luca didn’t just work on the Home Assistant integration, though. A standalone sensor was also developed, based on the Xiao SAMD21 microcontroller board and a BME280 temperature, pressure, and humidity sensor. It too can integrate with the Lacrosse weather station, and proved useful for one of [Luca’s] friends who was in the same boat.

Ultimately, it sucks when a manufacturer no longer supports hardware that you love and use every day. However, the hacking community has a way of working around such trifling limitations. It’s something to be proud of—as the corporate world leaves hardware behind, the hackers pick up the slack!

Retrotechtacular: Ford Model T Wheels, Start To Finish

There’s no doubt that you’ll instantly recognize clips from the video below, as they’ve been used over and over for more than 100 years to illustrate the development of the assembly line. But those brief clips never told the whole story about just how much effort Ford was forced to put into manufacturing just one component of their iconic Model T: the wheels.

An in-house production of Ford Motors, this film isn’t dated, at least not obviously. And with the production of Model T cars using wooden spoked artillery-style wheels stretching from 1908 to 1925, it’s not easy to guess when the film was made. But judging by the clothing styles of the many hundreds of men and boys working in the River Rouge wheel shop, we’d venture a guess at 1920 or so.

Production of the wooden wheels began with turning club-shaped spokes from wooden blanks — ash, at a guess — and drying them in a kiln for more than three weeks. While they’re cooking, a different line steam-bends hickory into two semicircular felloes that will form the wheel’s rim. The number of different steps needed to shape the fourteen pieces of wood needed for each wheel is astonishing. Aside from the initial shaping, the spokes need to be mitered on the hub end to fit snugly together and have a tenon machined on the rim end. The felloes undergo multiple steps of drilling, trimming, and chamfering before they’re ready to receive the spokes.

The first steel component is a tire, which rolls down out of a furnace that heats and expands it before the wooden wheel is pressed into it. More holes are drilled and more steel is added; plates to reinforce the hub, nuts and bolts to hold everything together, and brake drums for the rear wheels. The hubs also had bearing races built right into them, which were filled with steel balls right on the line. How these unsealed bearings were protected during later sanding and grinding operations, not to mention the final painting step, which required a bath in asphalt paint and spinning the wheel to fling off the excess, is a mystery.

Welded steel spoked wheels replaced their wooden counterparts in the last two model years for the T, even though other car manufacturers had already started using more easily mass-produced stamped steel disc wheels in the mid-1920s. Given the massive infrastructure that the world’s largest car manufacturer at the time devoted to spoked wheel production, it’s easy to see why. But Ford eventually saw the light and moved away from spoked wheels for most cars. We can’t help but wonder what became of the army of workers, but it probably wasn’t good. So turn the wheels of progress.

Continue reading “Retrotechtacular: Ford Model T Wheels, Start To Finish”

Ask Hackaday: Wink Hubs, Extortion As A Service?

Wink Labs just announced that their home automation hub, the Wink Hub, is “transitioning to a $4.99 monthly subscription, starting on May 13, 2020.” Should you fail to pay the fiver every month, you will lose access to their app, voice control, and automations, which is everything it does as far as we can tell.

This is an especially bitter pill to swallow for Hub users, because the device was just that — a hub. It speaks Bluetooth, Z-Wave, ZigBee, WiFi, Kidde, and a couple other specific device protocols, interfaces with Amazon’s Alexa, has a handy Android master panel app, and had a nice “robot” system that made the automation side of “home automation” simple for normal people. In short, with its low one-time purchase price, compatibility with many devices, nice phone app, and multiple radios, it was a great centerpiece for a home-automation setup.

“Nice home automation system you’ve got there. Would be a shame if anything happened to it.”

Continue reading “Ask Hackaday: Wink Hubs, Extortion As A Service?”

Concrete USB Hub Isn’t Going Anywhere

When starting a new project, the choice of material can have a big effect on the character of the finished product. Wood is stylish and has a certain elegance to it, while polished or brushed aluminium is great for a more futuristic feel. Sometimes though, you just want big, cheap and heavy – in which case, concrete is your friend!

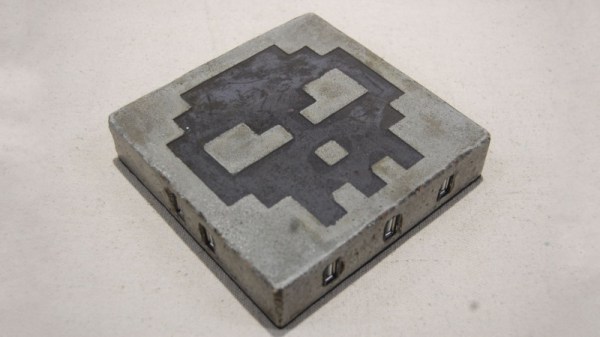
[BALES] was short on USB ports, and needed a hub with plenty of connectivity. Concrete had the benefits of being solid and heavy, and also impervious to beverages. Thus, a melamine form was produced, chosen as its surface doesn’t give the concrete anything to grab on to. A foam skull was cut out and added to create an inlay for decoration, and the 7-port octopus-style hub was placed inside.

With careful attention paid to the mixture consistency, the concrete was poured into the mold and allowed to set. Care was taken to avoid air bubbles and to ensure the mixture flowed completely into the mold, without leaving air pockets behind the inserted components. After allowing it to set for a few days, the part was demolded, with care taken to minimise edge crumbling. The foam skull was removed, and infilled with black epoxy, with a little more used to coat the top and sides of the hub. As a finishing touch, a foam pad was fitted to the base to allow it to sit on a desk without scratching everything up.

In the end, [BALES] has ended up with a hefty hub that won’t skitter around when plugging and unplugging devices. It should also serve admirably as a sturdy drink coaster on those cold winter nights. If you’re trying a similar project yourself, note that sometimes concrete can be surprisingly conductive. Video after the break.

Continue reading “Concrete USB Hub Isn’t Going Anywhere”

Printable Filament Spool Hub Skips The Bearings

When you really start fine-tuning your 3D printer, you might start to notice that even the smallest things can have a noticeable impact on your prints. An open window can cause enough of a draft to make your print peel up from the bed, and the slightly askew diameter of that bargain basement filament can mess up your extrusion rate. It can be a deep rabbit hole to fall down if you’re not careful.

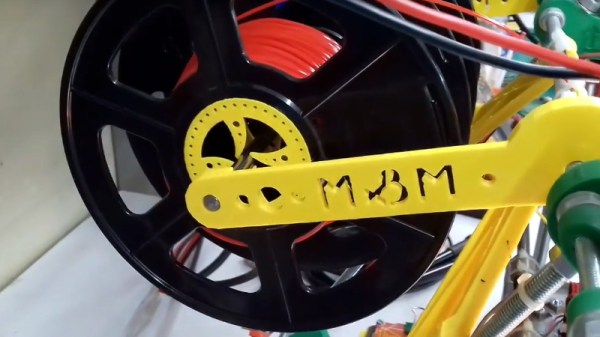
One element that’s often overlooked is the filament spool; if it’s not rotating smoothly, the drag it puts on both the extruder and movement of the print head can cause difficult to diagnose issues. For his custom built printer, [Marius Taciuc] developed a very clever printable gadget that helps the filament roll spin using nothing but the properties of the PLA itself. While the design might need a bit of tweaking to work on your own printer, the files he’s shared should get you most of the way there.

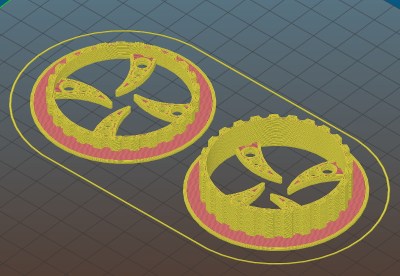
All you need to do is print out the hubs which fit your particular filament spools (naturally, they aren’t all a standard size), and snap them on. The four “claws” of the hub lightly contact a piece of 8 mm rod enough to support the spool while limiting the surface area as much as possible. The natural elasticity of PLA helps dampen the moment that would result if you just hung the hub-less spool on the rod.

The STL files [Marius] has provided for his low-friction hubs should work fine for anyone who’s interested in trying out his design, but you’ll need to come up with your own method of mounting the 8 mm rod in a convenient place. The arms he’s included are specifically designed for his customized Prusa Mendel, which is pretty far removed from contemporary desktop 3D printer design. Something to consider might be a piece of 8 mm rod suspended over the printer, with enough space that you could put a couple spools on for quick access to different colors or materials.

Hackers have been trying to solve the spool friction issue for years, and as you might expect we’ve seen some very clever designs in the past. But we especially like how simple [Marius] has made this design, and the fact that you don’t need to source bearings to build it. If you’re thinking of giving this new design a shot, be sure to leave a comment so we know how it worked out for you.

Continue reading “Printable Filament Spool Hub Skips The Bearings”

Unicycle Given A Hand Crafted Gear Box

Being able to coast on a bicycle is a feature that is often taken for granted. The use of a freewheel was an improvement made early in the bicycle’s history, for obvious reasons. This also unlocked the ability to build bikes with multiple gears, allowing higher speeds to be easily reached. On a unicycle, however, there’s no chain and the pedals are permanently fixed to the wheel’s axle, meaning that there is (usually) no freewheel and no gearing. [johnybondo] wanted to get some more speed out of his unicycle, though, and realized he could do this with his own homemade internal geared hub for his unicycle.

The internal hub gear was machined and welded by hand as a one-off prototype. There are commercial offerings, but at $1700 it’s almost best to fund your own machine shop. It uses a planet gearset which is more compact than a standard gear, allowing it to fit in the axle. Once all the machining was done, it was time to assemble all of the gears into the hub, lace it to the wheel with spokes, and start pedaling away. Since it was so successful, he plans to build another and lace it to a larger wheel which will allow him to reach even higher speeds. If this isn’t fast enough for you, personally, there are other options available for ludicrous speed.

Now, this gear is still “fixed” in the sense that it’s a permanent gear ratio for his unicycle and it doesn’t allow him to shift gears or coast. There’s no freewheel mechanism so the unicycle can still be pedaled forward and backwards like a traditional unicycle. The advantage of this setup is that the wheel spins 1.5 times for every one revolution of the pedals, allowing him to more easily reach higher speeds.

Wireless Doorbell Hacked Into Hands-on MQTT Tutorial

The project itself is very simple: getting push notifications via MQTT when a wireless doorbell sounds. But as [Robin Reiter] points out, as the “Hello, world!” program is a time-honored tradition for coders new to a language, so too is his project very much the hardware embodiment of the same tradition. And the accompanying video build log below is a whirlwind tour that will get the first-timer off the ground and on the way to MQTT glory.

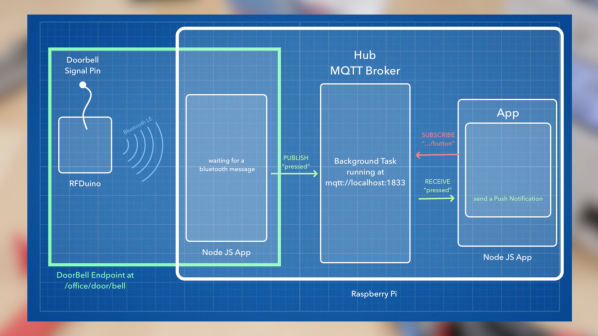
The hardware [Robin] chose for this primer is pretty basic – a wireless doorbell consisting of a battery-powered button and a plug-in receiver that tootles melodiously when you’ve got a visitor. [Robin] engages in a teardown of the receiver with attempted reverse engineering, but he wisely chose the path of least resistance and settled on monitoring the LEDs that flash when the button is pushed. An RFduino was selected from [Robin]’s ridiculously well-organized parts bin and wired up for the job. The ‘duino-fied doorbell talks Bluetooth to an MQTT broker on a Raspberry Pi, which also handles push notifications to his phone.

The meat of the build log, though, is the details of setting up MQTT. We’ve posted a lot about MQTT, including [Elliot Williams]’ great series on the subject. But this tutorial is very nuts and bolts, the kind of thing you can just follow along with, pause the video once in a while, and have a working system up and running quickly. There’s a lot here for the beginner, and even the old hands will pick up a tip or two.

Continue reading “Wireless Doorbell Hacked Into Hands-on MQTT Tutorial”