Jenkins Given An Industrial Stack Light For Build Reporting

When working on software development in a team environment, it’s important to know the status of your build at all times. Jenkins can display build automation info on a screen but where’s the fun in that? A popular office project is to build some kind of visual display of a project’s status, and [dkt01] has done just that with this stack light build monitor.

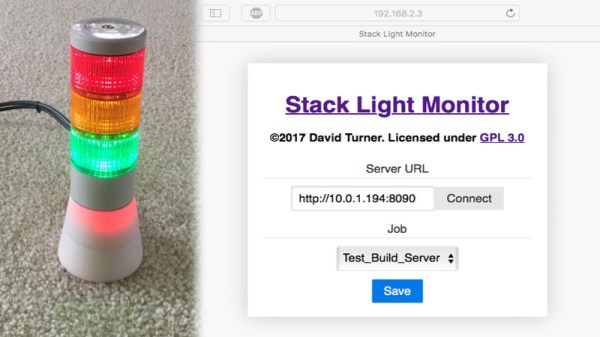
In this day and age of online shopping, random bits of industrial hardware are just an eBay away, so it’s easy to find some cool lamps or indicators for any project. [dkt01] sourced a standard 24V stack light off the shelf. With its green, red, and yellow indicators, its perfect for showing the current status of their build server.

The project uses an Arduino Pro Micro combined with an ENC28J60 Ethernet adapter. We used to see that chip all the time but in 2017 it’s somewhat of a classic setup with the great unwashed masses largely migrating to the ESP8266. However, for the purposes of this project, it was perfect for connecting to the wired office network (after all, you want to know the status of your build and not of your WiFi). [dkt01] even managed to get a web configuration to work despite the relatively meager resources of the ATmega32u4.

The build is cleanly executed, with the microcontroller and Ethernet hardware tucked into a 3D printed base for the stack light’s enclosure. It’s far more likely to become a permanent office fixture if it’s a tidy build without wires hanging out everywhere so a custom PCB ties everything together neatly. In another nice touch, the stack lights flash on initialization to indicate if the DHCP lease was successful, which makes troubleshooting easier. There’s an overview of all different light combinations and meanings in the video after the break.

Overall it’s a solid build with some off-the-shelf components that serves a genuine purpose. For a similar project built on a smaller scale, check out the Indictron. For something bigger, show us how you’ve learned to output your server status on the city’s traffic lights. Ask first, though.
Continue reading “Jenkins Given An Industrial Stack Light For Build Reporting”

Desktop Factory Teaches PLC Programming

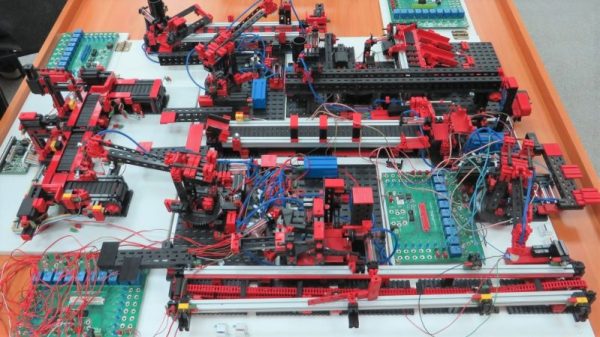
How to train young engineers in industrial automation is a thorny issue. Most factories have big things that can do a lot of damage and cost tons of money if the newbie causes a crash. Solution: shrink the factory down to desktop size and let them practice on that.

Luckily for [Vadim], there’s an off-the-shelf solution for miniaturizing factory automation: FischerTechnik industrial training models. The models have motors, conveyors, pneumatic cylinders, and sensors galore, but the controller is not exactly the industry standard programmable logic controller (PLC). [Vadim] set out to remedy this by building an interface between the FischerTechnik models and a Siemens PLC. He went through a couple of revisions of his board, including one using rivets from the sewing store to interface with the FischerTechnic connectors. Eventually, he settled on more robust connectors and came up with a board that lets students delve into PLC programming without killing anyone. The video below shows it going through its paces; we can only imagine where playing with these kits as a kid would have led us.

As great as [Vadim]’s system is for training engineers, we can also see it helpful in getting kids interested in a career in industrial automation. We recently covered a similar effort to show kids big science using LEGO Mindstorms. Both of these can help get STEM kids to see the wider world of technical careers and perhaps steer them into automation. After all, the people who make the robots are probably going to be the last ones obsoleted, right?

Continue reading “Desktop Factory Teaches PLC Programming”

Industrial Indicator Makes The Move From PLC To FPGA

Industrial controls are fun to use in a build because they’re just so — well, industrial. They’re chunky and built to take a beating, both from the operating environment and the users. They’re often power guzzlers, though, so knowing how to convert an industrial indicator for microcontroller use might be a handy skill to have.

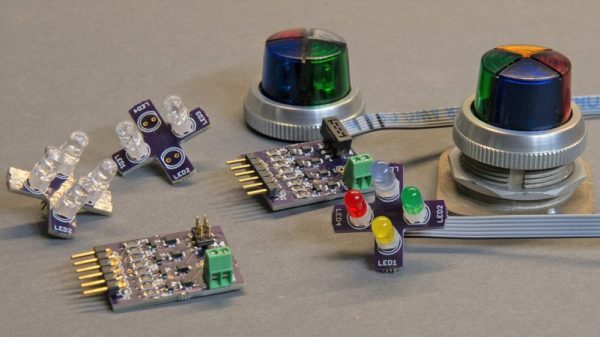
Having decided that an Allen-Bradley cluster indicator worked with the aesthetic of his project, a Halloween prop of some sort, [Glen] set about dissecting the controls. Industrial indicators usually make that a simple task so that they can be configured for different voltages in the field, and it turned out that the easiest approach to replacing the power-hungry incandescent bulbs with LEDs was to build a tiny PCB to fit inside the four-color lens.

The uniquely shaped board ended up being too small for even series resistors for the LEDs, so a separate driver board was also fabbed. The driver board is set up to allow a single 5-volt supply and logic levels of 3.3-volt or 5-volt, making the indicator compatible with just about anything. The finished product lends a suitably sinister look to the prop.

If you’re not familiar with the programmable logic controllers such an indicator would be used with in the field, then maybe you should try running Pong on a PLC for a little background.

Mod Your Camera With ModBus

Industrial hardware needs to be reliable, tough, and interoperable. For this reason, there are a series of standards used for command & control connections between equipment. One of the more widespread standards is ModBus, an open protocol using a master-slave architecture, usually delivered over RS-485 serial. It’s readily found being used with PLCs, HMIs, VFDs, and all manner of other industrial equipment that comes with a TLA (three letter acronym).

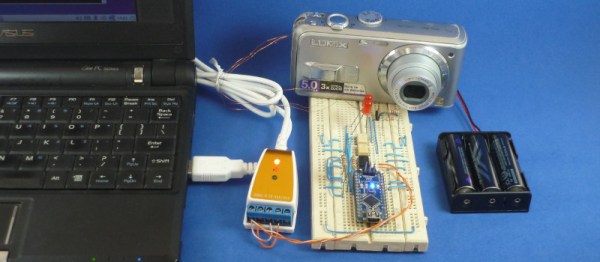
[Absolutelyautomation] decided to leverage ModBus to control garden variety digital cameras, of the type found cluttering up drawers now that smartphones have come so far. This involves getting old-school, by simply soldering wires to the buttons of the camera, and using an Arduino Nano to control the camera while talking to the ModBus network.

This system could prove handy for integrating a camera into an industrial production process to monitor for faults or defective parts. The article demonstrates simple control of the camera with off-the-shelf commercial PLC hardware. Generally, industrial cameras are very expensive, so this hack may be useful where there isn’t the budget for a proper solution. Will it stand up to industrial conditions for 10 years without missing a beat? No, but it could definitely save the day in the short term for a throwaway price. One shortfall is that the camera as installed will only save pictures to its local memory card. There’s a lot to be said for serving the images right to the engineer’s desk over a network.

We’ve seen [Absolutelyautomation]’s work before – check out this implementation of Pong on an industrial controller.

Japanese Lab Builds 5-Axis 3D Printer

A Japanese lab is investing some time in the possibilities of a 5-axis 3D printer. They show it printing using five axis as well as doing finish machining on a printed part. We’ve covered parts of why this is the right direction to go for 3D printing in another post.

It looks like they have modified an existing industrial machining center for use with a 3D printing nozzle. This feels like cheating, but it’s the right way to go if you want to start playing with the code early. The machines are intensely accurate and precise. After all, building a five axis machine is a well known science, 3D printing with one opens a whole new field of research.

There isn’t too much to show in the video, other than it’s possible and people are doing it. The Five-axis 3D printing and machining is uninteresting, we have been able to machine plastic for a long time.

However, they show one blue part in which the central axis of the part was printed vertically, but revolute splines along its outer perimeter were printed normal to the surface of the already printed 3D part. Which is certainly not commonly done. Video after the break.

Continue reading “Japanese Lab Builds 5-Axis 3D Printer”

Vacuum Gauge Display; Arduino Replaces Industrial

Arduinos! They’re a great tool that make the world of microcontrollers pretty easy, and in [cptlolalot]’s case, they also give us an alternative to buying expensive, proprietary parts. [cptlolalot] needed a gauge for an expensive vacuum pump, and rather than buying an expensive part, built a circuit around an Arduino to monitor the vacuum.

pressure-gauge-thumbThis project goes a little beyond simple Arduino programming though. A 12V to 5V power supply drives the device, which is laid out on a blank PCB. The display fits snugly over the circuit which reduces the footprint of the project, and the entire thing is housed in a custom-printed case with a custom-printed pushbutton. The device gets power and data over the RJ45 connection so no external power is needed. If you want to take a look at the code, it’s linked on [cptlolalot]’s reddit thread.
This project shows how much easier it can be to grab an Arduino off the shelf to solve a problem that would otherwise be very expensive. We’ve been seeing Arduinos in industrial applications at an increasing rate as well, which is promising not just because it’s cheap but because it’s a familiar platform that will make repairs and hacks in the future much easier for everyone.

Building An Industrial Control Unit With An Industrial Control Unit

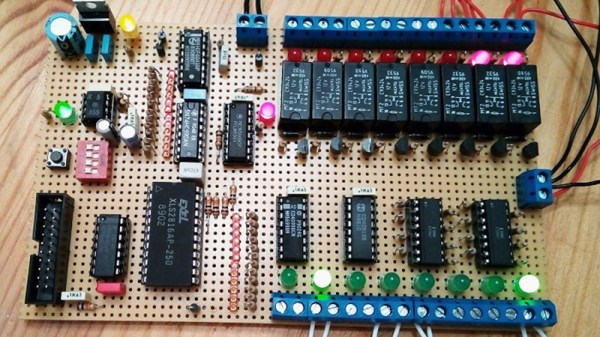
Back in the 70s, industrial control was done with either relays and ladder logic or new programmable logic controllers. These devices turned switches on and off, moved stuff around a factory, and kept the entire operation running smoothly. In the late 70s, Motorola came out with an Industrial Control Unit stuffed into a tiny chip. The chip – the MC14500 – fascinated [Nicola]. He finally got around to building an ICU out of this chip, and although this was the standard way of doing things 30 years ago, it’s still an interesting build.

[Nicola]’s ICU is extremely simple, just eight relays, eight inputs, the MC14500, a clock, and some ROM. After wiring up the circuit, [Nicola] wrote a compiler, although this chip is so simple manually writing opcodes to a ROM wouldn’t be out of the question.

To demonstrate his ICU, [Nicola] connected up an on/off switch, a start button, and a stop button. The outputs are a yellow, green, and red lamp. It’s a simple task for even a relay-based control scheme, but [Nicola]’s board does everything without a hitch.

If you’re looking for something a little more complex, we saw the MC14500 being used as an almost-CPU last year.

Video below.

Continue reading “Building An Industrial Control Unit With An Industrial Control Unit”