PHONK – A Hacker’s Fun Shortcut To Android Programming

As the common myth goes, the average human utilizes only about 10% of the true potential their smartphone is capable of. Especially when it comes to electronics projects, it seems that we often overlook how we can integrate and take advantage of their functionality here. Maybe that’s not a big surprise though — while it isn’t rocket science, getting into mobile development certainly has its hurdles and requires a bit of commitment. [Victor Diaz] figured there had to be a better way, so he went on and created PHONK, the self-contained creative scripting toolbox for Android.

PHONK is installed like any other app, and allows rapid prototyping on your Android device via JavaScript by abstracting away and simplifying the heavily boilerplated, native Java parts. So instead of setting up an app from scratch with all the resources defining, UI design, activity and application lifecycle management — not to mention the Android development environment itself — PHONK takes care of all that behind the curtain and significantly reduces the amount of code required to achieve the task you’re actually interested in. In case you’re worrying now that you have to actually program on your phone, well, you can, which can definitely come in handy, but you don’t have to.

Once the app is opened, a web server is started, and connecting to it from any modern browser within the same WiFi network presents you the PHONK development environment with everything you need: editor, file browser, console, and API documentation. You can write your code in the browser, and pressing the run button will execute it straight on the device then. As everything is self-contained within the app itself, no additional software is required, and you can start right away by exploring the set of provided examples that showcase everything supported so far: sensor interaction, BLE server and client, communication protocols like MQTT or WebSockets, OpenStreetMap maps, and even integration with Pure Data and Processing. Attach a USB OTG cable and you can program your Arduino, have serial communication, or interface a IOIO board. You can even connect a MIDI controller.

This is really impressive work done by [Victor], and a lot of attention to detail went into the development. If you have an old Android phone collecting dust somewhere, this would be a great opportunity to revive it and build something with it. And as [Victor] writes on the project’s GitHub page, he’s always curious what people will come up with. If you’re thinking about building a mobile sensor lab, or want to learn more about the sensors inside your phone, have a look at the 36C3 talk about phyphox.


Ask Hackaday: Why Aren’t We Hacking Cellphones?

When a project has outgrown using a small microcontroller, almost everyone reaches for a single-board computer — with the Raspberry Pi being the poster child. But doing so leaves you stuck with essentially a headless Linux server: a brain in a jar when what you want is a Swiss Army knife.

It would be a lot more fun if it had a screen attached, and of course the market is filled with options on that front. Then there’s the issue of designing a human interface: touch screens are all the rage these days, so why not buy a screen with a touch interface too? Audio in and out would be great, as would other random peripherals like accelerometers, WiFi, and maybe even a cellular radio when out of WiFi range. Maybe Bluetooth? Oh heck, let’s throw in a video camera and high-powered LED just for fun. Sounds like a Raspberry Pi killer!

And this development platform should be cheap, or better yet, free. Free like any one of the old cell phones that sit piled up in my “hack me” box in the closet, instead of getting put to work in projects. While I cobble together projects out of Pi Zeros and lame TFT LCD screens, the advanced functionality of these phones sits gathering dust. And I’m not alone.

Why is this? Why don’t we see a lot more projects based around the use of old cellphones? They’re abundant, cheap, feature-rich, and powerful. For me, there’s two giant hurdles to overcome: the hardware and the software. I’m going to run down what I see as the problems with using cell phones as hacker tools, but I’d love to be proven wrong. Hence the “Ask Hackaday”: why don’t we see more projects that re-use smartphones?

Continue reading “Ask Hackaday: Why Aren’t We Hacking Cellphones?”

camera dolly

Timelapse Photography On An Android-Powered Dolly

If you’re heading off on a trip to Alaska, you need to make sure you have plenty of supplies on hand for the wilderness that awaits. If you’re [Bryce], that supply list includes some interesting photography equipment, including a camera dolly that he made to take time-lapse video of the fantastic scenery.

On the hardware side, the dolly carries the camera on a rail that is set up on a slant. The camera starts on one side and moves up and towards the otherside which creates a unique effect in the time-lapse. The rig is driven by a stepper motor, and rides on some pretty fancy bearings. The two cameras [Bryce] plans to use are a Canon T2i and a EOS-M which sit on the top from a tripod.

The software and electronics side is interesting as well. Instead of the usual Arduino, [Bryce] opted for controlling the rig through Android and a IOIO board. This gives the project a lot of options for communications, including Bluetooth. The whole thing is powered by a 19V battery pack. If you’re looking for something a little simpler, you might want to check out the egg timer for time lapse! Check out the video of [Bryce]’s rig in action after the break.

Continue reading “Timelapse Photography On An Android-Powered Dolly”

Repairing And Adding Bluetooth Control To An Induction Cooker

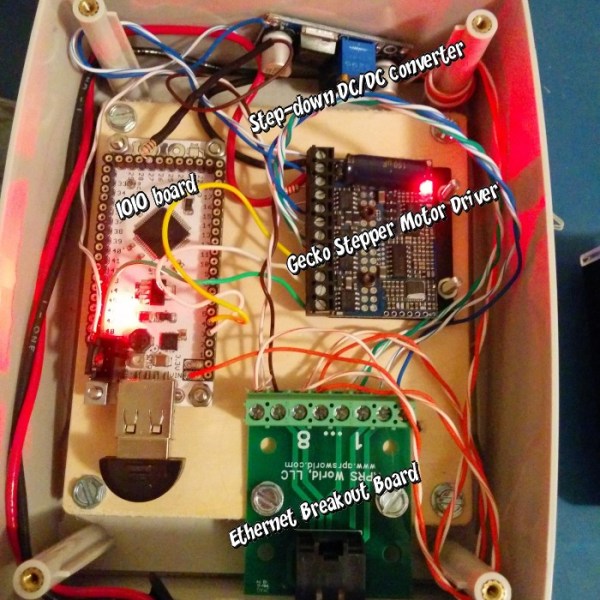
When his 6 years old induction cooker recently broke, [Johannes] decided to open it in an attempt to give it another life. Not only did he succeed, but he also added Bluetooth connectivity to the cooker. The repair part was actually pretty straight forward, as in most cases the IGBTs and rectifiers are the first components to break due to stress imposed on them. Following advice from a Swedish forum, [Johannes] just had to measure the resistance of these components to discover that the broken ones were behaving like open circuits.

He then started to reverse engineer the boards present in the cooker, more particularly the link between the ‘keyboards’ and the main microcontroller (an ATMEGA32L) in charge of commanding the power boards. With a Bus Pirate, [Johannes] had a look at the UART protocol that was used but it seems it was a bit too complex. He then opted for an IOIO and a few transistors to emulate key presses, allowing him to use his phone to control the cooker (via USB or BT). While he was at it, he even added a temperature sensor.

LED-Guided Piano Instruction

LEDpianoGuide

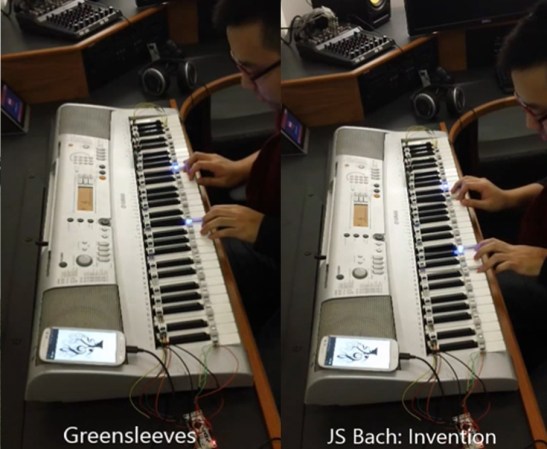
[Kay Choe] can’t play the piano. Rather, he couldn’t, until he converted his keyboard to include LED-guided instruction. [Kay] is a microbial engineering graduate student, and the last thing a grad student can afford is private music lessons. With $70 in components and a cell phone, however, he may have found a temporary alternative.

The build works like a slimmed-down, real-world Guitar Hero, lighting up each note in turn. We’ve seen a project like this before, with the LEDs mounted above the keys. [Kay]’s design, however, is much easier to interpret. He embedded the LEDs directly into the keys, including ones above each black key to indicate the sharps/flats. An Android app takes a MIDI file of your choice and parses the data, sending the resulting bits into an IOIO board via USB OTG. A collection of shift registers then drives the LEDs.

For a complete novice, [Kay] seems to benefit from these lights. We are unsure whether the LEDs give any indication of which note to anticipate, however, as it seems he is pressing the keys after each one lights up. Take a look at his video demonstration below and help us speculate as to what the red lights signify. If you’re an electronics savant who wants to make music without practicing a day in your life, we recommend that you check out [Vladimir’s] Robot Guitar.

Continue reading “LED-Guided Piano Instruction”

Android Pen Plotter Snaps, Processes, And Prints Pictures

android-pen-plotter

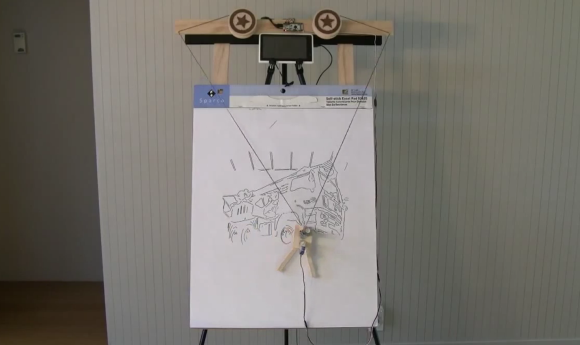
Here’s an Android powered pen plotter that does it all. It was built by [Ytai Ben-Tsvi] to take with him to Maker Faire. He’s the creator of IOIO, a hardware interface module designed to communicate with an Android device via USB (host or OTG are both supported).

The physical hardware is simple enough. He draws on a pad of white paper using a felt-tipped marker. Located at the top of the easel are two wheels with stars etched on them. They are reels which spool and dole-out string to control the pen’s movements. The pen tip can be lifted by a ball bearing mounted just below it.

But the project really takes off when you watch [Ytai’s] demonstration. The Android tablet controlling the device captures a picture of an object — in this case it’s a toy truck. The app then processes it using edge detection to establish how to plot the image.

Continue reading “Android Pen Plotter Snaps, Processes, And Prints Pictures”

Putting The Brains Of A Reverse Geocache On The Outside

ioio

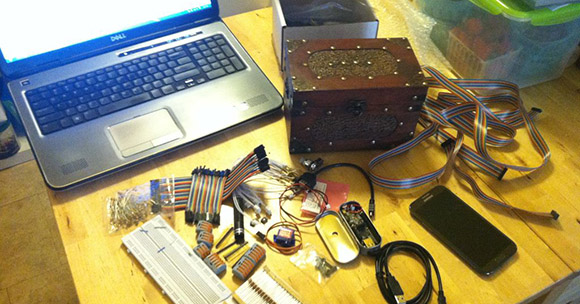
A reverse geocache – a box that only opens in a specific geographical area – is a perennial favorite here at Hackaday. We see a ton of different implementations, but most of the time, the builds are reasonably similar. Of course dedicating a GPS receiver solely to a reverse geocache isn’t an inexpensive prospect, so [Eric] came up with a better solution. He’s using a smart phone as the brains of his geocache, allowing him to keep the GPS and display outside the locked box.

The build began by finding an old box and modifying it so it can be locked with a servo. The only other bits of electronics inside the box are an IOIO board, a battery pack, and an I2C EEPROM for storing a few settings. On the phone side of things, [Eric] wrote an Android app to serve as both the programming interface, UI, and GPS hardware for his reverse geocache. It’s exactly like all the other reverse geocaches we’ve seen, only this time the controls are wireless.

[Eric] put up a video demoing his reverse geocache. You can check that out after the break.

Continue reading “Putting The Brains Of A Reverse Geocache On The Outside”