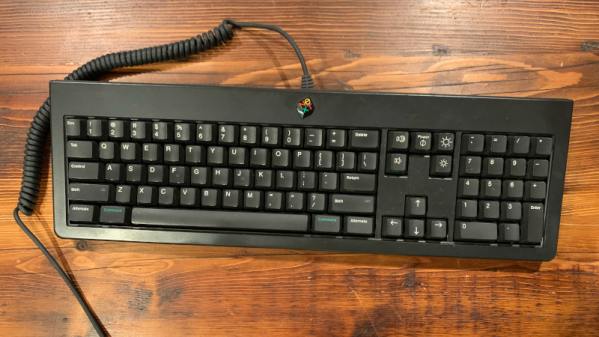
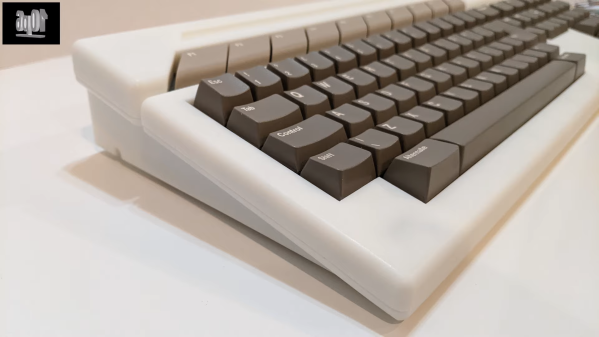
The threeboard simulator running

Threeboard: Short On Keys, Long On Documentation

As peripherals go, few are hacked on more than keyboards. The layouts, the shapes, the sizes, materials, and even the question of what a keyboard is are all on the table for tinkering. In that vein, [TaylorConor] released his simplified keyboard called the threeboard on GitHub, having only three keys and replicating a full keyboard.

We’ve covered keyboards built with chording in mind, wrapped around coffee cups, and keyboards with joysticks for added speed. So why cover this one? What makes it different? The execution is superb and is a great example to look at next time you’re making a project you want to show off. The keyboard is just three mechanical switches, two 8-bit binary displays (16 LEDs total), three status LEDs, and three LEDs showing the current layer (four layers). The detailed user’s manual explains it all. There is a reliable Atmega32U4 microcontroller and two EEPROM chips at its heart.

Where this project shows off is the testing. It has unit tests, simulated integration tests, and simulated property tests. Since all the code is in C++, unit testing is relatively straightforward. The integration and property tests are via a simulator. Rather than recompiling the code with some new flags, he uses the simavr AVR simulator, which means it simulates the same binary file that gets flashed onto the microcontroller. This approach means the design is tested and debugged via GDB. It’s an incredible technique we’d love to see more of in hobby projects. Marketing speak might call this a “digital twin” but the idea is that you have a virtual version that’s easier to work on and has a tighter iteration loop while being as close as possible to the physical version.

[TaylorConor’s] goal was to create a from-scratch microcontroller project with easy-to-read code, fantastic documentation, and best practices. We think he nailed it. So feel free to run the simulator or jump right into building one for yourself. All the hardware is under a CERN-OHL-P license, and the firmware is under GPLv3.

3D Printed Magnetic Switches Promise Truly Custom Keyboards

While most people are happy to type away at whatever keyboard their machine came with, for the keyboard enthusiast, there’s no stone to be left unturned in the quest for the perfect key switch mechanism. Enter [Riskable], with an innovative design for a 3D printed mechanism that delivers near-infinite adjustment without the use of springs or metallic contacts.

The switching itself is performed by a Hall effect sensor, the specifics of which are detailed in a second repository. The primary project simply represents the printed components and magnets which make up the switch mechanism. Each switch uses three 4 x 2 mm magnets, a static one mounted on the switch housing and two on the switch’s moving slider. One is mounted below the static magnet oriented to attract it, while the other is above and repels it.

With this arrangement the lower magnet provides the required tactility, while the upper one’s repulsive force replaces the spring used in a traditional mechanism. [Riskable] calls it the magnetic separation contactless key switch, but we think “revolutionary” has a nicer ring to it.

The part which makes this extra-special is that it’s a fully parametric OpenSCAD model in which the separation of the magnets is customisable, so the builder has full control of both the tactility and return force of the keys. There’s a video review we’ve posted below that demonstrates this with a test keypad showing a range of tactility settings.

We have a resident keyboard expert here at Hackaday in the shape of our colleague [Kristina Panos], whose Keebin’ With Kristina series has introduced us to all that is interesting in the world of textual input. She plans on taking a keyboard made of these clever switches on a test drive, once she’s extruded the prerequisite number of little fiddly bits.

Continue reading “3D Printed Magnetic Switches Promise Truly Custom Keyboards”

It's a keyboard!

The Charachorder Keyboard Is Too Fast For Competition

We interrupt the flow of Keebin’ with Kristina to bring you this special bulletin. When three different people alert you to a keyboard within 48 hours or so, it calls for more than just a paragraph in the roundup column. So here are several paragraphs, an animated GIF, and some extended commentary about the Charachorder, a new kind of input that came up through Kickstarter in 2021.

Driving this hype train are some short viral videos that show the founder hitting 500+ WPM on this crazy thing. FYI, that is fast enough to get you banned from typing competitions, including the monkeytype leaderboard. Those apes forbid chorded input altogether, and automatically throw out entries above 300 WPM. It acheives these insane speeds through clever mechanical design and, of course, firmware.

Continue reading “The Charachorder Keyboard Is Too Fast For Competition”

Raspberry Pi Pico Gets A Tiny Keyboard On Its Back

With hackers and makers building custom computing devices that don’t necessarily follow conventional design paradigms, there’s been a growing demand for smaller and smaller keyboards. Many of the cyberdecks we’ve seen over the last couple of years have used so-called 60% or even 40% keyboards, and there’s been a trend towards repurposing BlackBerry keyboards for wearables and other pocket-sized gadgets. But what if you need something even smaller?

Enter this incredibly diminutive keyboard created by [TEC.IST]. With 59 keys crammed into an area scarcely larger than three US pennies, it may well be the smallest keyboard ever made. The PCB has been designed to mount directly onto the back of a Raspberry Pi Pico, which is running some CircuitPython code to read the switch matrix and act as a standard USB Human Interface Device. The board design files as well as the source code for the Pico have been released on the project’s Hackaday.io page, giving you everything you need to spin up your own teeny tiny input device.

The Pi Pico’s castellated pads make attaching the PCB a snap.

Of course, you probably won’t be breaking any speed records when banging out text on this thing. We know from past Hackaday badges that an array of microswitches make for a functional, if somewhat unpleasant, method of text entry.

Continue reading “Raspberry Pi Pico Gets A Tiny Keyboard On Its Back”

An Atari 130XE's keyboard made mechanical with Kailh box pinks and 3D-printed keyswitch stems.

Atari 130XE Keyboard Now Goes Clack

Performing a resto-mod on a beloved piece of childhood technology can be quite a ride. In [Bertrand]’s case, it was the keyboard to their Atari 130XE. Although it has those cool double-shot keycaps, they’re hiding a crappy membrane underneath that could really benefit from a mechanical upgrade. Relax — the membrane part was broken.

[Bertrand] designed and printed some new stems for Kailh box pinks that can accept both of the two known variants instead of the standard Cherry MX receptacle. He also made a new PCB (natch) and a keyboard adapter to replace the membrane interface, and had a steel keyswitch plate custom cut. The so-called Atari 130MX mod can be used with an Atari 130XE computer, or as a regular keyboard for a PC if you solder in a Pico.

[Bertrand] says that this labor of love was meant to be reproduced and told us that for some folks in the Atari community, it’s already on like Donkey Kong. If you’re going to attempt this mod, know that filament printers won’t work well at all for these tiny and precise parts. [Bertrand] printed the stems on an Elegoo with a resolution of 1/20 mm (50 micrometers). On the bright side, old-new stock Atari keycaps are not that hard to find. Check it out after the break.

We love to see vintage keyboards get modern upgrades. Did you see the nuclear missile silo keyboard/trackball combo? When we read that it came from ebay, our wallet took itself to DEFCON 1.

Continue reading “Atari 130XE Keyboard Now Goes Clack”

The Operator Input Device in a Minuteman II Missile Silo computer

Nuclear Missile Silo Keyboard Re-Launched In USB

When [jns] and their colleague came across an industrial or possibly military grade keyboard/trackball combo on eBay, their minds did the same backflips that yours or mine might. Enthralled by the specialty key caps, the custom layout, and companion trackball adorned with its own keys rather than buttons [jns] and his workmate they did the only thing that infatuated hackers can do: They each bought one! [jns]’s goal? Make it work via USB.  Everything’s been documented in both software and in a very well done video that you can see below the break.

The OID in its natural habitat, a Minuteman Missile installation
The OID its its natural habitat, a Minuteman III installation (U.S. Air Force photo)

After doing some digging, they found that the keyboard and trackball combination was used in Minuteman III nuclear missile silos beginning in the early 1990’s, when the REACT program replaced aging cold war era computers and communications systems with simpler, more flexible systems.

Since the eBay auction came with only the keyboard and trackball, and not the entire Minuteman III outfit, using the new keyboard in its native habitat and wielding nuclear launch capabilities was right out the door. Instead, [jns] focused on reverse engineering the keyboard and trackball, collectively known as the OID (Operator Input Device) for use via USB.

In the video, [jns] goes into more detail about the discovery of reed switched keys, the RS422 protocol being used, blowing up an Arduino Pro Micro, and even repairing the aging trackball. Success was had, and he’s graciously shared the software and hardware design with the world.

If industrial and military grade control hardware gets your hacker juices flowing, you’ll not want to miss that time we covered a control console from a nuclear power plant for sale. Have you been working on any tantalizing, weird, obscure keyboards or equipment with far too many buttons and blinkenlights for your own good? Be sure to let us know about it via the Tip Line!

Continue reading “Nuclear Missile Silo Keyboard Re-Launched In USB”

N-Gage Controller Uses All The Buttons

If there’s anything you can guarantee about a video game system, it’s that in 20 years after one suffers a commercial failure there will be a tiny yet rabid group of enthusiasts obsessed with that system. It’s true for the Virtual Boy, the Atari Jaguar, and of course, the Nokia N-Gage. For those not familiar, this was a quirky competitor of the Game Boy Advance that was also a cell phone. And for that reason it had more buttons than a four-player arcade cabinet, which has led to things like this custom controller.

Most N-Gage gaming these days takes place on emulators, this build is specifically built for the emulator experience. The original system had so many buttons that it’s difficult to get even a standard 102-key keyboard mapped comfortably to it, so something custom is almost necessary. [Lvaneede], the creator of this project, took some parts from an existing arcade cabinet he had and 3D printed the case in order to craft this custom controller. The buttons he chose are a little stiff for his liking, but it’s much better than using a keyboard.

In the video below, [Lvaneede] demonstrates it with a few of the N-Gage’s games. It seems to hold up pretty well. With backing from Sony and Sega, it’s a shame that these gaming platforms weren’t a bigger hit than they were, but there are plenty of people around with original hardware who are still patching and repairing them so they can still play some of these unique games.

Thanks to [Michael] for the tip!

Continue reading “N-Gage Controller Uses All The Buttons”