Fifty Shades Of Brown: 3D Printing With Sugar

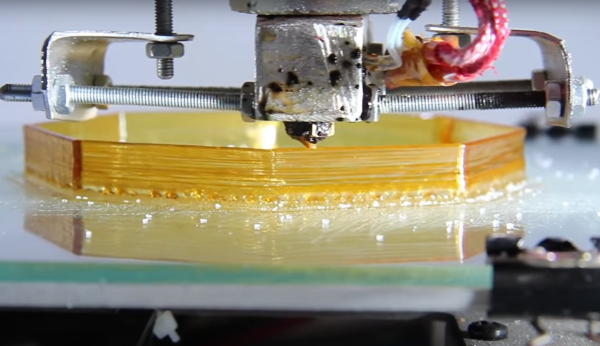
[Norbert Heinz] has been busy for the 2021 Hackaday Prize entry, working on the design of a direct granule extruder for 3D printing with waste materials, or materials that are not provided in the form of a filament. Sugar is pretty common in most households, so since that’s already available in granular form, [Norbert] gave 3D printing with granulated sugar a try. (Video, embedded below.)

[Editor’s note: He earned fifth place for this one! Well, not the sugar in particular, but the overall great work on granular extruders.]

Success was somewhat variable, as the gloopy material is notoriously fickle to work with, but the setup did produce some structures that stayed in one piece, at least for a while. Initially [Norbert] tried it real slow, effectively printing with the liquified sweet stuff, by dragging a molten blob of it around on the end of the extruder nozzle. Whilst this did work, the resulting print resolution did leave something to be desired. The next thing tried was increased print speed. This produced clearer prints, as the sugar did not have time to caramelise, or form a noticeable blob, but as soon as the bed started to cool, it caused it to crack badly.

Going slow seemed to be the way forward, as more time to cool may have reduced the stresses in the structure due to the increased cooling time. But anyway, the way we see it, is it’s fun trying, and if it fails, you can just eat it, so long as you disregard all that food safety stuff anyway.

[Norbert] documents the granule extruder journey on the project Hackaday.io page, so it should be straightforward enough to duplicate this is you were so inclined.

We’ve covered a few sugary hacks before; Need a renewable bed adhesive? out of glue stick? try sugar as a bed adhesive! Printing in gloopy, sloppy materials is nothing new at all, we covered it nearly ten years ago.

Continue reading “Fifty Shades Of Brown: 3D Printing With Sugar”

Bring A Minitel Terminal Back To Life WIth An ESP32

Most of us who are old enough are likely to have had our first experience of an online service some time in the 1990s, either through the likes of Compuserve or via an ISP. For our French readers the online experience will have come much earlier, as a forward-thinking telecommunications environment led to every household in the country receiving a viewdata terminal. The Minitel system as it was called was a runaway success, and was only finally turned off as late as 2012. Many of the terminals survive to make a great basis for projects, and it’s one of these that [Louis H] has taken and enhanced with an ESP32.

One of the special things about this project is that unlike so many other Minitel conversions it doesn’t involve tearing into the terminal itself. Instead the PCB plugs into the socket on the back of the unit and emulates the line for the terminal to talk to. It can then be used as an SSH terminal over WiFi, or as a serial terminal for the ESP32 itself for example running a MicroPython firmware. If you can handle the French AZERTY keyboard there is no easier way to drag a viewdata terminal into the 2020s, as you can see in the video below the break.

Chez Hackaday, we love these nostalgic gems from the 1980s. Indeed we like this classic French public network so much that we’ve featured it quite a few times. Here for example is a similar project using an Arduino. Continue reading “Bring A Minitel Terminal Back To Life WIth An ESP32”

Ken Shirriff Breaks Open The Yamaha DX7

For better or worse, this synthesizer was king in the 1980s music scene. Sure, there had been synthesizers before, but none acheived the sudden popularity of Yamaha’s DX7. “Take on Me?” “Highway to the Dangerzone”?  That harmonica solo in “What’s Love Got to Do With It?”  All DX7. This synth was everywhere in pop music at the time, and now we can all get some insight from taking a look at this de-capped chip from [Ken Shirriff].

To be clear, by “look” that’s exactly what we mean in this case, as [Ken] is reverse-engineering the YM21280 — the waveform generator of the DX7 — from photos. He took around 100 photos of the de-capped chip with a microscope, composited them, and then analyzed them painstakingly. The detail in his report is remarkable as he is able to show individual logic gates thanks to his powerful microscope. From there he can show exactly how the chip works down to each individual adder and array of memory.

[Ken]’s hope is that this work improves the understanding of the Yamaha DX7 chips enough to build more accurate emulators. Yamaha stopped producing the synthesizer in 1989 but its ubiquity makes it a popular, if niche, platform for music even today. Of course you don’t need a synthesizer to make excellent music. The next pop culture trend, grunge, essentially was a rebellion to the 80s explosion of synths and neon colors and we’ve seen some unique ways of exploring this era of music as well.

Thanks to [Folkert] for the tip!

ESP32 Brings Air Purifier Online With Home Assistant

A lot of hackers are rightfully concerned about the privacy issues that surround many of today’s “smart” gadgets, but it’s hard to argue that the ability to remotely control devices around your home isn’t convenient. Enter self-hosted, open source projects like Home Assistant. This provides the framework for building out a home automation system without having your soul information sold, but as you might expect, you’re going to have to put some effort in to get the most of it.

For example, take a look at this Phillips AC4014 air purifier that [Anton] connected to Home Assistant by way of an ESP32. Rather than getting too bogged down in reverse engineering the purifier’s surprisingly complex internal electronics, he took the easy way out and wired a couple of relays across the power and fan speed buttons; this allows the device to be easily controlled by the microcontroller, without impacting the functionality of the original controls.

But since those front panel controls still work, that meant [Anton] needed a way for the ESP32 to detect the device’s status and report that to Home Assistant so everything stayed in sync. So he looked around on the PCB for a trace that got powered up when the air purifier was up and running, which he connected to a pin of the microcontroller through a transistor. This let’s the firmware determine if the machine is running or not just by checking if the appropriate pin has gone high.

Speaking of the firmware, [Anton] decided to use ESPHome rather than trying to write his own code from scratch. This project allows you to rapidly add new devices to Home Assistant by providing the firmware with a relatively simple YAML configuration file, which he’s provided as an example. In fact, he’s provided quite a lot of examples with this project, down to an annotated image of the PCB that shows where to tap your wires into. He’s done quite a service for anyone who’s got this same model of air purifier.

This unit doesn’t appear to have any capability of actually checking the quality of the air in the room, but we’ve recently seen a low-cost IKEA product that can do exactly that. Even better, it can be easily modified to report its findings over the network using the ESP8266.

Inverted Pendulum Balanced On A Drone

[Nicholas Rehm] works during the day at the Applied Physics Laboratory at Johns Hopkins, Maryland, so has considerable experience with a variety of UAV applications. The question arose about how the perseverance mars rover landing worked, which prompted [Nicholas] to hang a rock under his drone, attached via a winch. This proved to be interesting. But what is more interesting for us, is what happens when you try to attach an inverted pendulum to the top of a drone in flight? (video embedded, below)

This is a classic control theory problem, where you need to measure the angle of the pendulum with respect to the base, and close the loop by calculating the necessary acceleration from the pendulum angle. Typically this is demonstrated in one dimension only, but it is only a little more complicated to balance a pendulum with two degrees of freedom.

[Nicholas] first tried to derive the pendulum angle by simply removing the centering springs from an analog joystick, and using it to attach the pendulum rod to the drone body. As is quite obvious, this has a big drawback. The pendulum angle from vertical is now the sum of the joystick angle and the drone angle, which with the associated measurement errors, proved to be an unusable setup. Not to be discouraged, [Nicholas] simply added another IMU board to the bottom of the pendulum, and kept the joystick mechanism as a pivot only. And, as you can see from the video after the break, this indeed worked.

The flight controller is [Nicholas’] own project, dRehmFlight (GitHub), which is an Arduino library intended for the Teensy 4.0, using the ubiquitous MPU6050 6-DOF IMU. [Nicholas] also made an intro video for the controller, which may prove instructive for those wishing to go down this road to build their own VTOL aircraft. The code for pendulum experiment is not available at the time of writing, perhaps it will hit the GitHub in the future?

Continue reading “Inverted Pendulum Balanced On A Drone”

Surfboard Gets Jet Upgrades

Surfing is a fun and exciting sport but a lot of beginners can get discouraged with how little time is spent actually riding waves while learning. Not only are balance and wave selection critical skills that take time to learn, but a majority of time in the water is spent battling crashing waves to get out past the breakers. Many people have attempted to solve this problem through other means than willpower alone, and one of the latest attempts is [Andrew W] with a completely DIY surfboard with custom impeller jet drives.

The surfboard is hand-made by [Andrew W] himself using a few blocks of styrofoam glued together and then cut into a generic surfboard shape. After the rough shaping is done, he cuts out a huge hole in the back of the board for the jet drive. This drive is almost completely built by [Andrew] as well including the impeller pumps themselves which he designed and 3D printed. The pair of impellers are driven by some beefy motors and a robust speed controller that connects wirelessly to a handheld waterproof throttle to hold while surfing. Once everything was secured in the motor box the surfboard was given a final shaping and then glassed. The final touch was an emergency disconnect attached to a leash so that if he falls off the board it doesn’t speed away without him.

The build is impressive not only for [Andrew]’s shaping skills but for his dedication to a custom jet drive for the surfboard. He spent over a year refining the build and actually encourages people not to do this as he thinks it took too much time and effort, but we’re going to have to disagree with him there. Even if you want to try to build something a lot simpler, builds like these look like a lot of fun once they’re finished. The build seems flawless and while he only tested it in a lake we’re excited to see if it holds up surfing real waves in an ocean.

Continue reading “Surfboard Gets Jet Upgrades”

N-Gage Controller Uses All The Buttons

If there’s anything you can guarantee about a video game system, it’s that in 20 years after one suffers a commercial failure there will be a tiny yet rabid group of enthusiasts obsessed with that system. It’s true for the Virtual Boy, the Atari Jaguar, and of course, the Nokia N-Gage. For those not familiar, this was a quirky competitor of the Game Boy Advance that was also a cell phone. And for that reason it had more buttons than a four-player arcade cabinet, which has led to things like this custom controller.

Most N-Gage gaming these days takes place on emulators, this build is specifically built for the emulator experience. The original system had so many buttons that it’s difficult to get even a standard 102-key keyboard mapped comfortably to it, so something custom is almost necessary. [Lvaneede], the creator of this project, took some parts from an existing arcade cabinet he had and 3D printed the case in order to craft this custom controller. The buttons he chose are a little stiff for his liking, but it’s much better than using a keyboard.

In the video below, [Lvaneede] demonstrates it with a few of the N-Gage’s games. It seems to hold up pretty well. With backing from Sony and Sega, it’s a shame that these gaming platforms weren’t a bigger hit than they were, but there are plenty of people around with original hardware who are still patching and repairing them so they can still play some of these unique games.

Thanks to [Michael] for the tip!

Continue reading “N-Gage Controller Uses All The Buttons”