Dual Screen Laptop Is A Slick DIY Build

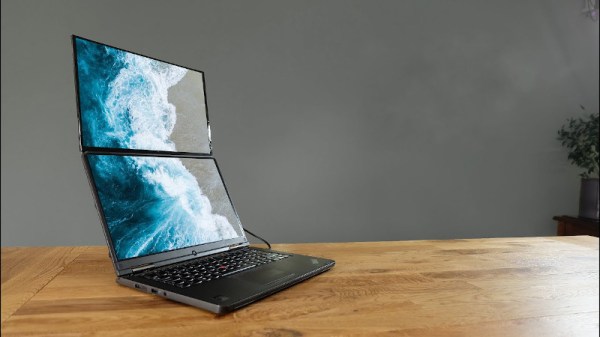
Laptops are great for portable productivity, but ergonomically they can leave something to be desired. They tend to force the user to look down, creating neck strain over extended periods. Rather than invest in expensive massages, [DIY Perks] decided what he really wanted was a dual screen laptop. So he built one! (Video embedded below.)

The build stats with a replacement laptop screen sourced from eBay, a nice full-HD IPS unit with a matching Embedded DisplayPort driver to enable the screen to be driven with the laptop’s existing HDMI port. To power the display, a USB-C Power Delivery board is used, in combination with a high-quality USB-PD compliant battery pack. This provides the 12 V required to run the screen.

To integrate the screen into the laptop, a set of 3D-printed hinges are used to create a folding mechanism, along with a brushed aluminium backing plate. Finished with a set of 3D-printed bezels, the final result is quite attractive from the front, looking almost stock at a glance.

It’s a build that may prove enticing to serious laptop professionals, particularly those that are willing to trade-off productivity against a little added bulk. We’ve seen other great work from [DIY Perks] before too, like these versatile LED panel lights. Video after the break.

Continue reading “Dual Screen Laptop Is A Slick DIY Build”

Modern Linux Runs On Ancient Toshiba

While Microsoft no longer supports those of its operating systems that were in heavy use into the early 2000s, support for old hardware is not typically something that you will have to worry about if you run Linux on your machines. Sure, there will be driver issues from time to time, and you might have to do some things by hand, but if you’re using legacy hardware you’ll want a Linux distribution of some sort. Especially if you’re running it on one of the first laptops to ever feature a Pentium processor of any kind.

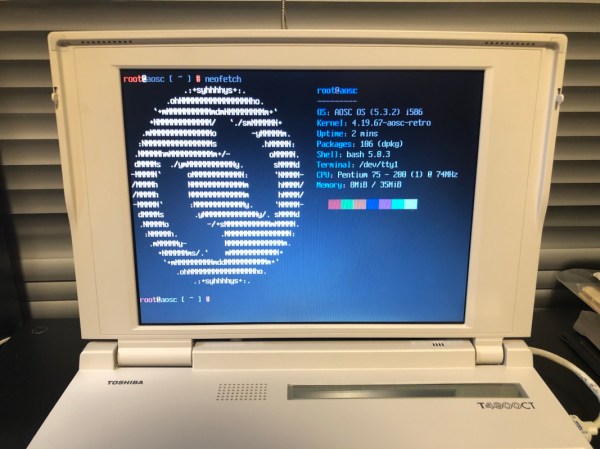
This is a Toshiba T4900CT which [MingcongBai] has been able to spruce up by installing a simplified version of the AOSC OS Linux distribution. The distribution is known for its simplified user interface, and this particular one runs a “Retro” command-line-only version. Upon startup (which takes over two minutes), the user can view the hardware and software specs: Linux kernel 4.19.67 (released within the past year) on a 75 MHz Intel processor.

Getting old equipment to work, even if the software is available, is a challenge and this one stands out for the historical noteworthiness of the laptop. We didn’t see it connect to the Internet, but if it ever does we still keep Retro Hackaday up specifically for situations like this.

A Real All-In-One Printer Should Have A Computer In It, Too

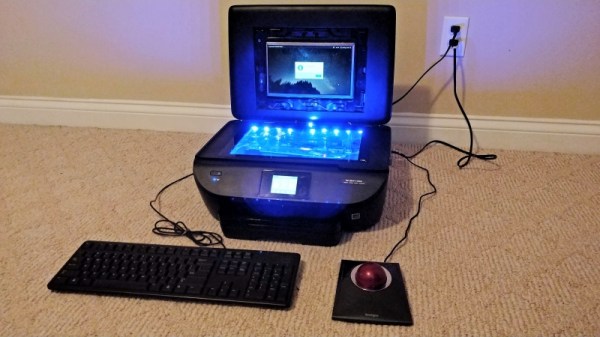
With printers generally being cheaper to replace than re-ink, there are plenty of cast-offs around to play with. They’re a great source for parts, but they’re also tempting targets for repurposing for entirely new uses. Sure, you could make a printer into a planter, but slightly more useful is this computer built into a printer that still prints.

This build is [Mason Stooksbury]’s earlier and admittedly useless laptop-in-a-printer build, which we covered a few months back. It’s easy to see where he got his inspiration, since the donor printer’s flip-up lid is a natural for mounting a display, and the capacious, glass-topped scanner bed made a great place to show off the hybrid machine’s guts. But having a printer that doesn’t print didn’t sit well with [Mason], so Comprinter II was born. This one follows the same basic approach, with a Toshiba Netbook stuffed into an H-P ENVY all-in-one. The laptop’s screen was liberated and installed in the printer’s lid, the motherboard went into the scanner bay along with a fair number of LEDs. This killed the scanner but left the printer operational, after relocating a power brick that was causing a paper jam error.

[Mason]’s Comprinter II might not be the next must-have item, but it certainly outranks the original Comprinter on the utility spectrum. Uselessness has a charm of its own, though; from a 3D-printed rotary dial number pad to a useless book scanner, keep the pointless projects coming, please.

Preserving Precious Laptop Stickers

Stickers belong on laptops. That’s not just because all developers are issued a 2015 MacBook Pro at birth to zealously hold and cherish for the rest of their careers, and the vast uniformity of laptop models in the workplace makes each individual’s laptop indistinguishable from anyone else’s. No, stickers belong on laptops because that ‘RUN GCC’ sticker is just so good. But how do you keep a laptop stickered up while not hurting the resale value or worrying about sticky residue left behind? That’s the question [Graham] answered, and the answer may surprise you.

The problem is such: there mus be a way to apply stickers to a MacBook that is invisible, removable, and leaves no trace after being removed, even after years of enjoying a bestickerd’ laptop. The first thought turned to old-style screen protectors for a phone, but this had problems: they’re glossy, and sourcing a large sheet of screen protectors proved difficult.

After some research, it turned out there was a market with similar requirements: car wraps. Yes, you can wrap your car in vinyl that’s any color you want, including whatever Apple is calling their plain aluminum finish these days. As far as a protector for an aluminum MacBook, it looks good: it doesn’t leave any residue behind, it’s strong enough to survive on a car, so it’s probably good enough for a laptop on a desk, and it’s easy to apply.

With some stickers applied to this larger sticker, everything looked good and lived up to a few months of abuse. Then came the real test: could this MacBook wrap be removed with all the other stickers intact? Yes, and you can frame the result. While this is only a test of the aluminum-colored MacBook, vehicle wraps come in nearly every color imaginable. There is apparently a vinyl that looks like Space Gray, and if you want Thinkpad Black, you can get that wrap, too.

Homebrew Laptop Makes A Statement With A Steampunk Theme

Some may argue, but your choice of computing hardware says exactly zero about you, at least when you buy off the shelf. Your laptop or PC is only one of millions, and the chances of seeing someone with the exact same machine are pretty good. If you want to be different, you really need to build something yourself.

This homebrew steampunk laptop does a great job at standing out from the crowd. [Starhawk]’s build is an homage to the Steampunk genre, in a wooden case with brass bits and bobs adorning. The guts are based on an Intel motherboard, a bit dated but serviceable enough for the job. There’s a touch-capable LCD in the lid, and we absolutely love the look of the keyboard with its retro-style chrome and phenolic keycaps. Exposed USB cables run to and fro, and the braided jackets contribute to the old-timey look. The copier roller as a lid hinge is a nice touch too.

[Starhawk]’s build log is long and detailed, and covers the entire build. We’ve seen interesting builds from him before, like this junk-bin PC build for a friend in need. Looks like this one is for personal use, though, and we can’t blame him.

A Briefcase Computer For Your Hacking Needs

Decent laptop computers have been available for decades now. Despite this, there’s still something charming and enigmatic about a computer hidden within a briefcase. [MakeFailRepeat] wanted just such a rig, so did the maker thing and built one.

The project began when [MakeFailRepeat] was donated a 15″ monitor that ran on 12V. Naturally, it needed to be used in an awesome project, and the build began. MDF panels were cut to mount the screen inside an aluminium briefcase, and covered in black felt for a pleasing look and feel. A Logitech wireless keyboard and touchpad combo is used for input. The brains of the operation is a Raspberry Pi, equipped with a UPS HAT to handle battery and mains power, and an Adafruit Speaker Bonnet for sound.

The project was inspired by the classic video game Captive, released on Amiga, Atari, and MS-DOS platforms way back in 1990. While we’re pretty sure [MakeFailRepeat] isn’t trapped on a space station, his briefcase computer should nonetheless prove useful. A computer isn’t the only thing you can build into a briefcase, though. Video after the break.

Continue reading “A Briefcase Computer For Your Hacking Needs”

Comprinter Hides A Laptop Inside A Printer

Sometimes we find projects that border on the absurd but are too cool to pass up. The Comprinter is exactly that. [Mason Stooksbury] had a dream. An all-in-one scanner printer that was also a computer. What would turn heads more than walking into a hackerspace with a printer, plugging your headphones in, then opening up the top to reveal a monitor?

[Mason’s] dream became possible when friends gave him some old laptops and a dead Kodak printer. After going through the laptops, he picked a Dell Inspiron 1440 to be the donor machine. The printer and laptop were both carefully stripped down. [Mason’s] goal for the project was to build a “beautiful” printer/computer. No bodges allowed. He spent most of his time planning out how to mount the motherboard and display inside the scanner section of the chassis.

The actual assembly was quite fiddly. Working with only an inch or so of clearance, [Mason] installed standoffs for the motherboard and display. He to do all this without breaking the wires for the display and WiFi antennas.

Once the main parts of the laptop were assembled, [Mason] completed the build with a nine-port USB hub, some internally mounted speakers and a USB keyboard mounted in the paper tray. The twelve-hour operation was a complete success. What looks to be a cheap inkjet actually hides a complete laptop running Xubuntu. The only downside is that the printer doesn’t actually print, but [Mason] is quick to note that if the printer hadn’t been broken in the first place, it would work fine — all the modifications are in the scanner section.

We’ve seen some wild casemods over the years, including a Nintendo in a toaster, a modern PC stuffed into an original Xbox, and Raspberry Pi’s stuffed into just about everything.