Very Clever 555 Bassline Synth/Sequencer

If we had a dime for every 555-based noisemaker circuit we see… But this one’s got a twist.

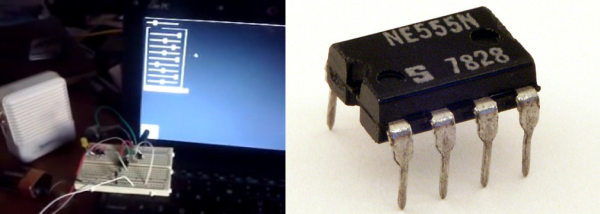
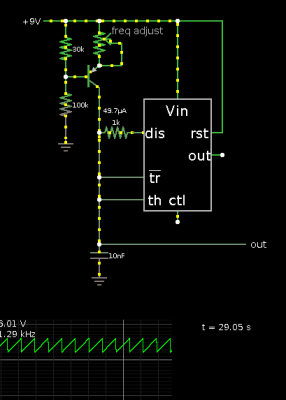
[Tristan] does two things that elevate his sawtooth-wave noisemaker above the norm. First, he gets a clean sawtooth wave out of it so that it sounds about right. Then he manages to make it more or less playable. It’s a refined version of a classic hack.
555sawtoothosc2

The first trick is a matter of putting a constant current supply upstream of the timing capacitor. The usual 555-timer circuit just charges the capacitor up from the power rails through a resistor. This is fine if all you care about is timing. But because the current is proportional to the constantly dropping voltage difference, the voltage on the capacitor is an exponential function over time.

A simple transistor current source linearizes the waveform in no time. Raw sawtooth waves are “rich in harmonics” which is synth-geek code for “a bit grating”, but it will surely do well with a little filtering. The Javascript suggests that he’s already thinking in that direction, but we’re going to need video proof!

The second cool trick up [Tristan]’s sleeve is the light-dependent resistor (LDR) that determines the pitch. Yeah, we’ve all made those before — the light-dependent “Theremin”. But [Tristan] took the extra step and wrote up a Javascript application that makes his monitor brighter and darker, enabling him to get musical pitches out of the gizmo.

We’ve always wanted to implement LED-to-LDR control while writing the Logic Noise series, but never found a reliable way to make it work. It’s cool to see [Tristan]’s efforts. Maybe we’ll pull a 555 out of the junk box in his honor.

Greet The Sun With A 555 Flute

Here’s an interesting implementation of a classic: the 555 timer as astable multivibrator for the noble purpose of making weird music. [pratchel] calls this a Morgenflöte or morning flute, indicating that it is best played in the morning. It would certainly wake up everyone in the house.

Instead of using LDRs in straight-up Theremin mode and waving his hands about, [pratchel] mounted one in each of several cardboard tubes. One tube is small and has just a few holes; this is intended to be used as a flute. [pratchel] cautions against locating holes too close to the LDR, because it will overpower the others when left uncovered. A larger tube with more holes can be used as a kind of light-dependent slide whistle with another holey tube that fits inside. We were disappointed to find that the giant tube sitting by the amplifier hasn’t been made into a contrabass flute.

Continuing the theme of astability, [pratchel] went completely solderless and built the circuit on a breadboard. The LDR’s legs are kept separate by a piece of cardboard. This kind of project and construction is fairly kid and beginner-friendly. It would be a good one for getting your musically inclined friends and family members into electronics. Here’s a 555 player piano built by Hackaday’s own [Steven Dufresne] that might be a good second step. Check out [pratchel]’s performance after the break.

Continue reading “Greet The Sun With A 555 Flute”

Power Meter

Solar Panel System Monitoring Device Using Arduino

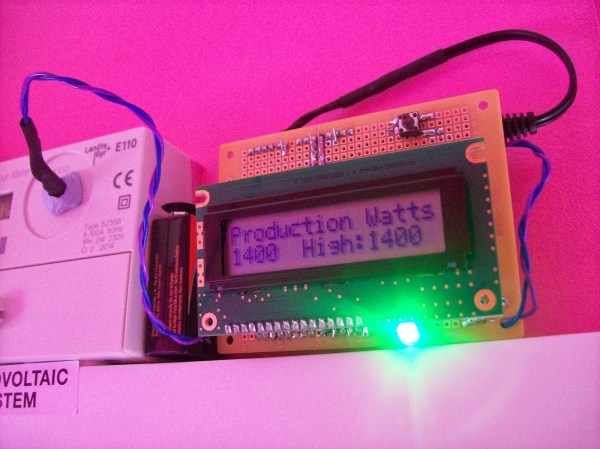
[Carl] recently upgraded his home with a solar panel system. This system compliments the electricity he gets from the grid by filling up a battery bank using free (as in beer) energy from the sun. The system came with a basic meter which really only shows the total amount of electricity the panels produce. [Carl] wanted to get more data out of his system. He managed to build his own monitor using an Arduino.

The trick of this build has to do with how the system works. The panel includes an LED light that blinks 1000 times for each kWh of electricity. [Carl] realized that if he could monitor the rate at which the LED is flashing, he could determine approximately how much energy is being generated at any given moment. We’ve seen similar projects in the past.

Like most people new to a technology, [Carl] built his project up by cobbling together other examples he found online. He started off by using a sketch that was originally designed to calculate the speed of a vehicle by measuring the time it took for the vehicle to pass between two points. [Carl] took this code and modified it to use a single photo resistor to detect the LED. He also built a sort of VU meter using several LEDs. The meter would increase and decrease proportionally to the reading on the electrical meter.

[Carl] continued improving on his system over time. He added an LCD panel so he could not only see the exact current measurement, but also the top measurement from the day. He put all of the electronics in a plastic tub and used a ribbon cable to move the LCD panel to a more convenient location. He also had his friend [Andy] clean up the Arduino code to make it easier for others to use as desired.

SenseLamp Automates Rooms By Replacing Light Fixtures

senselamp

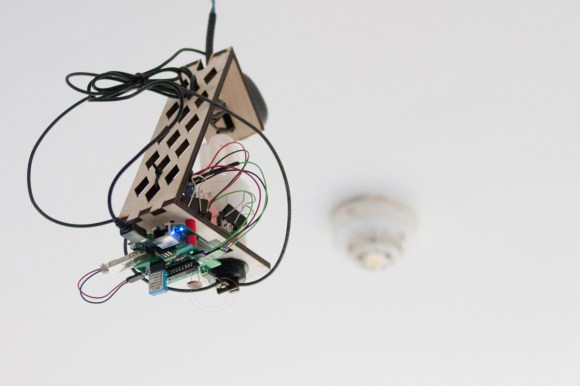
Would you believe that this beautiful light fixture is actually a hacked together home automation project? Okay, so this wire mess is the second of three versions that [Christian] built. It replaces a light fixture in the room, but if you look closely you’ll see that there is a compact fluorescent bulb included in the build. The laser-cut frame acts as a bit of a lamp shade, while providing a place to mount the rest of the hardware.

The final version cleans things up a bit, and adds a footprint for the PIR motion sensor that he forgot to design into this version. The idea is that each lamp monitors motion in the room, switching the light on and off again as necessary. A light-dependent resistor ensures that the bulb is only powered up if the room is dark so as not to waste electricity during the day.

The build includes a sensor package that reports back temperature and humidity data. Communications are provided by a WR703N router rolled into each of the four units installed in his house. With this kind of hardware at his disposal it should be a snap to control every IR remote control device in his house via the network by adding an IR LED and some code to the lamps.

Using A Flashing LCD Monitor To Transfer Data

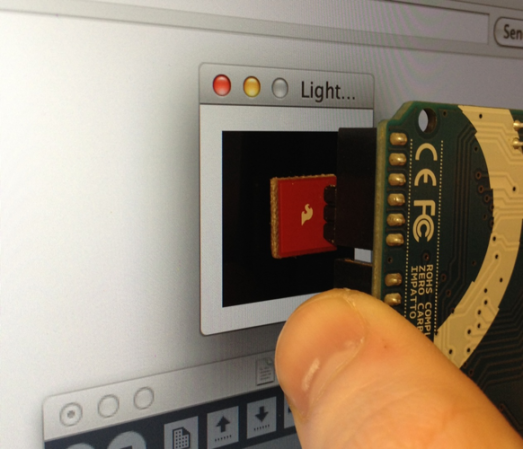
lcd-screen-data-transferWe love the concept of using an LCD screen to transfer data. The most wide-spread and successful method we know of is the combination of a QR code and the camera on a smart phone. But for less powerful/costly devices data can be transferred simply by flashing colors on the screen. That’s what [Connor Taylor] is testing out with this project. He’s using a TEMT6000 light sensor to turn a white and black flashing monitor into binary data.
So far this is just a proof of concept that takes measurements from the light sensor which is held in front of a Macbook Retina display with different backlight levels. At 3/4 and full brightness it provides more than enough contrast to reliably differentiate between black and white when measuring the sensor with the Arduino’s ADC. What he hasn’t gotten into yet is the timing necessary to actually transfer data. The issue arises when you need to have multiple 1’s or 0’s in a row. We’ve tried this ourselves using an LDR with limited success. We know it’s possible to get it working since we’ve seen projects like this clock which can only be programmed with a flashing screen.

[Connor’s] choice of the TEMT6000 should prove to be a lot more sensitive than using just an LDR. We figure he could find a way to encode using multiple colors in order to speed up the data transfer.

Pair Of Musical Hacks Use Sensor Arrays As Keyboards

sensor-driven-musical-keyboards

This pair of musical keyboard hacks both use light to detect inputs. The pair of tips came in on the same day, which sparks talk of consipiracy theory here at Hackaday. Something in the weather must influence what types of projects people take on because we frequently see trends like this one. Video of both projects is embedded after the jump.

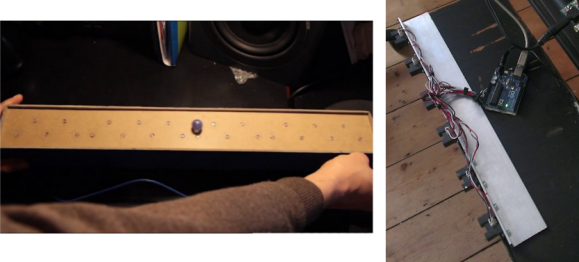
On the left is a light-sensitive keyboard which [Kaziem] is showing off. In this image he’s rolling a marble around on the surface. As it passes over the Cadmium Sulfide sensors (which are arranged in the pattern of white and black keys from a piano keyboard) the instrument plays pitches based on the changing light levels. [Thanks Michael via Make]

To the right is [Lex’s] proximity sensor keyboard. It uses a half-dozen Infrared proximity sensor which pick up reflected light. He calls it a ‘quantised theremin’ and after seeing it in action we understand why. The overclocked Raspberry Pi playing the tones reacts differently based on distance from the keyboard itself, and hand alignment with the different sensors.

Continue reading “Pair Of Musical Hacks Use Sensor Arrays As Keyboards”

Humble Beginnings Of A Home Automation Project

humble-beginnings-to-a-home-automation-project

This board is the start of [Steven Pearson’s] quest to automate his home. The module will be used to prototype the rest of the project. Right now it uses an ATmega328 chip running the Arduino bootloader. This connects to one mechanical relay which we would wager is mains rated. The module will be controlled wirelessly via the wireless module seen in the foreground. That is a nRF24L01 board which he chose because of it’s bargain basement price tag of around $1.50.

There is much room for expansion in the system. You can see that a light-dependent resistor has been added to some of the microcontroller’s breakout pins. We would guess that [Steven] will use the hardware to develop for many different functions and will design more task-specific modules as the project progresses.

If you’re a fan of PCB milling and population you won’t want to miss the video after the break. [Steve] posted a fast-motion video of the entire process.

Continue reading “Humble Beginnings Of A Home Automation Project”