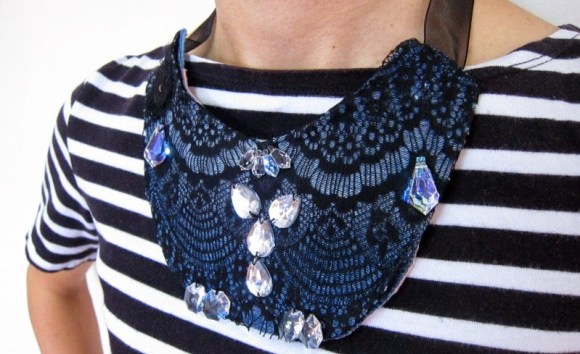
Ridiculously Over-Powered Quadrotor Spotlight Kills Battery, Blinds People

Flying quadrotors at night is awesome — but being in the dark tends to be a problem for not crashing them… Tired of not being able to get successful GoPro videos, [Diode] decided to strap a light to his quadrotor. A 3000+ lumen, 50W LED to be precise.

He found the 50W LED for $20 online with the driver! The only problem was it gets super hot. He salvaged a heat sink from an Xbox 360 which helps to keep the temperature at bay… but also increases the weight of the quad by a bit too much. Luckily his quadrotor is pretty powerful — but with the added weight, and 50W power drain, his flight time went from 15 minutes… to about 3 minutes.

Three of the most awesome minutes ever! Just watch the following video — the night-time possibilities are endless!

Continue reading “Ridiculously Over-Powered Quadrotor Spotlight Kills Battery, Blinds People”

Light Your Way To The Correct Resistor

click-and-see

Who doesn’t have issues with component storage (seriously, tell us your secret in the comments)? IF you can get your spare parts organized, it’s still quite difficult to figure out where you actually squirreled them away. Labeling drawers is one thing, but what if you have hundreds or thousands of drawers (we’re looking at you, every Hackerspace that’s been around for more than a few months). This project adds a digital cue to well-organized parts storage by lighting up the component drawer for stock selected from your computerized inventory (translated).

The idea is that all of your parts are assigned a drawer space on the computer. When you go into the index and select a part, the assigned drawer is illuminated by an LED. The setup here is a breakout board for an I2C LED driver which interfaces with a Raspberry Pi, but the concept should be easy to implement with just about any system.

Need help getting to the point where you’re organized enough to implement this? So do we. Maybe revisiting this storage roundup will help.

Hack All The Things In The Time You Save With This LED Pomodoro Timer

Do you want to use your time more productively but are tomato-averse? [Robin]’s LED Pomodoro timer could be the perfect hack for you.

The Pomodoro Technique is a time management solution developed in the late 1980s. The basic idea is to spend a very focused 25 minutes performing some activity such as working or studying and then take a 5-minute break. Many of its proponents use a tomato-shaped kitchen timer to alert them to switch between the two states, but [Robin] wanted to make his own and learn along the way.

First, he wanted to use an ATtiny85 and learn about its features. Specifically, he used its timers, PWM, and low-power sleep mode. [Robin] used Charlieplexing to drive a total of six LEDs. When the timer starts, five yellow LEDs are driven high to indicate each 5-minute slice of work time. A red LED is lit during the 5-minute break.

[Robin] also explored compact PCB design and fabrication. All components are SMD and his board is 4cm square. [Robin] is using this SMD buzzer for discrete feedback. He included a footprint for a six-pin ISP header and programmed it with pogo pins. The timer is completely interrupt-driven: one click of the tactile button starts the work counter, and the buzzer sounds when time is up. A second click starts the break counter.

[Robin] has made everything available in his GitHub repo and encourages you to use it. Time’s a-wastin’!

IKEA LED Table Mod Doesn’t LACK Awesome

Some people look at IKEA LACK tables as cheap furniture. Our readers look at them as a blank canvas. [Klaas] has turned a LACK Side table into an interactive LED table featuring 144 RGB LEDs. After attending a class on WS2801 pixel strings at his student IEEE chapter, [Klaas] was inspired to design something of his own. He settled on an IKEA LACK table and started sketching. He didn’t actually have a table on hand, so he had to deduce the size from the website images and dimensions. He calculated a usable size of around 45cm, which was pretty close to the mark. After running a few tests, [Klaas] determined that a 12×12 grid of squares 35mm on a side would provide that enough resolution to play simple games. The 35mm x 35mm grid would also be small enough for the LEDS to illuminate. He used a laser cutter to cut the an interlocking grid from 3mm MDF. A base plate with 144 12mm LED holes was also cut out, and the entire assembly was glued together.

For illumination, [Klaas] settled on WS2812B LEDs, as they were cheaper than their WS2801 couterparts. The WS2812B’s also snapped easily into his 12mm holes. At this point [Klaas] actually purchased his IKEA table and proceeded to cut a huge hole in it. The grid glued right in, and some aluminum L-profile cleaned up the top edge. Driving all those LEDs would need a bit of processing power, [Klaas] chose a Teensy 3, and the well-known OctoWS2811 library. He also added a USB host shield, which allowed him to use an Xbox 360 USB game pad as his controller. For software, he created a simple Tetris clone, and ported snake from the Arduino game shield. A menu and some scrolling text ties everything together. The only thing left to add is a glass top. [Klaas] hasn’t settled on clear or diffuse glass yet. We a suggest clear to avoid hiding any details of this great build.

Continue reading “IKEA LED Table Mod Doesn’t LACK Awesome”

LIDAR With LEDs For Under $100

If you need some sort of distance sensor for your robot, drone, or other project, you have two options: a cheap ultrasonic sensor with limited range, or an expensive laser-based system that’s top of the line. LIDAR-Lite fills that gap by stuffing an entire LIDAR module onto a small board.

In traditional LIDAR systems, a laser is used to measure the time of flight for a light beam between the sensor and an object. The very accurate clock and laser module required for this system means LIDAR modules cost at least a few hundred dollars. LIDAR-Lite gets around these problems by blinking a LED with a ‘signature’ and looking for that signature’s return. This tech is packaged inside a SoC that reduces both the cost and size of a traditional laser-based LIDAR system.

As for the LIDAR-Lite specs, it can sense objects out to 40 meters with 5% 95% accuracy, communicates to any microcontroller over an I2C bus, and is small enough to fit inside any project.

Considering the existing solutions for distance measurement for robots and quadcopters, this sensor will certainly make for some very awesome projects.

Edit: One of the guys behind this posted a link to their spec sheet and a patent in the comments

The Butt Lamp: Light From Where The Sun Don’t Shine

[Trent] is one of those guys who can make things happen. A friend of his gifted him a  mannequin derriere simply because he knew [Trent] would do something fun with it. “Something fun” turned out to be sound reactive LED butt. At first blush, this sounds like just another light organ. This butt has a few tricks up its …. sleeve which warrant a closer look. The light comes from some off the shelf 5050 style RGB LED strip. The controller is [Trent’s] own design. He started with the ever popular MSGEQ7 7 Band Graphic Equalizer Display Filter, a chip we’ve seen before. The MSGEQ7 performs all the band filtering and outputs 7 analog levels corresponding to the amplitude of the input signal in that band. The outputs are fed into an ATTiny84, which drives the RGB strip through transistors.

The ATTiny84 isn’t just running a PWM loop. At startup, it takes 10 samples from each frequency band. The 10 samples are then averaged, and used to create a noise filter. The noise filter helps to remove any ambient sound or distortions created by the microphone. Each band is then averaged and peak detected. The difference between the peak and the noise is the dynamic range for that band. The ATTiny84 remaps each analog sample to be an 8 bit value fitting within that dynamic range. The last step is to translate  the remapped signal values through a gamma lookup table. The gamma table was created to make the bright and dark colors stand out even more. [Trent] says the net result is that snare and kick drum sounds really pop compared to the rest of the music.

Without making this lamp the butt of too many jokes, we’d like to say we love what [Trent] has done. It’s definitely the last word in sound reactive lamps. Click through to see [Trent’s] PCB, and the Butt Lamp in action.

Continue reading “The Butt Lamp: Light From Where The Sun Don’t Shine”

Green Light LEGO, Red Light Stop

Master LEGO craftsman [Baron von Brunk] had the same childhood passions as a lot of us—LEGO (obviously), Transformers, and Nintendo. But he also harbored a passion for traffic lights and road signs. His latest offering, a fully functional LEGO traffic light, is some pretty fantastic plastic. You might recall that we featured [Baron von Brunk]’s LEGO mosaic lamps a few weeks ago. This project is that one on steroids.

The body is made of 1700+ LEGO and Technic pieces. [Baron von Brunk] was kind enough to provide his LDD file, though he says it should be considered a rough guide to construction. The red, yellow, and green 1×1 areas are each lit with a 48-SMD LED floodlight bulb. Colored lights are available, but he used the solid white variety for greater luminescence. The lights are driven by a traffic light controller typically used for model railroads.

[Baron von Brunk] ended up lining the inside with black 1x1s and metallic reflective duct tape to keep the light from leaking out of the masonry. He used some Technic bricks on the rear door to form hinges, and Technic pins to hold the LED lamps.