Using Binary Code Modulation To Control LED Brightness

Pulse Width Modulation is definitely the preferred method of dimming an LED with a microcontroller, but we were interested in hearing about a different method called Binary Code Modulation. BCM does the same thing as PWM, it turns the LED on and off very rapidly so that your eye cannot detect a flicker. The brightness level is a result of the average amount of time the LED is on versus when it is off. This is called duty cycle and although it can be the same percentage for both PWM and BCD, there is a fundamental difference.

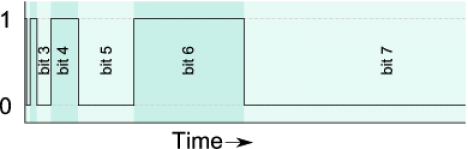
While PWM usually uses a cyclical on/off cycle (30% on, 70% off, repeat) BCD uses a cumulative cycle. As you can see above, each successive bit of binary code carries double significance compared to the previous bit. Now just assign a duty cycle based on your precision, and have an interrupt fire for each bit of the counter. The graph above shows some highs and some lows combining to reach the target duty cycle. An interrupt is used for each bit, and pin changes are made in the service routine.

The benefit of this system is that it is scaleable without adding overhead. You’re already running the interrupts so servicing 8 or 128 LEDs doesn’t have vastly different needs as it would with PWM. The big downside is that the more bits of precision you use, the faster your processor must run so that the eye doesn’t detect the lengthy on or off cycles of the higher bits as visible flickering.

Thank you [Yetihehe] for tipping us off about a link that [Tomas Martinsen] left when commenting about an Arduino library for up to 768 PWM outputs.

Race Car POV LED Displays

race_car_pov

Last year, when [Alex] was asked by his friend [Martin] to help him out with building some LED POV modules for a race car, his response was a enthusiastic “YES!”

[Martin’s] goal was to involve fans more deeply in the race, so he decided that the POV modules would carry messages from fans on-board, printing them in the night as the race cars screamed around the track. The pair started prototyping and testing a design, wrapping things up shortly before this year’s 24 hours of Nürburgring.

The modules consist of an Arduino-compatible AVR, a GPS module, a 16-LED light bar, and the circuitry for driving the LEDs. While most of the components are pretty standard fare, the we don’t often see a GPS sensor built into a POV display. [Alex] says that the sensor is used to calculate the speed of the cars, ensuring a uniform font size.

They took their LED displays to the 24 hours of Nürburgring, where they were invited by Audi to install the modules on a pair of R8 Le Mans race cars. As you can see by the pictures on his blog and Flickr set, the POV units worked out nicely without having to stretch the camera exposure times too far.

If you’ re interested to hear a bit more about how the displays were built, check out this entry in[Alex’s] blog, where he goes through some additional details.

Update:[Alex] pointed us to the videos!

Faux LED Scroller Using Phosphorescence

poor_mans_phosphorescent_led_scroller

Hackaday reader [BGR] wrote in to share a video he put together showing off a cool “poor man’s LED scroller” that he built. Rather than build a huge array of LEDs, spending tons of time time wiring and programming, he decided to use only a handful of LEDs on a moving display instead.

The scroller is built upon a PIC16F887 microcontroller which resides on an EasyPIC6 dev board he borrowed for the project. The PIC controls a strip of eight bright white LEDs, which are used to write text on a long strip of phosphorescent paper that can be found at many printing supply outfits. The paper’s dispensing mechanism was cobbled together with parts from several sources, including  a laser printer and VCR.

When he wants to display a message, he inputs text into a flash application he wrote. The app sends the LED byte values to his scroller via a separate serial proxy that talks to the pic over his computer’s COM port.

The effect is pretty slick, looking similar to a slow-moving diffused LED scroller. The messages disappear after about 5 minutes in a pitch black room, which is perfect, since he originally intended to use the device for displaying Twitter updates. He is already considering a second revision of the project, which he wants to mount on the wall – sounds great to us!

Be sure to swing by YouTube to see the video, or continue reading to watch it here.

Continue reading “Faux LED Scroller Using Phosphorescence”

Wearable Video Coat

[David Forbes] is no stranger to the weird and esoteric, so he created a color LED TV built into a lab coat. He plans on bringing it to Burning Man next month.

The RGB LEDs are mounted narrow flex boards, providing a 160×120 pixel NTSC display. Video processing is taken care of by an Xilinx FPGA that takes the YCrCb video feed from a video iPod and converts it into four separate RGB streams for the front, back, and the two sides. The requisite controls for brightness and color are on the shoulders.

Of course, the build wouldn’t be over-the-top without the ability to plug a Nintendo into a lab coat, so there’s an NTSC input on an RCA jack. Everything is powered by two 11.1 V, 5Ah radio-control LiPo battery packs that should power this for a while.

Check out a video of the LED lab coat below.

[youtube=http://www.youtube.com/watch?v=jtSm8Oom2n4&w=470]

DIY Clock Replica Is Better Than The Real Thing

diy_tix_clock

After seeing the TIX clock for the first time, [Gweedo Steevens] really wanted one, but wasn’t interested in paying the seemingly high asking price over at ThinkGeek. He figured it wouldn’t be too incredibly hard to build his own, so he decided to give it a shot.

The clock relies on 27 LEDs to display the time, which were multiplexed to make the most of his ATMega16 microcontroller’s available IO pins. Once he was happy with how things functioned on breadboard, he migrated the LEDs to a piece of perf board, and etched his own PCB for the controller circuit.

He used an office overhead lighting grate to separate the LEDs, providing nice uniform light segments. He put a piece of clear perspex on the front to cover the LEDs, but later switched it out for a much darker piece, for better daylight viewing.

The finished product is fantastic, and in our opinion looks even better than the retail version – awesome job!

[via HackedGadgets]

LED Wand For Light Painting Photography

[Michael Ross] is a photographer who has been getting into light painting recently. He’s come up with his own RGB light wand to create some amazing images, and also written a very, very thorough tutorial (PDF warning) on how to build your own light wand.

The light wand is based on an Arduino Mega board and uses an RGB LED strip based on the HL1606 controller chip. We’ve covered these LED strips before, and they’re very easy to use with the requisite library. So far, [Michael] has built a 48-LED light wand and a 16-LED wand with a 6-position program selector, making it easy to do awesome single-exposure photos like this.

[Michael] creates his images in an Excel spreadsheet – rows are which LED to address and columns are units of time. The picture data is then copied and pasted straight from the Excel worksheet to the Arduino source code. This in itself is a pretty clever use of Excel.

Check out the how [Michael] creates one of his light paintings here.

Slick 16-segment POV Hard Drive Clock

pov_hdd_clock

Hackaday reader [svofski] sent in a fantastic looking hard drive-based POV clock (Google Translation) created by a maker in the Sichuan province of China. The clock, like the one [svofski] built, relies on LEDs placed behind the spinning platter to create the POV effect.

Quite a few carefully placed cuts have been made to the platter, which make up the segments required to display both numbers and letters of the alphabet. This isn’t a simple 16-segment POV display however. The font uses a lot of sharp edges and odd segment lengths, so we’re guessing that quite a bit of care was taken in the production of this clock.

You can see a demonstration of the clock in the video embedded below, which shows off its ability to display numbers, text, as well as a handful of simple patterns. It looks like there are some details available on the designer’s site, however it is all in Chinese, and Google’s translation is questionable at best. If only we knew someone that could give us a hand with deciphering the inner-workings of this clock…

Continue reading “Slick 16-segment POV Hard Drive Clock”