YouTube Like It’s 1970s France With This Minitel-VCR Mashup

When it’s not just sticking fake gears on things and calling it a day, the Steampunk look is pretty cool. Imagining technology in a world stuck with Victorian aesthetics is a neat idea, and one that translates to the look of other time periods — Fallout, anyone?

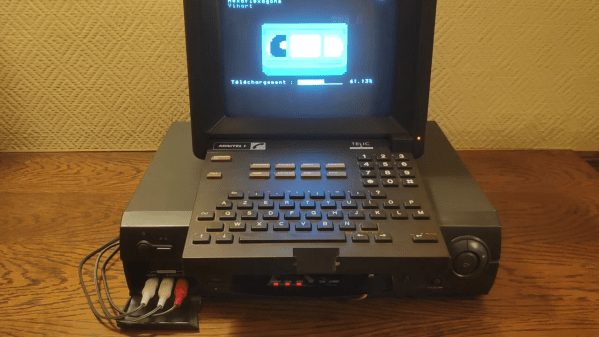
But what if you try to create a technological aesthetic based on a more recent and less celebrated time? That’s what [ghettobastler] has attempted with this somewhat bizarre Minitel-YouTube-VCR mash-up. Taking inspiration from a webcomic’s take on “Formicapunk,” modern tech based on the aesthetic of the wildly successful French videotex service of the 70s and 80s, the system uses a very cool Minitel 1B terminal and a Raspberry Pi 3.

A custom level-shifter for the Pi

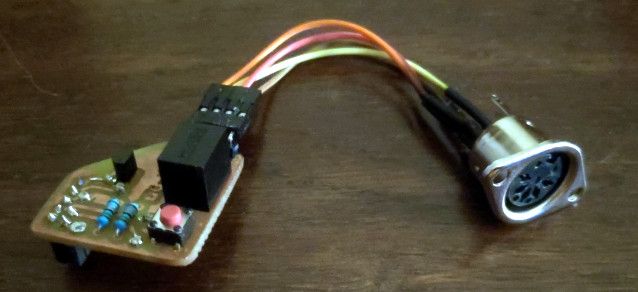
With the help of a level-shifting circuit, the Mintel and the Pi talk over serial, allowing the terminal to be used as, well, a terminal for the Pi. Videos are downloaded from YouTube by the Pi, which sends the video to the VCR from its composite output, and controls the VCR with an IR LED that emulates the original remote. Come to think of it, just watch the video below — it’s probably easier than trying to describe it.

It’s weird, true, but we love the look of that Minitel terminal. Something about it just screams cyberdeck; if anyone has a spare one of these, get busy and put something together for our Cyberdeck Design Contest.

Continue reading “YouTube Like It’s 1970s France With This Minitel-VCR Mashup”

Old Laptop? Mobile X86 Game System!

Between smartphones and tablets, computing is becoming increasingly mobile in nature. It used to be that everyone had a desktop computer, then laptops became the norm, and now many people don’t have anything beyond their mobile device. Unless you’re the kind of person who actually needs the power and versatility offered by a “real” computer, mobile devices are simply a more convenient option to browse the web and consume content.

But what if your needs are somewhere in the middle? You want an x86 computer and full operating system, but you also want something that’s more mobile than a tablet? If you’re like [mnt], you take an old Atom laptop that’s on its last legs and rebuild it as the Hacktop.

[mnt] describes the Hacktop as an “Emergency Gaming/Hacking Station”, and says he uses it everywhere he goes. Inspired by his Nintendo DSi, gaming controls are front-and-center on the Hacktop and he uses the machine to play everything from Half-Life to classic emulators.

But the Hacktop is capable of more than just playing Amiga games. The hand-soldered QWERTZ keyboard can be used with his thumbs, and the D-Pad doubles as the cursor keys. There’s a laptop touch pad on the back of the case, and the ten-inch LCD display is a touch screen as well. Definitely no shortage of input devices on this thing. It’s also packing some interesting special features, such as integrated RTL-SDR and LIRC hardware for mobile exploration and experimentation. [mnt] says the nine-cell battery should keep it alive and kicking for twelve hours or so, but it of course depends on what kind of stuff he gets into while out and about.

Hackers have been building their own mobile devices for a long time, and we’re always struck by the creative approaches individuals take compared to the rather cookie-cutter world of mobile consumer technology.

Remote Control Of Clocks Is Easy As Pi

[Fatjedi007] recently acquired three programmable boxing gym-type clocks to help his developmentally disabled clients manage their time. The plan was to have timers of varying lengths fire at preset times throughout the day, with the large displays providing a view from anywhere. Unfortunately, the clocks were not nearly as programmable as he needed them to be.

Since he’d spent enough money already, [Fatjedi007] turned to the power of Raspberry Pi to devise an affordable solution. Each clock gets a Pi Zero W and a simple IR transmit/receive circuit that operates using LIRC. The clocks came with remote controls, so it was just a matter of re-programming them. From LIRC, he wrote some scripts with SEND_ONCE and schedules the timers with a cron job. No need to get out the ladder—he can program all of them from his chair over VNC.

He does have one problem, though, and that’s getting the Zeros to set themselves over NTP with static IPs. Do you have any suggestions? Put ’em in the comments and help a Jedi out.

LIRC is pretty handy for anything you want to control remotely, like a stereo system.

Turning On Your Amplifier With A Raspberry Pi

Life is good if you are a couch potato music enthusiast. Bluetooth audio allows the playing of all your music from your smartphone, and apps to control your hi-fi give you complete control over your listening experience.

Not quite so for [Daniel Landau] though. His Cambridge Audio amplifier isn’t quite the latest generation, and he didn’t possess a handy way to turn it on and off without resorting to its infrared remote control. It has a proprietary interface of some kind, but nothing wireless to which he could talk from his mobile device.

His solution is fairly straightforward, which in itself says something about the technology available to us in the hardware world these days. He took a Raspberry Pi with the Home Assistant home automation package and the LIRC infrared subsystem installed, and had it drive an infrared LED within range of the amplifier’s receiver. Coupled with the Home Assistant app, he was then able to turn the amplifier on and off as desired. It’s a fairly simple use of the software in question, but this is the type of project upon which so much more can later be built.

Not so many years ago this comparatively easy project would have required a significant amount more hardware and effort. A few weeks ago [John Baichtal] took a look at the evolution of home automation technology, through the lens of the language surrounding the term itself.

Via Hacker News.

The Raspberry Pi As An IR To WiFi Bridge

[Jason] has a Sonos home sound system, with a bunch of speakers connected via WiFi. [Jason] also has a universal remote designed and manufactured in a universe where WiFi doesn’t exist. The Sonos can not be controlled via infrared. There’s an obvious problem here, but luckily tiny Linux computers with WiFi cost $10, and IR receivers cost $2. The result is an IR to WiFi bridge to control all those ‘smart’ home audio solutions.

The only thing [Jason] needed to control his Sonos from a universal remote is an IR receiver and a Raspberry Pi Zero W. The circuit is simple – just connect the power and ground of the IR receiver to the Pi, and plug the third pin of the receiver into a GPIO pin. The new, fancy official Raspberry Pi Zero enclosure is perfect for this build, allowing a little IR-transparent piece of epoxy poking out of a hole designed for the Pi camera.

For the software, [Jason] turned to Node JS, and LIRC, a piece of software that decodes IR signals. With the GPIO pin defined, [Jason] set up the driver and used the Sonos HTTP API to send commands to his audio unit. There’s a lot of futzing about with text files for this build, but the results speak for themselves: [Jason] can now use a universal remote with everything in his home stereo now.

Bitbang IR Remote

[Albert] has made a few PC IR transmitters and receivers using the traditional connection of RS232 serial, and that is fine, but as we are all aware, not every computer has serial ports standard. Searching though normal USB <> RS232 dongles didn’t meet his requirements. Deciding on making it himself, he whipped up this FTDI bit-bang IR receiver / transmitter.

While FTDI makes a range of chips most (if not all) support a bit-bang mode where you can manually control the IC’s pins. The FTDI chip handles the timing, and when paired up with libFTDI makes it pretty painless to control. The software is a work in progress, but [Albert] already has a driver that connects to LIRC, which lets you control a wide array of remote devices and a test program for carrier generation.

Schematics, source, and a few pages of good information are available on his site.

USB Adapter Options

[Ladyada] takes some time out of her day to explain the common options available for connecting projects through USB. You may be thinking that you already do this with an Arduino. Well, yes and no. The Arduino uses one of these options, an FTDI chip that handles the USB on one side and spits out microcontroller-friendly voltage signals on the other. This chip can be used with your projects, a topic that [Phil Burgess] covered in great detail.

In the video after the break you’ll also hear about USB to serial converters which connect to the Universal Serial Bus and output the traditional 12-20V serial signals (with the exception of cheap knockoff cables like the one from last week). These need to be stepped down to 5 volts or less using a MAX232 chip to work with your project.

Finally there’s the option of using a microcontroller running the V-USB firmware package. This is how the USBtinyISP works and I’ve used it in my own projects to build a LIRC compatible IR receiver.

Continue reading “USB Adapter Options”