An Intel 8085 Microprocessor Trainer

The Intel 8085 microprocessor was introduced 40 years back, and along with its contemporaries — the Z80 and the 6502 — is pretty much a dinosaur in terms of microprocessor history. But that doesn’t stop it from still being included in the syllabus for computer engineering students in many parts of the world. The reason why a 40 year old microprocessor is still covered in computer architecture text books instead of computer history is a bit convoluted. But there’s a whole industry that thrives on the requirements of college laboratories and students requiring “8085 Microprocessor Training Kits”. [TisteAndii] just finished college in Nigeria, where these kits are not locally built and need to be imported, usually costing well over a 100 dollars.

Which is why his final year project was a low cost Intel 8085 Microprocessor Trainer. It’s a minimalist design with some basic read/write memory, program execution and register inspection, with no provision for single stepping or interrupts yet. The monitor program isn’t loaded in an EEPROM. Instead, a PIC18 is used and connected to the 8085 address, data and control pins. This makes it easier to write a monitor program in C instead of assembly. And allows use of a 1.8″ LCD with SPI interface instead of the more usual 7-segment displays used for these kind of kits. [TisteAndii] built a 6×4 keyboard for input, but couldn’t solve debounce issues and finally settled on a 5×4 membrane keypad.

Being a rookie, he ended up with a major flaw in his board layout — he missed connecting the SRAM and the PPI devices to the data bus. A bunch of jumper links seemed to solve the issue, but it wasn’t perfect. This, and a few other problems gave him a lot of grief, but towards the end, it all worked, almost. Most importantly, his BoM cost of about $35 makes it significantly cheaper compared to the commercial units available in Nigeria.

While some hackers may consider this a trivial project, it solves a local problem and we hope the next iteration of the design improves the kit and makes it more accessible.

The Surprising Story Of The First Microprocessors

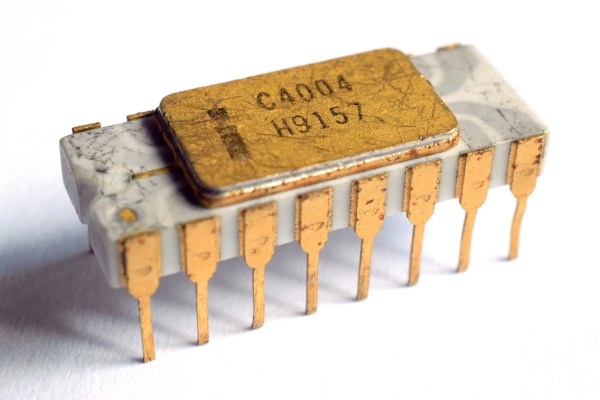
If you maintain an interest in vintage computers, you may well know something of the early history of the microprocessor, how Intel’s 4-bit 4004, intended for a desktop calculator, was the first to be developed, and the follow-up 8008 was the first 8-bit device. We tend to like simple stories when it comes to history, and inventions like this are always conveniently packaged for posterity as one-off events.

In fact the story of the development of the first microprocessors is a much more convoluted one than it might appear, with several different companies concurrently at the forefront of developments. A fascinating recent IEEE Spectrum piece from [Ken Shirriff] investigates this period in microprocessor design, and presents the surprising conclusion that Texas Instruments may deserve the crown of having created the first 8-bit device, dislodging the 8008 from its pedestal. Continue reading “The Surprising Story Of The First Microprocessors”

Megaprocessor Is A Macro Microprocessor

If we have to make a list of Projects that are insane and awesome at the same time, this would probably be among the top three right up there. For the past few years, [James Newman] has been busy building Megaprocessor – a huge micro-processor made out of transistors and LED’s, thousands of ’em. “I started by wanting to learn about transistors. Things got out of hand.” And quite appropriately, he’s based out of Cambridge – the “City of perspiring dreams“. The Why part is pretty simple – because he can. We posted about his build as recently as 10 months back, but he’s made a ton of progress since then and an update seemed in order.

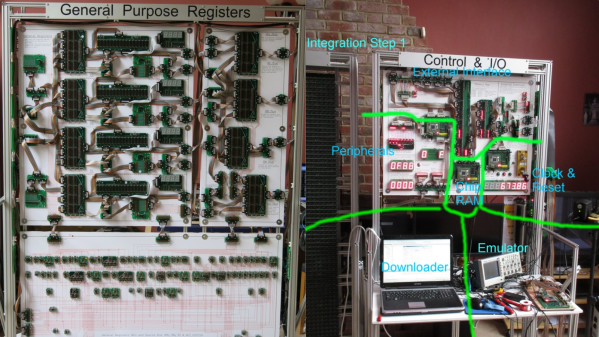
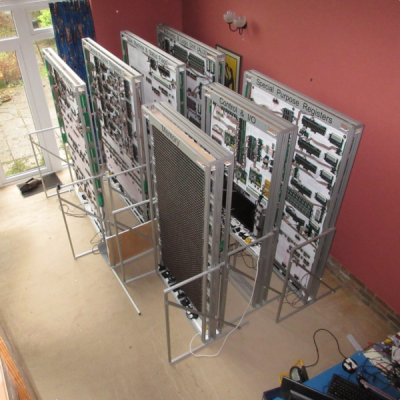
megaprocessor_04How big is it ? For starters, the 8-bit adder module is about 300mm (a foot) long – and he’s using five of them. When fully complete, it will stretch 14m wide and stand 2m tall, filling a 30 sq.m room, consisting of seven individual frames that form the parts of the Megaprocessor.

The original plan was for nine frames but he’s managed to squeeze all parts in to seven, building three last year and adding the other four since then. Assembling the individual boards (gates), putting them together to form modules, then fitting it all on to the frames and putting in almost 10kms of cabling is a slow, painstaking job, but he’s been on fire last few months. He has managed to test and integrate the racks shown here and even run some code.

The Megaprocessor has a 16-bit architecture, seven registers, 256bytes of RAM and a questionable amount of PROM (depending on his soldering endurance, he says). It sips 500W, most of it going to light up all the LED’s. He guesses it weighs about half a ton. The processor uses up 15,300 transistors and 8,500 LED’s, while the RAM has 27,000 transistors and 2,048 LED’s. That puts it somewhere between the 8086 and the 68000 microprocessors in terms of number of transistors. He recently got around to calculating the money he’s spent on this to date, and it is notching up over 40,000 Quid (almost $60,000 USD)!  You can read a lot of other interesting statistics on the Cost and Materials page.

Continue reading “Megaprocessor Is A Macro Microprocessor”

Code Craft: Subtle Interrupt Problems Stack Up

[Elliot Williams’] column, Embed with Elliot, just did a great series on interrupts. It came in three parts, illustrating the Good, the Bad, and the Ugly of using interrupts on embedded systems. More than a few memories floated by while reading it. Some pretty painful because debugging interrupt problems can be a nightmare.

One of the things I’ve learned to watch out for over the years is the subtlety of stack based languages, like C/C++, which can ensnare the unwary. This problem has to do with the corruption of arrays of values on a stack during interrupt handling. The fix for this problem points up another one often used by black hats to gain access to systems.

Continue reading “Code Craft: Subtle Interrupt Problems Stack Up”

Non-Arduino Powered By A Piece Of Computing History

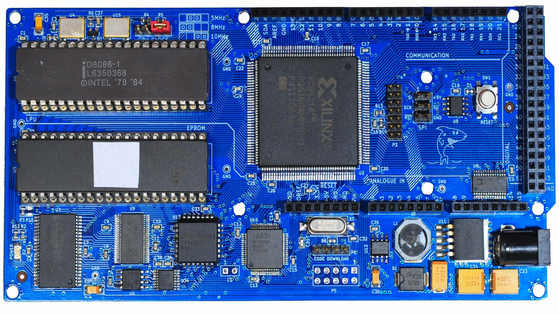
Sometimes it is a blessing to have some spare time on your hands, specially if you are a hacker with lots of ideas and skill to bring them to life. [Matt] was lucky enough to have all of that and recently completed an ambitious project 8 months in the making – a Non-Arduino powered by the giant of computing history – Intel’s 8086 processor. Luckily, [Matt] provides a link to describe what Non-Arduino actually means; it’s a board that is shield-compatible, but not Arduino IDE compatible.

He was driven by a desire to build a single board computer in the old style, specifically, one with a traditional local bus. In the early days, a System Development Kit for Intel’s emerging range of  microprocessors would have involved a fair bit of discrete hardware, and software tools which were not all too easy to use.

Back in his den, [Matt] was grappling with his own set of challenges. The 8086 is a microprocessor, not a microcontroller like the AVR, so the software side of things are quite different. He quickly found himself locking horns with complex concepts such as assembly bootstrapping routines, linker scripts, code relocation, memory maps, vectors and so on. The hardware side of things was also difficult. But his goal was learning so he did not take any short cuts along the way.

[Matt] documented his project in detail, listing out the various microprocessors that run on his 8OD board, describing the software that makes it all run, linking to the schematics and source code. There’s also an interesting section on running Soviet era (USSR) microprocessor clones on the 8OD. He is still contemplating if it is worthwhile building this board in quantities, considering it uses some not so easy to source parts. If you are interested in contributing to the project, you could get lucky. [Matt] has a few spares of the prototypes which he is willing to loan out to anyone who can can convince him that they could add some value to the project.

Continue reading “Non-Arduino Powered By A Piece Of Computing History”

Anthropomorphizing Microprocessors

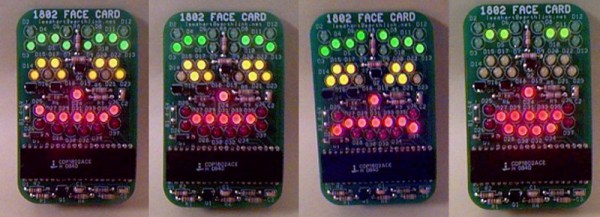
Vintage microprocessors usually do something, be it just sitting in an idle loop, calculating something, or simply looking cool in a collector’s cabinet. [Lee] has come up with a vastly cooler use for an old microprocessor: he’s anthropomorphized it by wiring LEDs up to the address lines and arranged those LEDs into a face. After wiring up the right circuit, the face of LEDs slowly changes expressions, making this tiny little board react to random electronic fluctuations.

The CPU used for this project is the RCA 1802, best known for being the smarts in the COSMAC Elf, a very early microprocessor training computer, but still capable of teaching the basics of computing today, albeit on a processor that isn’t made any more with an instruction set that is barely supported by anything modern.

[Lee] apparently has a lot of these 1802s, and to show off how simple a microcomputer can get, he created the strangest use for a CPU we’ve ever seen. You can’t program this face of LEDs; the data bus is left floating so random values are ‘displayed’ on the face. Only one of the data lines is pulled high. This prevents the data bus from ever being 0x00, the HALT instruction.

If you’re looking for something a little more useful to do with an RCA 1802 MPU, [Lee] also has a COSMAC Elf membership card. It’s a reproduction of the famous COSMAC Elf, repackaged into a board the size of an Altoid tin. It has the 1802 onboard, a few switches and blinkenlights,  and a parallel port for interacting with peripherals.

When Worlds Collide: 68008 Bootstrapped By An Arduino Uno

68008-ardu

[Peter Bjornx] brings classic microprocessors and modern microcontrollers together with his Arduino bootstrapped 68008 computer. The Motorola 68008 is the 8-bit external bus version of the well-known 68000 (or 68k) microprocessor. A friend gave [Peter] one of these chips, so he built a simple computer around it.

This isn’t one of those clean retrocomputers with every connection carefully planned out and wire wrapped. [Peter’s] created a true hack – a working 68k system on a breadboard created with whatever he had on hand at the time. The real gem of this system is the ROM. [Peter] replaced an EPROM chip with an Arduino.

In the not-so-good-old-days, microprocessors (and many microcontrollers) ran from an external ROM chip. This often was a UV-erasable EPROM. Carefully compiled code was burned into the EPROM with a device programmer. If the code wasn’t perfect, the EPROM had to be pulled and placed under a UV lamp for 20 minutes or so to erase it before it was time to try again. EPROM emulators were available, but they were way too expensive for the hobbyist.

Thankfully those days are far behind us now with the advent of EEPROM and then Flash. [Peter] didn’t want to revisit the past either, so he wrote a simple Arduino sketch which allowed it to act as an EPROM emulator, including address logging via the serial port.

The design still caused [Peter] some headaches, though. His major problem was a classic 68k issue, /DTACK timing. /DTACK or Data Transfer Acknowledge is one of several bus control signals used by the 68k. When the 68k performs a read from the data bus, it waits for /DTACK before it transfers data. The Arduino was too slow to release /DTACK in this case, which caused the 68k to think every read was immediately completed. There is a much clearer explanation of the 68k bus cycles on this Big Mess O Wires page. [Peter’s] solution was simple – a D flip-flop connected to the address strobe took care of the timing issues.

It took quite a bit of tinkering, but the system eventually worked. Peter was able to run the 68008 from its reset vector into a simple loop using the Arduino. It’s only fitting that the 68k program loaded by the Arduino was an LED blinker, everyone’s favorite hardware Hello World.

Thanks [Robert!]