Molded Parts: Prusa Mendel In 30 Minutes

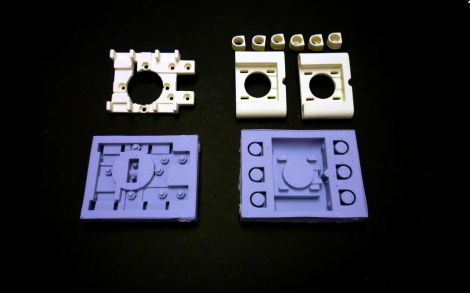
This set of white RepRap parts were created in molds, instead of being printed by another RepRap. [Mark A. Ganter] of the University of Washington admits that this breaks the idea of a 3D printer that is self-replicating. But the molds – which were created by tweaking Prusa Mendel parts to be mold friendly – have the ability to produce every plastic part necessary to build your own RepRap and they can do it much faster. Once the molds were completed [Mark] and his students were able to produce a full set of parts in just 30 minutes, cutting as much as 14 hours off of the time it would have taken to print the parts. Still not convinced? How about this: the molds can be created by a 3D printer or by using a high-resolution power printing method like they have here.

The process starts by printing master parts, then creating a silicone RTV mold from them. Once the molds are ready, [Mark’s] team pours polyurethane into them and waits for it to harden. They plan to share the STL files in less than a week so that you can make your own molds to use to build your RepRap army.

Carbon Fiber Part Fabrication Guide

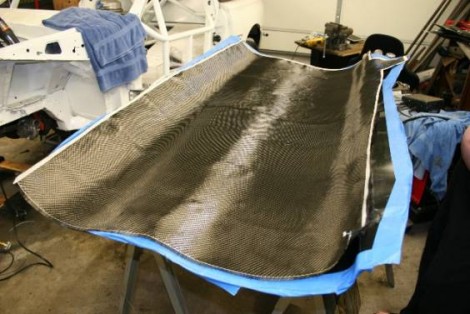
If you’re thinking of working with carbon fiber this guide should be a big help. The example is aimed at the automotive crowd but the principles transfer quite easily. Carbon fiber parts are constructed in a similar manner as fiberglass parts. A mold is covered in a release agent, the fibers are put in place and covered in epoxy. With fiberglass the fibers are often sprayed on but carbon fiber components use woven mats of the material to build up multiple layers. Vacuum bags are used to hold the layers together, removing air and impregnating the fibers with the epoxy. This guide even outlines the construction of a vacuum pump needed for that step.

The benefits of carbon fiber are many, including strength and weight reduction. This makes it a great material for adding parts to weight-sensitive hacks such as quadcopters. But the mesh also has an interesting look which is why it shows up in custom electronics cases. The one real drawback is that when this material fails it is a catastrophic failure, tending to crumble across the entire structure rather than limiting damage to a small area. That means that a rough landing might be the end of your new parts.

[Thanks MS3FGX]

Blueberry Squishee? Mechanically-separated chicken? Nope! It’s Oogoo!

Oogoo, A Home-made Sugru Substitute

If you follow Instructables.com, it might seem like every third article lately is about Sugru, the nifty air-drying silicone putty that’s good for all manner of repairs and custom parts. It’s fantastic stuff (and we love their slogan, “Hack things better”), but one can’t (yet!) just drop in on any local hardware store to buy a quick fix…so [mikey77] has cooked up a recipe for a basic Sugru work-alike. His “Oogoo” (a name likely inspired by oobleck) is a simple mix of corn starch and silicone caulk.

A two-ingredient recipe would hardly seem adequate material for an article, but [mikey77]’s left no stone unturned, providing an extensive tutorial not only on mixing the compound, but how to add colors, cast and carve custom shapes, and how his home-made recipe compares to the name brand product. As a bonus, the article then drifts into a little Halloween project where he demonstrates etching conductive cloth, how to make conductive glue, and other hands-on shenanigans.