ESP8266 As A Networked MP3 Decoder

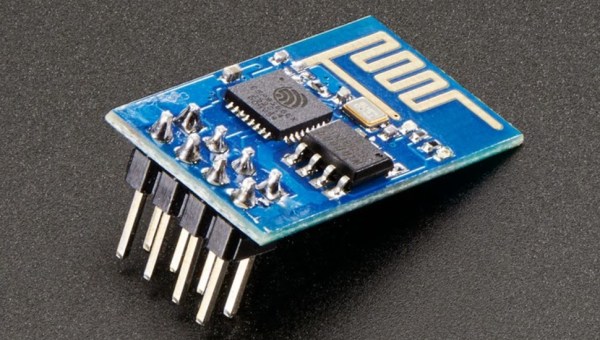
Support libraries, good application notes, and worked examples from a manufacturer can really help speed us on our way in making cool stuff with new parts. Espressif Systems has been doing a good job with their ESP8266 product (of course, it doesn’t hurt that the thing makes a sub-$5 IOT device a reality). Only recently, though, have they started publishing completed, complex application examples. This demo, a networked MP3 webradio player, just popped up in Github, written by the man better known to us as Sprite_tm. We can’t wait to see more.

The MP3 decoder itself is a port of the MAD MP3 library, adapted for smaller amounts of SRAM and ported to the ESP8266. With a couple external parts, you can make an internet-connected device that you can point to any Icecast MP3 stream, for instance, and it’ll decode and play the resulting audio.

What external parts, you ask? First is something to do the digital-to-analog conversion. The application, as written, is build for an ES9023 DAC, but basically anything that speaks I2S should be workable with only a little bit of datasheet-poking and head-scratching. Of course, you could get rid of the nice-sounding DAC chip and output 5-bit PWM directly from the ESP8266, but aside from being a nice quick demo, it’s going to sound like crap.

The other suggested external IC is an SPI RAM chip to allow for buffering of the incoming MP3 file. WiFi — and TCP networks in general — being what they are, you’re going to want to buffer the MP3 files to prevent glitching. As with the dedicated DAC, you could get away without it (and there are defines in the “playerconfig.h” file to do so) but you’ll probably regret it.

In sum, an ESP8266 chip, a cheap I2S DAC, and some external RAM and you’ve got a webradio player. OK, maybe we’d also add an amplifier chip, power supply, and a speaker. Hmmm…. and a display? Or leave it all configurable over WiFi? Point is, it’s a great worked code example, and a neat DIY device to show your friends.

The downsides? So far, only the mono version of the libMAD decoder / synth has been ported over to ESP8266. The github link is begging for a pull request, the unported code is just sitting there, and we think that someone should take up the task.

Other Resources

In our search for other code examples for the ESP8266, we stumbled on three repositories that appear to be official Espressif repositories on Github: espressif, EspressifSystems, and EspressifApp (for mobile apps that connect to the ESP8266). The official “Low Power Voltage Measurement” example looks like a great place to start, and it uses the current version of the SDK and toolchain.

There’s also an active forum, with their own community Github repository, with a few “Hello World” examples and a nice walkthrough of the toolchain.

And of course, we’ve reported on a few in the past. This application keeps track of battery levels, for instance. If you’ve got the time, have a look at all the posts tagged ESP8266 here on Hackaday.

You couldn’t possibly want more resources for getting started with your ESP8266 project. Oh wait, you want Arduino IDE support?

Thanks [Sprite_tm] for the tip.

Manual Data Recovery With A Hex Editor

Let’s say you use an SD card-base portable audio recorder for work – doing an interview, perhaps. Things go well until one day, you turn the recorder off before stopping the recording. Without pressing that big red Stop button, the file doesn’t close, and you’re left with a very large 0kB file on the SD card. How do you get it back?  There are tools that will do it for you, but they cost money. You can do it yourself with a hex editor, though, and it’s actually pretty easy.

The software required for this feat of data recovery is Roadkil’s Disk Imager to dump all the bits on the SD card to an image file, the free version of ISO Buster to show the block addresses and length of each file, and the hex editor of your choice. The process starts as simply an experiment for hot to create an MP3 file by cutting and pasting bits into a hex editor. A good file was found in the hex editor, copied to a new file, and played. Everything works so far; great.

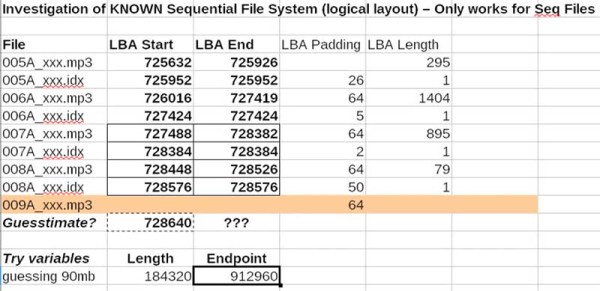
For the actual data recovery, a spreadsheet was created to make an educated guess as to where the lost file should be. Starting at this address, about 90MB of data was copied into a new hex editor window. This is where the recovery hit a snag. Because the SD card was plugged into a Mac before, a bunch of data was written on the card. This went into the first available place on the disk, which just happened to be the header of the lost MP3 file.

That’s not a problem; there’s already the header from an MP3 file sitting in a hex editor from the first experiment to see if this was possible. By copying a few hundred bytes to the front of the lost file, the file was corrected just enough that an MP3 player could reconstruct the file.

It’s not perfect – the first fifty seconds of the interview was garbled. The rest of the interview was saved, though, and that’s much better than losing the entire thing. Thanks [Lewin] for sending this one in.

Continue reading “Manual Data Recovery With A Hex Editor”

The Four Thousand Dollar MP3 Player

[Pat]’s friend got a Pono for Christmas, a digital audio player that prides itself on having the highest fidelity of any music player. It’s a digital audio device designed in hand with [Neil Young], a device that had a six million dollar Kickstarter, and is probably the highest-spec audio device that will be released for the foreseeable future.

The Pono is an interesting device. Where CDs have 16-bit, 44.1 kHz audio, the Pono can play modern lossless formats – up to 24-bit, 192 kHz audio. There will undoubtedly be audiophiles arguing over the merits of higher sampling rates and more bits, but there is one way to make all those arguments moot: building an MP3 player out of an oscilloscope.

Digital audio players are limited by the consumer market; there’s no economical way to put gigasamples per second into a device that will ultimately sell for a few thousand dollars. Oscilloscopes are not built for the consumer market, though, and the ADCs and DACs in a medium-range scope will always be above what a simple audio player can manage.

[Pat] figured the Tektronicx MDO3000 series scope sitting on his bench would be a great way to capture and play music and extremely high bit rates. He recorded a song to memory at a ‘lazy’ 1 Megasample per second through analog channel one. From there, a press of the button made this sample ready for playback (into a cheap, battery-powered speaker, of course).

Of course this entire experiment means nothing. the FLAC format can only handle a sampling rate of up to 655 kilosamples per second. While digital audio formats could theoretically record up to 2.5 Gigasamples per second, the question of ‘why’ would inevitably enter into the minds of audio engineers and anyone with an ounce of sense. Short of recording music from the master tapes or another analog source directly into an oscilloscope, there’s no way to obtain music at this high of a bit rate. It’s just a dumb demonstration, but it is the most expensive MP3 player you can buy.

Speaker Cabinet Boom Box Build

When you get that itch to build something, it’s difficult to stop unless you achieve a feeling of accomplishment. And that’s how it was with [Rohit’s] boombox build.

He started out with a failing stereo. He figured he could build a replacement himself that played digital media but his attempts at mating microcontrollers and SD cards was thwarted. His backup plan was to hit DX for a cheap player and he was not disappointed. The faceplate he found has slots for USB and SD card, 7-segment displays for feedback, and both buttons and a remote for control. But this little player is meant to feed an amplifier. Why buy one when you can build one?

[Rohit] chose ST Micro’s little AMP called the TDA2030 in a Pentawatt package (this name for a zig-zag in-line package is new to us). We couldn’t find stocked chips from the usual suspects but there are distributors with singles in the $3.50-5 range. [Rohit] tried running it without a heat sink and it gets hot fast! If anyone has opinions on this choice of chip (or alternatives) we’d love to hear them.

But we digress. With an amp taken care of he moved onto sourcing speakers. A bit of repair work on an upright set got them working again. The bulky speaker box has more than enough room for the amp and front-end, both of which are pretty tiny. The result is a standalone music player that he can be proud of having hacked it together himself.

DIY Custom Molded Earbud Roundup

Headphones have become ubiquitous these days. Thanks to the iPod and the smartphone, it’s become commonplace to see someone wearing a pair of earbud style headphones. Earbuds aren’t always comfortable though. On some people they are too loose. On others, the fit is so tight that they cause pain.To that end, we’ve found a few great solutions for this problem.

[cptnpiccard] has documented his custom molded Sugru earbuds in an Imgur gallery. He’s molded a pair of standard earbuds into a cast of his ear. He uses them both for hearing protection and tunes while skydiving. Sugru’s FAQ states that while the cured material is safe for skin contact (and in ear use) some people are sensitive to the uncured material.

While discussing his project on Reddit, a few users chimed in and mentioned they’ve made custom molded earbuds using Radians custom earplug kits. The Radians material hardens up in only 10 minutes, which beats waiting an hour for Sugru.

The absolute top of the food chain has to be building your own triple driver in ear monitors, which is exactly what [marozie] has done. Professional custom molded monitors can cost over $1000, which puts them in the realm of professional musicians and audiophiles. [marozie] discovered that mouser stocks quite a few transducers from Knowles. These tiny speakers don’t come cheap, though; you can spend upwards of $70 just for a single driver.

[marozie] took a cast of his ear using an earmold impression kit. He used this cast to create a mold. From there it was a matter of pouring resin over his carefully constructed driver circuits and audio tubes. The resulting monitors look and sound incredible.

It goes without saying that making custom in ear monitors involves putting chemicals into you ears. The custom earmold kits come with tiny dams to keep the mold material from going in too far and causing damage. This is one of those few places where we recommend following the instructions. Click past the break to see a demo video of the ear molding process.

Continue reading “DIY Custom Molded Earbud Roundup”

Bumpy, The Beautiful DIY MP3 Player

OLYMPUS DIGITAL CAMERA

[Matt]’s been working on a small hombrew MP3 player, and although it’s not much more useful than an iPod Shuffle, sometimes that’s all you need. Besides, it turned out to be a beautiful project, completely custom, and a great example of what a high resolution 3D printer can do with an enclosure design.

Inside Bumpy is an ATMega32u4 with a VS1003 MP3 codec IC. The device is powered by a 1000mAh lithium battery, and the user interface is an exercise in simplicity; a single click/scroll wheel changes the volume, toggles play and pause, and selects the next or previous track. Eight LEDs mounted in the center of the board glow through the case for status, volume, and interface feedback.

By far the most impressive part of Bumpy is the case. It was printed at [Matt]’s place of employment – Formlabs – in white UV curing resin. The pictures show a surface finish that would be difficult to replicated on a squirting plastic style 3D printer, with a textured, bumpy surface that inspired the name.

AM Tube Radio Restored And Given MP3 Playback Too

mp3-antique-radio

This AM radio looks a bit like it did coming out of the factory. But there are a lot of changes under the hood and that faceplate is a completely new addition. The project really is a restoration with some augmentation and [Michael Ross] did a great job of documenting the project.

The Kenyon radio was built in 1946 and uses vacuum tubes for the amplifier. Considering its age this was in relatively good shape and the first thing that [Michael] set out to do was to get the electronics working again. It involved replacing the messy collection of capacitors inside. He then cleaned up the tubes, checking for any problems, and put the electronics back together to find they work great!

He cleaned up the chassis and gave it a new coat of finish. The original dial plate was missing so he built a wood frame to match a dial scale he ordered. The bell-shaped brass cover hides the light that illuminates the dial.

He could have stopped there but how much do people really listen to AM radio these days? To make sure he would actually use the thing he added an Arduino with an MP3 shield. It patches into the antenna port via a relay, injecting modern tunes into the old amplifier circuit. Catch a glimpse of the final project in the video after the break.

Continue reading “AM Tube Radio Restored And Given MP3 Playback Too”