VFD 430 Clock, NYC Style

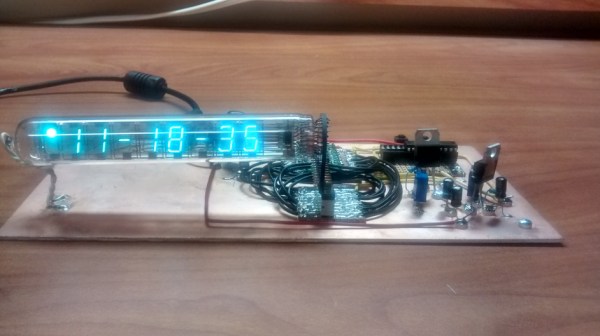
[Daniel] seems to have a lot of time on his hands for building clocks, and that’s fine by us. For his latest build, he used a vacuum fluorescent display (VFD) to display hours, minutes, and seconds using an MSP430 to drive it.

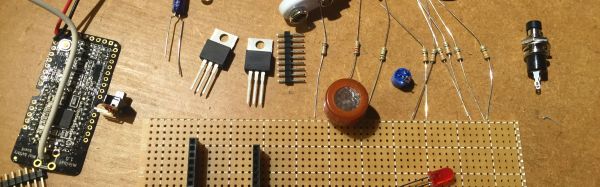
Like the analog meter clock he built recently, there is no RTC. Instead, [Daniel] used the 430’s watchdog timer to generate 1Hz interrupts from the 430’s 32KHz clock. [Daniel] wanted to try Manhattan-style board construction for this project, so he built each module on a punch-cut stripboard island and super glued them to a copper-clad board. We have to agree with [Daniel] that the bare-bones construction is a nice complement to the aesthetic of the VFD.

[Daniel] set out to avoid using a VFD display driver, but each of the segments require +50V. He ran through a couple of drawing board ideas, such as using 17 transistors to drive them all before eventually settling on the MAX6921 VFD driver. The +50V comes from an open-loop boost converter he built that steps up from 12V.

The time is set with two interrupt-triggering buttons that use the shift register example from TI as a jumping off point. All of the code is available on [Daniel]’s site. Stick around after the break for a quick demo of the clock.

Continue reading “VFD 430 Clock, NYC Style”

Web Connected Breathalyser With Phone Display

[spillsman] is working on a IoT startup and wanted to work and play while he tested their hardware. His company, WifiThing, is bundling the Texas Instruments toolchain and mesh networking with a sort of plug-and-play web interface. The board uses a MSP430 and two other TI Networking chips to make setting up, logging data, and controlling outputs simpler. The web interface looks interesting, but in our experience this sort of approach only saves time up to a point. Then it’s time to pull out the chip’s various bibles, ‘nomicons, spell manuals, and supporting religious documents to get the thing to work.

Though, there are some projects where you would like a simple way to log data from multiple sensors, if this can do that easily (and more importantly, cheaply) it might be very cool. We are interested to see if the open source software is easy to integrate without buying their hardware. Either way, after setting up a simple circuit to heat the coil in the breathalyzer, and translate the data into a signal usable for the chip, [spillsman] was able to record alcohol levels and even keep a, perhaps unwise to record, high-score from his phone.

Continue reading “Web Connected Breathalyser With Phone Display”

Current Meter Shows Current Time

This isn’t the first of its type, but [Daniel]’s MSP430 based Analog Gauge Clock certainly ticks off the “hack” quotient. He admits an earlier Voltmeter Clock we featured a while back inspired him to build his version.

[Daniel] was taking an Embedded systems class, and needed to build an MSP430G2553 microcontroller based final project. Which is why he decided to implement the real time clock using the micro-controller itself, instead of using an external RTC module. This also simplified the hardware used – the microcontroller, a crystal, three analog ammeters, and a few passives were all that he needed. Other than the Ammeters, everything else came from his parts bin. Fresh face plates were put on the ammeters, and the circuit was assembled on a piece of strip board. A piece of bent steel plate served as the housing.

The interesting part is the software. He wrote all of it in bare C, without resorting to using the Energia IDE. He walks through all of the important parts of his code on his blog post. Setting load capacitance for the timing crystal was important, so he experimented with an oscilloscope to see which value worked best. And TI’s Application Note on MSP430 32-kHz Crystal Oscillators (PDF) proved to be a useful resource. Three PWM output’s run the three ammeters which indicate hours, minutes and seconds. Push-button switches let him set the clock. See a short demo of the clock in the video below.

Continue reading “Current Meter Shows Current Time”

A Wooden Based, CD Stepper Scribbler

[Rohit Gupta] is back with a plotter made from scrap CD drives and an old RC servo. [Rohit] is working on hacks to create CNC machines and sharing his activities with the world. His CNC design calls for salvaged stepper motors so he first built a device for testing them. You’ve got to admire his use of the language. He named his plotter project ‘Sketchy’ and his motor tester is called ‘Easy Peasy’.

sketchyAfter finding some CD drives at the scrap pile he tore them down to test with Easy Peasy. The raw materials for the frame came from a wooden crate for an AC unit but he didn’t just start cutting it up. Nope, first he created plans with CAD; now that’s a hack you have to admire.

With the steppers tested working, and the base build under way he moved onto the control system. Originally the hardware was demonstrated using an MSP430. This worked, but a flaw in the hardware design was found. With the pen attached directly to the servo horn, it would draw a long line when being rotated away from the drawing position.

The fix is a replacement servo setup which lifts the pen up instead of rotating it. But that showed that the drawing surface wasn’t smooth. The pen kept missing places or getting caught and destroyed. The use of a spring loaded pen solved this issue. Success!

One further change migrated away from the MSP430 in favor of an Arduino Pro Mini in order to use a GRBL library instead of the g-code generator which was performing questionably. Since he likes Hackaday so much one of his first attempts with the final version of Sketchy was our logo, shown in the video after the break.

When we last saw [Rohit] he had created a fancy PCB ruler to measure components.

Continue reading “A Wooden Based, CD Stepper Scribbler”

RoomMote home automation

RoomMote, A DIY Remote For Your Room Project

[Rohit] wrote in to tell us about a project he has created. Like most projects, his solves a problem. Sometimes while sleeping, a mosquito will infiltrate his room. He has a mosquito repellent machine but there are 2 problems, he has to get up to turn it on/off and it smells bad when in use. [Rohit] only needed a remote-controlled mosquito repelling machine but decided to make a 6 channel system he calls the RoomMote.

From the beginning, the plan was to use an old Sony TV remote to do the transmitting. The receiver unit was completely made from scratch. [Rohit] designed his own circuit around a surface mount MSP430 chip and made a really nice looking PCB to fit inside a project box he had kicking around. The MSP430 chip was programmed to turn relays on and off based on the signals received from the Sony remote.  These relays are inside an electrical box and control AC outlets. Just plug in your light, radio or mosquito repellent into the appropriate outlet for wireless control. Code for the MSP430 is made available on [Rohit’s] project page for anyone wanting to make something similar.

In addition to the relays, there is an RGB LED strip attached to the custom circuit board. By using more of the Sony remote’s buttons, the LED strip can output 6 pre-programmed colors, some mood lighting for the mosquitoes!

Continue reading “RoomMote, A DIY Remote For Your Room Project”

Chili-Gation With The MSP430

[Dave] used to grow chili peppers, but after moving to Texas he noticed his plants were drying up and dying off. This is understandable; Texas is freaking hot compared to his old home in the UK. These chilis needed a watering system, and with a pump, relay module, and an MSP430 launchpad, it was pretty easy to put together.

The core of the build is an MSP430 launchpad, a Sharp Memory LCD BoosterPack for the user interface, and a few bits and bobs for pumping water from a large soda bottle to the plant.

Before beginning his build, [Dave] took a look at commercial watering systems, but could only find huge irrigation systems for greenhouses or gardens. This was obviously overkill, but with a few parts – a six volt pump and a relay control board – [Dave] was able to make a simple system that keeps chilis watered for seven days between refilling the reservoir.

New Part Day: MSP430 + Cortex M4F

Texas Instruments’ MSP430 series of microcontrollers has been the standard extremely low power microcontroller for several years now. It’s not an ARM, though, so while there are fans of the ‘430, there aren’t a lot of people who would want to port their work in ARM to a completely different architecture. Here is TI’s answer to that. It’s called the MSP432, and it combines the low power tech of the ‘430 with a 32-bit ARM Cortex M4F running at 48MHz.

This is not the first ARM Cortex M4F platform TI has developed; the Tiva C series is based on the Cortex M4F core and was released a few years ago. The MSP432 is a little bit different, leveraging the entire development system of the MSP430 and adding a DSP engine and a FPU. If you’re looking for something that’s low power but still powerful, there you go. You can find the official press release here.

If you’d like to try out the MSP432, there’s a LaunchPad available. $13 to TI gets you in the door. The most capable MSP432 with 256 kB of Flash, 64 kB of SRAM, and 24 ADC channels hasn’t hit distributors yet, but you can sample it here.