Driving WS2811 LEDs With…VGA?

We thought we’d seen it all. All the ways to drive WS2811/2812 “Neopixel” LEDs, that is. And then [Steve Hardy] comes up with a new one: hacking a computer’s VGA output to drive 500 WS2811s in a string. And it’s quite a hack. You can check out the video (it’s worth enduring the horrible wind noise) below the break.

bits
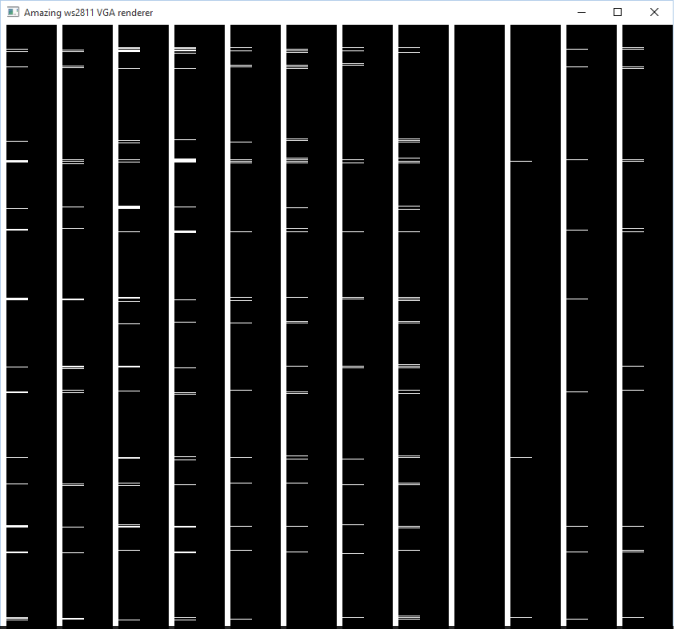
[Steve]’s big realization was that he could send the digital data that the Neopixels needed by carefully selecting a resolution and clock rate for the VGA to match the timings that the WS2811 modules wanted. A resolution of 840×1000 at 28MHz produces 70 pixels per WS2811 bit, or 12 bits per line. This means two VGA lines need to be sent for the RGB triple for each LED, hence the 1000 rows.

There are some further tricks before [Steve] got around to writing a custom OpenGL shader that converts regular graphics to his strange black-and-white bit pattern to drive the LEDs, but you’re going to have to read [Steve’s] blog for all that. If you’re waiting for a full code write-up, [Steve] says that one’s pending.

We’re just stoked to see the computing power that lies within a video card used for other purposes. Once you think of the VGA output as a general-purpose high speed (analog!) output, it opens up a whole bunch of possibilities if you can write the corresponding video software. As [Steve] points out, he’s only using the red channel right now — he could trivially add another 1000 LEDs just by tweaking his video code.

Continue reading “Driving WS2811 LEDs With…VGA?”

Break Your Wrist? Twitter-Enable That Plaster Cast

Plaster casts are blank canvases for friends and family to post their get well messages. But if it’s holiday season, adding blinky LED lights to them is called for. When [Dr Lucy Rogers] hurt her hand, she put a twitter enabled LED Christmas tree on her cast.

The hardware is plain simple – some RGB LEDs, an Arduino, a blue tooth module and a battery. The LEDs and wires formed the tree, and all the parts were attached to the plaster cast using Velcro. This allowed the electronics to be removed during future X-ray scans. The fun part was in connecting the LEDs to the #CheerLights project. CheerLights is an “Internet of Things” project that allows people’s lights all across the world to synchronize to one color set by a Tweet. To program the Arduino, she used code written by [James Macfarlane] which allowed the LED color to be set to any Cheerlights color seen in blue tooth UART data.

Connectivity is coordinated using MQTT — lightweight standard popular with connected devices. By connecting the MQTT feed to the cheerlights topic from [Andy Stanford-Clark’s] MQTT feed (mqtt://iot.eclipse.org with the topic cheerlights) the lights respond to tweets (Tweet #cheerlights and a color). The LED colors can also be selected via the phone from the color picker tool in the controller, or directly via the UART. If the Bluetooth connection is lost, the LEDs change colors randomly. Obviously, delegates had great fun when she brought her Twitter enabled LED blinky lights plaster cast arm to a conference. It’s not as fun unless you share your accomplishments with others!

Chromatic Clocks With A Steampunk Twist

There’s nothing like a good clock project, and tacking the steampunk modifier on it only makes it better. [José] built a steampunk clock that does it much better than just gluing some gears on an enclosure and calling it a day. This build includes glowing jewels displaying the time in different colors while displaying the a steampunker’s prowess with a pipe cutter.

The body of the clock is a piece of finely lacquered wood, hiding a perfboard construction with a DS3231 real time clock, a DHT22 temperature and humidity sensor, and a light sensor for dimming the WS2812 LEDs according to the ambient light level.

The rest of the clock is a bunch of 12mm copper pipe, elbows, and t couplers. The end of these pipes are capped off with marbles, with the RGB LEDs behind each of the ‘digits’ of the clock. This is a chromatic clock, with the digits 0 through 9 assigned a different color, based on the resistor color code scheme with exceptions for black and brown. Once you’ve figured out how to tell time with this clock, you should have no problem finding that single 56k resistor in your junk box.

You can check out the video of the clock below.

Continue reading “Chromatic Clocks With A Steampunk Twist”

Knappa Tutu: Some Dancing Required

Sometimes, you see a lamp shade and you’re just intoxicated enough to put it on your head like a hat and dance around on the table. Other times, you see the same lamp shade, and decide to wire it up with Neopixels, an accelerometer, and an Arduino and make a flowery, motion-activated light show when you wear it as a dress. Or at least that’s what we’ve heard.

[Cheng] gets full marks for the neo-IKEA name for the project and bonus points for clean execution and some nice animations to boot. The build is straightforward: build up the lamp so that it fits around your waist, zip-tie in the RGB LED strip, and connect up accelerometer and microcontroller. A tiny bit of coding later, and you’re off to the disco. It looks like a ridiculous amount of fun, and a sweet weekend build.

Continue reading “Knappa Tutu: Some Dancing Required”

Three Watt Individually Addressable RGB LEDs

While the gold standard for colorful blinky projects are individually controllable RGB LEDs, the usual offerings aren’t really that impressive. Yes, a few hundred Neopixels, WS2812, or other RGB LEDs will sear your retinas, but what if you wanted blinky glowy stuff that is so over the top as to be an affront to whatever creator you believe in?

This is it. [Ytai Ben-Tsvi] created an individually addressable RGB LED called the Pixie that is perfect for all the times when you need something bright, colorful, and want to blind a few people in the process.

WS2812s and Neopixels are basically RGB LEDs with a small microcontroller tucked tucked away inside, and so far there is no design house or fab plant in China that is crazy enough to add one of these tiny dies to an already overpowered LED. To build the Pixie, [Ytai] took a bare RGB LED module and added a microcontroller – a PIC12FF157X in this case. It’s not exactly a powerful microcontroller, but it can handle the shift register-like function of an individually addressable RGB, and adds gamma correction, over heating protection (something necessary when you’re dumping this much power into a tiny board, and other safeguards for each individual LED.

[Ytai] is working with Adafruit to produce these Pixies, and although they’re rather expensive at $15 per LED, you won’t need very many to blind yourself.

neopixals

Seven Segment Clock Made From Scratch

[David Hopkins] built a seven segment clock, but not in a way you would think.  Typically, if one wants to make something like this, one would start off with some seven segment LEDs. [David] wanted to kick it up a notch and use RGB LEDs to get access to the wide array of different colors, but found off the shelf assemblies cost prohibitive. So, he did what any good hacker would do. He made his own.

clock
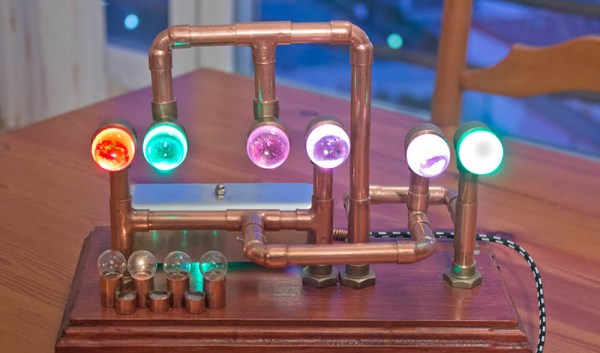
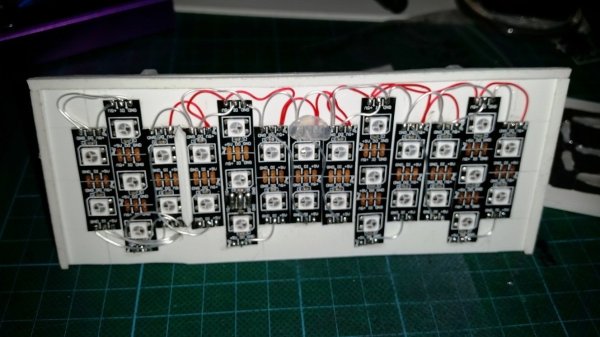
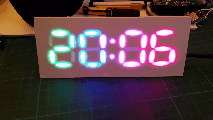
The easy part consists of Neopixels, an Arduino Nano and a DS3231 Real Time Clock. The hard part consists of Plasticard and a polymorph diffuser. Plasticard also goes by the name of Polystyrene and comes in sheets. [David] describes Polymorph as a type of moldable nylon that softens with heat, with a working temperature low enough that boiling water will suffice.

He was able to cut out the individual segments to make an impressive looking desk clock.

Shinewave Gamecube Controller Reacts To Smash Brothers

[Garrett Greenwood] plays Smash Brothers, and apparently quite seriously. So seriously that he needed to modify his controller with five Neopixels so that it flashed different color animations according to the combo he’s playing on the controller; tailored to match the colors of the moves of his favorite character, naturally.

All of this happens with an ATtiny85 as the brains, which we find quite ambitious. Indeed, [Garrett] started out thinking he could simply read each of the inputs from the controller directly into the microcontroller at the heart of the whole thing, but then counted up how many wires that would be, and looked at how many pins he had free (six), and thought up a better solution.

[Garrett]’s routine instead reads the single line that the Gamecube controller uses to send back to the console. The protocol is well understood, using long-short and short-long signals to encode bits. The only trick is that each bit is sent in four microseconds, so the decoding routine has to be fairly speedy. To make it work he had to do quite a bit of work. More about that, and the demo video, after the break.

Continue reading “Shinewave Gamecube Controller Reacts To Smash Brothers”