ESP-Powered Nixie Clock Knows The Time

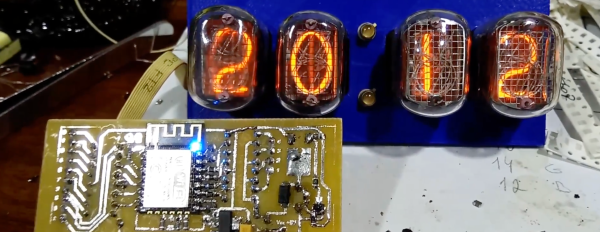
We see more than our fair share of nixie clocks here at Hackaday, and it’s nice to encounter one that packs some clever features. [VGC] designed his nixie tube clock to use minimal energy to operate: it needs only 5V via USB to work, and draws a mere 200 mA. Nixies require Soviet-approved 180v to trigger, so [VGC] used dynamic indication and a step-up voltage converter to run them, with a 74141 nixie decoder doing the heavy lifting.

The brains of the project is an ESP8266, which connects to his house’s WiFi automatically. The clock simply dials into an NTP server and sets its own time, so no RTC is needed. It also can communicate with the cloud via Telegram, allowing the clock to send alerts to [VGC]’s devices. The ESP’s firmware may likewise be updated over WiFi. The 3D-printed case and flashing second indicators are nice touches on top of the clock functionality.

As we said, everything from wrist watches to dashboard tachometers uses nixies for displays — we love those old-skool tubes!

Continue reading “ESP-Powered Nixie Clock Knows The Time”

The Nixie Tube Killer That Never Was

With the wealth of Nixie projects out there, there are points at which Hackaday is at risk of becoming Nixieaday. Nixie clocks, Nixie calculators, Nixie weather stations, and Nixie power meters have all graced our pages. And with good reason – Nixie tubes have a great retro look, and the skills needed to build a driver are a cut above calculating the right value for a series resistor for an LED display.

But not everyone loved Nixies back in the day, and some manufacturers did their best to unseat the venerable cold cathode tubes. [Fran Blanche] came across one of these contenders, a tiny cathode ray tube called the Nimo, and after a long hiatus in storage, she decided to put the tube to the test. After detailing some of the history of the Nimo and its somewhat puzzling marketing — its manufacturer, IEE, was already making displays to compete with Nixies, and seven-segment LEDs were on the rise at the time — [Fran] goes into the dangerous details of driving the display. With multiple supply voltages required, including a whopping 1,700 V DC for the anode, the Nimo was anything but trivial to integrate into products, which probably goes a long way to explaining why it never really caught on.

If you happen to have one of these little bits of solid unobtanium, [Fran]’s video below will go a long way to bringing back its ghostly green glow. You might say that [Fran] has a thing for oddball technologies of the late 60s — after all, she’s recreating the Apollo DSKY electroluminescent display, and she recently helped a model Sputnik regain its voice.

Continue reading “The Nixie Tube Killer That Never Was”

Hackaday Prize Entry: IoT Nixie Clocks

Nixie clocks are the in thing right now, and they have been for at least a decade. For his Hackaday Prize entry, [mladen] is bringing things into the 21st century with a USB-powered, IoT Nixie clock. It displays the time, temperature, the current cryptocurrency price in fiat, your current number of Twitter followers, the number of updoots on your latest reddit meme, or anything else that can be expressed as four digits.

This Nixie clock uses four IN-12B tubes, with the dot, which are more or less standard when it comes to small Nixie clocks. These tubes are mounted directly to a PCB, which is in turn mounted at 90 degrees to the main board, providing a slim form factor for the machined wood or aluminum enclosure.

The control electronics are built around the ESP8266, with a handy USB connection providing the power and a serial connection. A BQ3200 real time clock keeps the time with the help of a supercapacitor. The killer feature here is a piezo sensor to detect taps on the enclosure. Hit the clock once, and it displays the time. Hit it two times, and the current balance of your bitcoin wallet is displayed. It’s a great project, and [mladen] is hoping to turn this project into a product and put it up on Crowdsupply soon. All in all, a great entry to The Hackaday Prize.

Nixie Tachometer Displays In Style

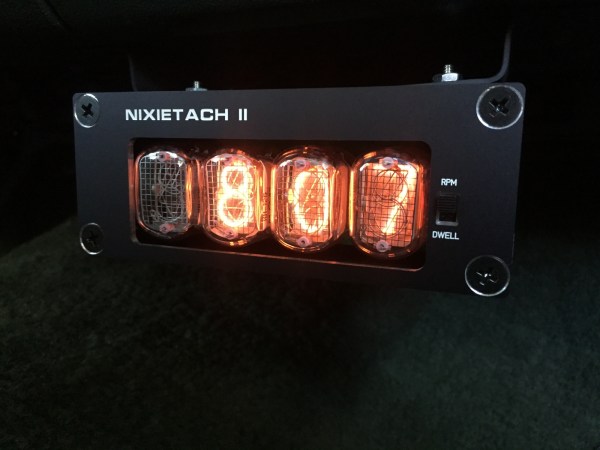
Nixietach II is a feature-rich tachomoter [Jeff LaBundy] built for his 1971 Ford LTD. It displays RPM with an error rate of only 0.03 RPM at 1,000 RPM

The latest iteration of a long-running project, [Jeff] approached it with three goals: the tachometer had to be self-contained and easy to install, the enclosure had to be of reasonable size, and it had to include new and exciting features over the first two versions.

The finished project consists of an enclosure mounted under the dash with a sensor box in the engine bay connected to the ignition coil. He can also flip a switch and the Nixietach serves as a dwell sensor able to measure the cam’s angle of rotation during which the ignition system’s contact points are closed.  The dash-mounted display consists of those awesome Soviet nixie tubes with a lovely screen-printed case. Its reverse has a USB plug for datalogging and a programming interface.

Hackaday has published some great car projects recently, like this chess set built from car parts and a 90-degree gearbox harvested from a wrecked car.


Slimline Nixie Clocks

Everyone needs to build a Nixie clock at some point. It’s a fantastic learning opportunity; not only do you get to play around with high voltages and tooobs, but there’s also the joy of sourcing obsolete components and figuring out the mechanical side of electronic design as well. [wouterdevinck] recently took up the challenge of building a Nixie clock. Instead of building a clock with a huge base, garish RGB LEDs, and other unnecessary accouterments, [wouter] is building a minimalist clock. It’s slimline, and a work of art.

The circuit for this Nixie clock is more or less what you would expect for a neon display project designed in the last few years. The microcontroller is an ATMega328, with a Maxim DS3231 real time clock providing the time. The tubes are standard Russian IN-14 Nixies with two IN-3 neon bulbs for the colons. The drivers are two HV5622 high voltage shift registers, and the power supply is a standard, off-the-shelf DC to DC module that converts 5 V from a USB connector into the 170 V DC the tubes require.

The trick here is the design. The electronics for this clock were designed to fit in a thin base crafted out of sheets of bamboo plywood. The base is a stackup of three 3.2mm thick sheets of plywood and a single 1.6 mm piece that is machined on a small desktop CNC.

Discounting the wristwatch, this is one of the thinnest Nixie clocks we’ve ever seen and looks absolutely fantastic. You can check out the video of the clock in action below, or peruse the circuit design and code for the clock here.

Continue reading “Slimline Nixie Clocks”

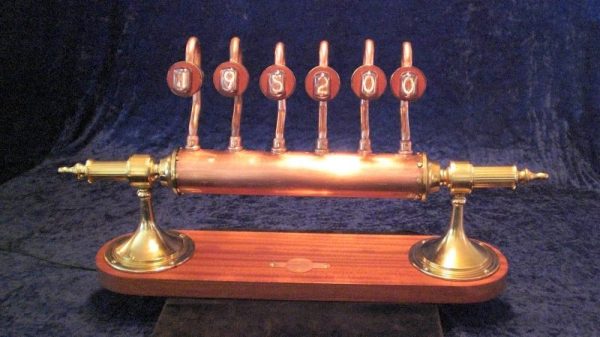
Copper, Brass, Mahogany, And Glass Combine In Clock With A Vintage Look

No two words can turn off the average Hackaday reader faster than “Nixie” and “Steampunk.” But you’re not the average Hackaday reader, so if you’re interested in a lovely, handcrafted timepiece that melds modern electronics with vintage materials, read on. But just don’t think of it as a Nixie Steampunk clock.

No matter what you think of the Steampunk style, you have to admire the work that went into [Aeon Junophor]’s clock, as well as his sticktoitiveness –he started the timepiece in 2014 and only just finished it. We’d wager that a lot of that time was spent finding just the right materials. The body and legs are copper tube and some brass lamp parts, the dongles for the IN-12A Nixies are copper toilet tank parts and brass Edison bulb bases, and the base is a fine piece of mahogany. The whole thing has a nice George Pal’s Time Machine vibe to it, and the Instructables write-up is done in a pseudo-Victorian style that we find charming.

If you haven’t had enough of the Nixie Steampunk convergence yet, check out this Nixie solar power monitor, or this brass and Nixie clock. And don’t be bashful about sending us tips to builds in this genre — we don’t judge.

Continue reading “Copper, Brass, Mahogany, And Glass Combine In Clock With A Vintage Look”

High Vacuum With Mercury And Glassware

If you want to build your own vacuum tubes, whether amplifying, Nixie or cathode-ray, you’re going to need a vacuum. It’s in the name, after all. For a few thousand bucks, you can probably pick up a used turbo-molecular pump. But how did they make high vacuums back in the day? How did Edison evacuate his light bulbs?

Strangely enough, you could do worse than turn to YouTube for the answer: [Cody] demonstrates building a Sprengel vacuum pump (video embedded below). As tipster [BrightBlueJim] wrote us, this project has everything: high vacuum, home-made torch glassware, and large quantities of toxic heavy metals. (Somehow [Jim] missed out on the high-voltage from the static electricity generated by sliding mercury down glass tubes for days on end.)

Continue reading “High Vacuum With Mercury And Glassware”