In common with quite a few in the hardware hacking community, I have a fondness for older vehicles. My “modern” ride is an older vehicle by today’s standards, a Volkswagen Polo 6N made in the late 1990s. It’s by my estimation a Good Car, having transported me reliably back and forth across the UK and Europe for several years.
Last week though, it let me down. Outside the church in a neighbouring village the driver’s door lock failed, leaving me with my igniton key stuck in the door, and a mildly embarrassing phone call to my dad to bring the Torx driver required to remove the assembly and release it. I am evidently not 1337 enough, I don’t carry a full set of Torx bits with me everywhere I go. The passenger side lock has never worked properly while I’ve had the car, and this is evidently my cue to sort it all out.
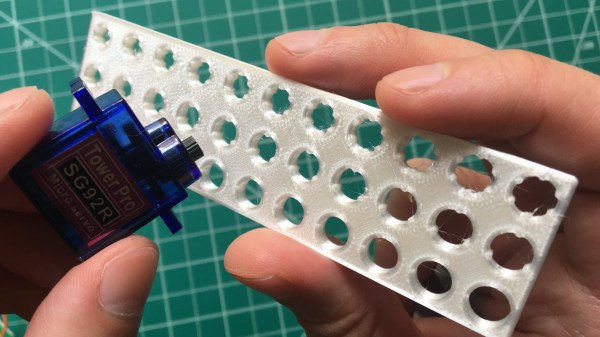
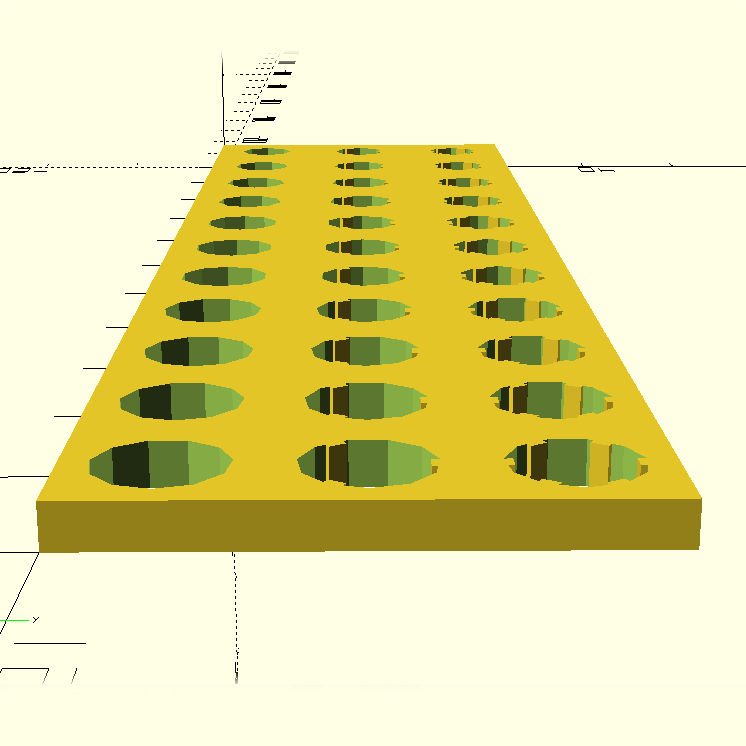
There is something to be said for brute force or trial-and-error approaches to problems, especially when finding a solution has an empirical element to it. [Tommy] perceived that to be the case when needing to design and 3D print servo horns that would fit factory servos as closely as possible, and used OpenSCAD to print a “Goldilocks array” from which it was possible to find a perfect match for his printer by making the trial and error process much more efficient. By printing one part, [Tommy] could test-fit dozens of options.
What made doing this necessary is the fact that every 3D printer has some variance in how accurately they will reproduce small features and dimensions. A 6.3 mm diameter hole in a CAD model, for example, will not come out as exactly 6.3 mm in a 3D-printed object. It will be off by some amount, but usually consistently so. Therefore, one way around this is to empirically determine which measurements result in a perfect fit, and use those for production on that specific 3D printer.
That’s exactly what [Tommy] did, using OpenSCAD to generate an array of slightly different sizes and shapes. The array gets printed out, servos are test-fitted to them, and whichever option fits best has its dimensions used for production. This concept can be implemented in any number of ways, and OpenSCAD makes a decent option due to its programmatic nature. Interested in OpenSCAD? It will run on nearly any hardware, and you can get up and running with the basics in probably less than ten minutes.
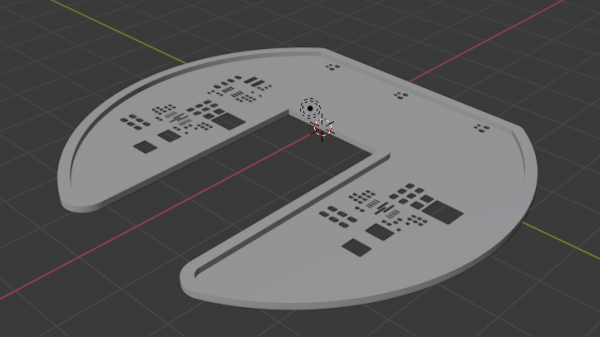
[Jan Mrázek]’s success with 3D printing a solder paste stencil is awfully interesting, though he makes it clear that it is only a proof of concept. There are a lot of parts to this hack, so let’s step through them one at a time.
First of all, it turns out that converting a PCB solder paste layer into a 3D model is a bit of a challenge. A tool [Jan] found online didn’t work out, so he turned to OpenSCAD and wrote a script (available on GitHub) which takes two DXF files as input: one for the board outline, and one for the hole pattern. If you’re using KiCad, he has a Python script (also on GitHub) which will export the necessary data.
The result is a 3D model that is like a solder paste mask combined with a raised border to match the board outline, so that the whole thing self-aligns by fitting on top of the PCB. A handy feature, for sure. [Jan] says the model pictured here printed in less than 10 minutes. Workflow-wise, that certainly compares favorably to waiting for a stencil to arrive in the mail. But how do the actual solder-pasting results compare?
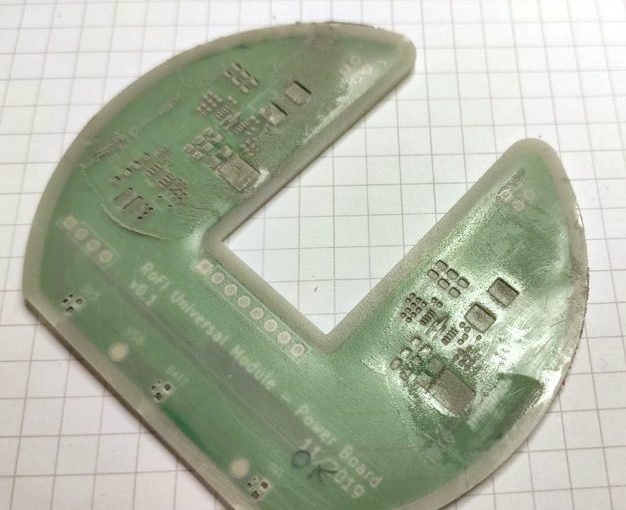
3D printed solder stencil on PCB, after applying solder paste.
[Jan] says that the printed stencil had a few defects but it otherwise worked fine for 0.5 mm pitch ICs and 0402 resistors, and the fact that the 3D printed stencil self-registered onto the board was a welcome feature. That being said, it took a lot of work to get such results. [Jan]’s SLA printer is an Elegoo Mars, and he wasn’t able to have it create holes for 0.2 mm x 0.5 mm pads without first modifying his printer for better X/Y accuracy.
In the end, he admits that while a functional DIY solder stencil can be 3D printed in about 10 minutes, it’s not as though professionally-made stencils that give better results are particularly expensive or hard to get. Still, it’s a neat trick that could come in handy. Also, a quick reminder that we stepped through how to make a part in OpenSCAD in the past, which should help folks new to OpenSCAD make sense of [Jan]’s script.
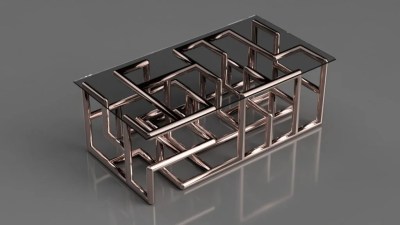
Copper is a material with many applications; typically, it’s used for electrical wiring or in applications where good heat conductivity is a requirement. However, it can also make for an attractive material in furnishings, which [Andrei Erdei] decided to explore.
A render of the coffee table design, exported from OpenSCAD into Fusion360.
[Andrei]’s work began in OpenSCAD, where he wrote scripts to enable the quick and easy assembly of various designs. The modular nature of commercially-available copper pipe and fittings allows complex structures to be assembled, particularly if you’re a fan of 90-degree bends. The final renders of some of these designs are impressive, with the coffee table design a particular highlight. Staying conceptual wasn’t enough, however, so [Andrei] set out to build one of his designs. Constructing a table lamp shroud out of copper parts was successful, though the real components have flanges and other features that aren’t represented in the rendering.
It’s a project that shows the value of tools such as OpenSCAD to aid the design process before committing to cutting real-world materials. While the designs on screen aren’t perfect representations of what’s possible in reality, it still proves to be a useful guide.
We’re a fan of the aesthetic, and would love to see more done with copper pipe as a construction kit. Global ore prices may limit experimentation, however. Alternatively, you can always harvest the metal from scrap!
The Logitech SqueezeBox was a device you hooked up to your stereo so you could stream music from a Network Attached Storage (NAS) box or your desktop computer over the network. That might not sound very exciting now, but when [Aaron Ciuffo] bought it back in 2006, it was a pretty big deal. The little gadget has been chugging all these years, but the cracks are starting to form. Before it finally heads to that great electronics recycling center in the sky, he’s decided to start work on its replacement.
Thanks to the Raspberry Pi, building a little device to stream digital audio from a NAS is easy these days. But a Pi hooked up to a USB speaker isn’t necessarily a great fit for the living room. [Aaron] didn’t necessarily want his replacement player to actually look like the SqueezeBox, but he wanted it to be presentable. While most of us probably would have tried to make something that looked like a traditional piece of audio gear, he took his design is a somewhat more homey direction.
An OpenSCAD render of the enclosure.
The Raspberry Pi 4 and HiFiBerry DAC+ Pro live inside of a wooden laser cut case that [Aaron] designed with OpenSCAD. We generally associate this tool with 3D printing, but here he’s exporting each individual panel as an SVG file so they can be cut out. We especially like that he took the time to add all of the internal components to the render so he could be sure everything fit before bringing the design into the corporeal world.
While the case was definitely a step in the right direction, [Aaron] wasn’t done yet. He added a WaveShare e-Paper 5.83″ display and mounted it in a picture frame. Software he’s written for the Raspberry Pi shows the album information and cover art on the display while the music is playing, and the current time and weather forecast when it’s idle. He’s written the software to plug into Logitech’s media player back-end to retain compatibility with the not-quite-dead-yet SqueezeBox, but we imagine the code could be adapted to whatever digital media scheme you’re using.
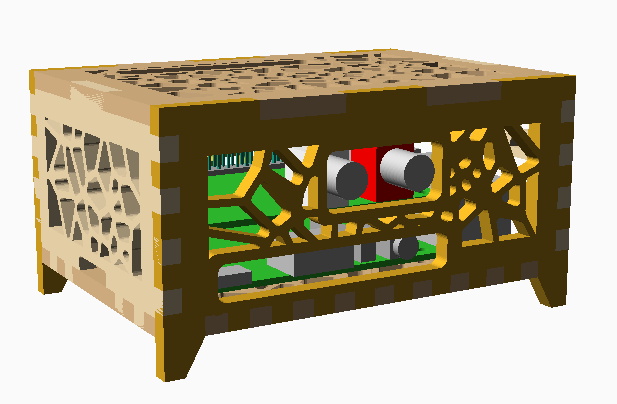
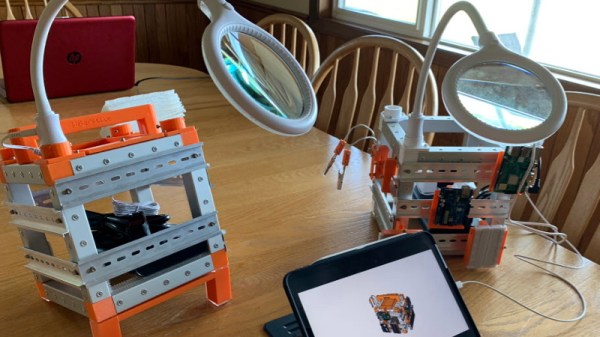
Don’t bother denying it, we know your workbench is a mess. A tangled pile of wires, tools, and half-completed projects is standard decor for any hardware hacker. In fact, if you’ve got a spotless work area, we might even be a bit skeptical about your credentials in this field. But that’s not to say we wouldn’t be interested in some way of keeping the electronic detritus in check, perhaps something like the Open Makers Cube created by [technoez].
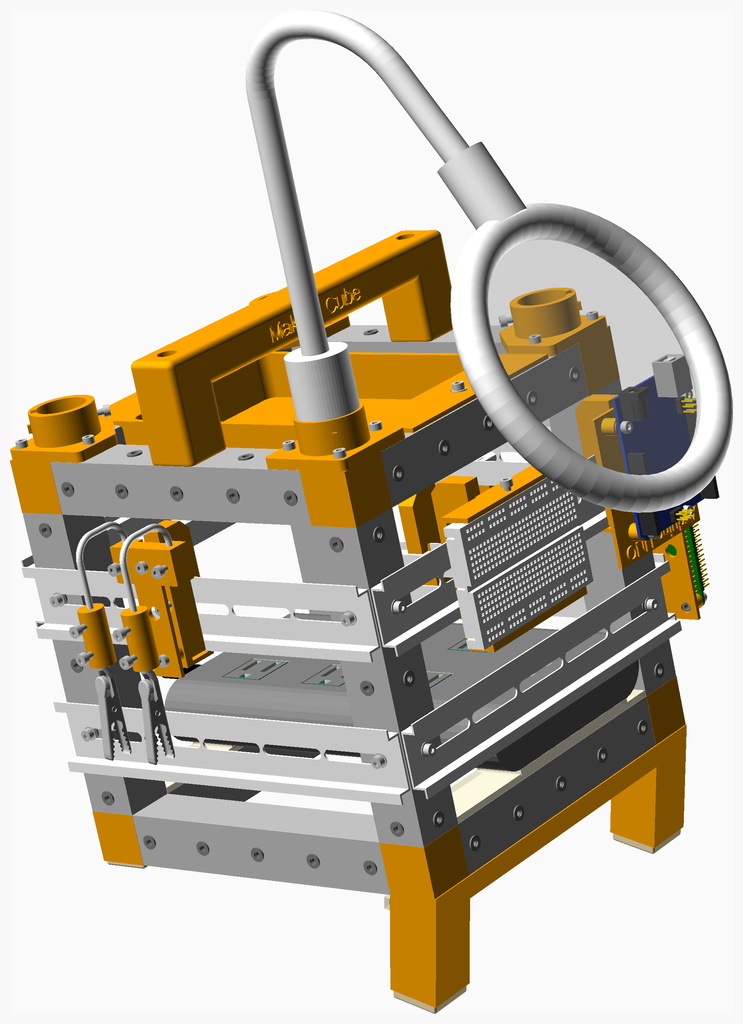
This all-in-one hardware hacking station uses DIN rails and 3D-printed mounting hardware to allow the user to attach a wide array of tools, gadgets, and boards to the outside surface where they’re easily accessible. The OpenSCAD design includes mounts for the usual suspects like the Raspberry Pi, Arduino Uno, and general purpose breadboards. Of course, your own custom mounts are just a few lines of code away.
The Cube also includes a lighted magnifying glass on a flexible arm so you can zoom in on what you’re working on, a simple “helping hands” attachment, and provisions for internal USB power. It even features angled feet so the front side of the cube is held at a more comfortable viewing angle. All of which is held together by a lightweight and portable frame built from square aluminum tubing.
We can understand if you’ve got some doubts about the idea of mounting all of your tools and projects to the side of a jaunty little cube. But even if the jury is still out on the mobile workspace concept, one thing is for sure: the Open Makers Cube is easily one of the best documented projects we’ve seen in recent memory. Thanks to NopSCADlib, [technoez] was able to generate an exploded view and Bill of Materials for each sub-assembly of the project. If you’ve ever needed proof that NopSCADlib was worth checking out, this is it.
The ability to duplicate keys with a 3D printer is certainly nothing new, but so far we’ve only seen the technique used against relatively low hanging fruit. It’s one thing to print a key that will open a $15 Kwikset deadbolt from the hardware store or a TSA-approved “lock” that’s little more than a toy, but a high-security key is another story. The geometry of these keys is far more complex, making them too challenging to duplicate on a consumer-level printer. Or at least, you’d think so.
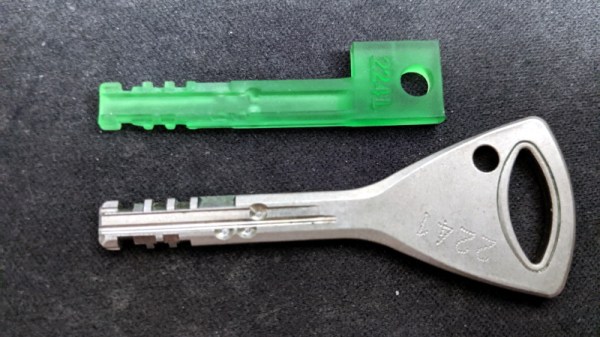
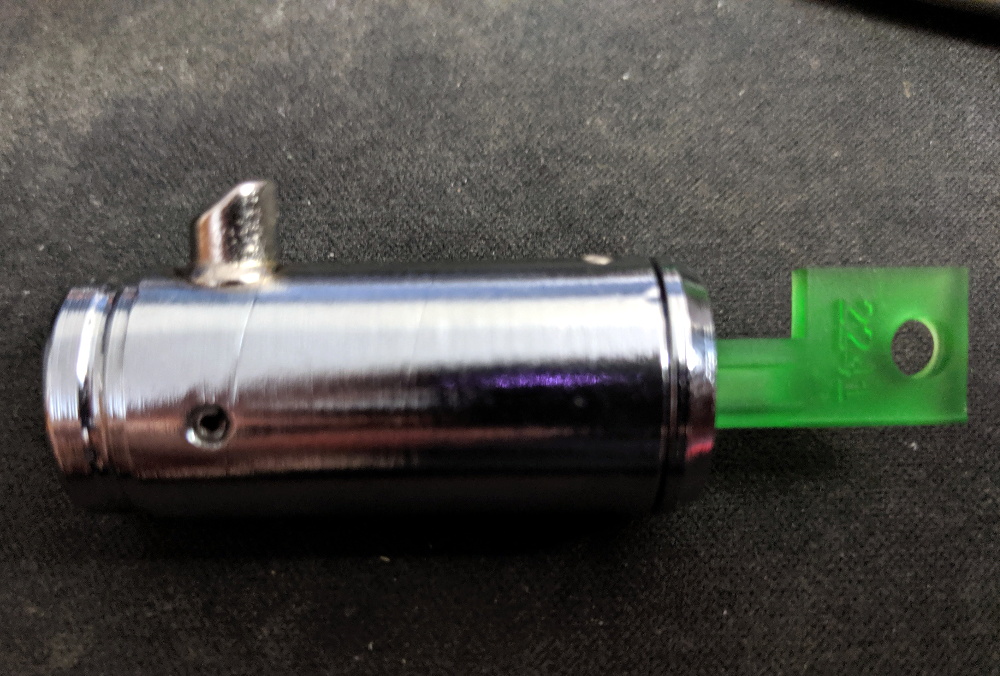
Inspired by previous printed keys, [Tiernan] wanted to see if the techniques could be refined for use against high security Abloy Protec locks, which are noted for their resistance to traditional physical attacks such as picking. The resulting STLs are, unsurprisingly, beyond the capabilities of your average desktop FDM printer. But with a sub-$300 USD Anycubic Photon DLP printer, it’s now possible to circumvent these highly regarded locks non-destructively.
Of course, these keys are far too intricate to duplicate from a single picture, so you’ll need to have the physical key in hand and decode it manually. [Tiernan] wisely leaves that step of the process out, so anyone looking to use this project will need to have a good working knowledge of the Abloy Protec system. Hopefully this keeps bad actors from doing anything too nefarious with this research.
Once you have the decoded values for the key you want to duplicate, you just need to provide them to the OpenSCAD library [Tiernan] has developed and print the resulting STL on your sufficiently high-resolution printer. Generally speaking, the parts produced by resin-based printing have a high tensile strength but are very brittle, so perhaps not the kind of thing you want to stick in your expensive Abloy lock. That said, there are some “Tough Resin” formulations available now which produce parts that are at least as strong as those made with thermoplastics. So while the printed keys might not be strong enough for daily use, they’ll certainly work in a pinch.