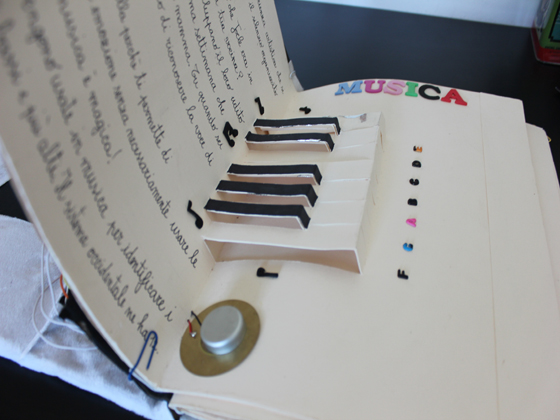
Papercraft Flash Reflector

We never use the flash on our point-and-shoot. It has a way of washing out every image we take. But [Joey] has a different solution to the problem. He shows us how to make a papercraft flash reflector that will still light up your subject without washing out everything in the foreground.

[Joey] is perfectly aware that at first glance it would seem you need to have a reflective forehead for this to work. But the reflector is actually set up to aim the flash toward the ceiling. Since most ceilings are white this will reflect the light back into the room, dispersing it at the same time. His write-up includes a link to a PDF of the pattern. After cutting it out, one side is coated in black electrical tape, the other is left white to reflect the light. The design includes a tab that slides into the hot shoe of his Nikon DSLR to position it in front of the pop-up flash.

Astounding Papercraft Skills Result In This Working Robot

It would have been very hard to believe this is made from paper if we hadn’t seen all the parts being built. As a still image it looks neat, but the speed at which those paper gears turn in the video after the break will certainly leave you slack-jawed. It really is a walking robot made using papercraft (translated).

These are actually being sold as kits, but there’s not much in the way of materials. You’ll get six sheets of paper, some skewers which act as the axles, and a bit of elastic band which stores potential energy when winding-up the model. The genius is in the design, which is printed on those sheets of paper. The build process involves plenty of delicate work. Dozens of cuts lead into hundreds of folds, and that’s before assembly even starts. We’ve never considered building a ship in a bottle, but this might be right up our alley. If you need to give a gift to a tinkerer this should show up high on the idea list.

Continue reading “Astounding Papercraft Skills Result In This Working Robot”

Qube Robots Use Well-designed Laser-cut Acrylic

These robot cubes, called BOXZ, use an interesting interlocking part design to mount and protect the parts within. But to really make them pop you need to color and apply your own papercraft skins.

The actual hardware is quite simple. They’ve used an Arduino, along with motor driver and Bluetooth shields, to control a set of geared DC motors. There’s a battery pack which holds four AA cells and a pair of servo motors which seem to be there to act as arms. This base can then be adorned with sensors to add functionality (line following, wall following, obstacle avoidance, etc.).

Despite the simple appearance of the cube, the chassis is the most complicated part. It uses sixteen pieces of acrylic, but they may also be hand cut from cardboard by printing out templates and gluing them onto the material. The parts are designed with interlocking tabs which we often see used on laser-cut wooden box parts.

We’ve embedded the video presentation of BOXZ after the break.

Continue reading “Qube Robots Use Well-designed Laser-cut Acrylic”

Flimsy Pi Case Still Provides A Level Of Protection

This flimsy case isn’t going to protect your Raspberry Pi if you knock it off the workbench. It will provide a level of protection against shorting out from contact with metal objects, or from liquids spilled in the near vicinity. [CGPatterson] ended up making this case from a single sheet of transparency film.

The project is basically papercraft. He started with the dimensions published on the Raspberry Pi FAQ, which turned out to be wrong. Not having a caliper available to help with the precision of the measurements, he grabbed his ruler and did the best he could. The first two cases were a poor fit, but as you can see the third is like a glove. Luckily you don’t have to go through this same trial and error as he release the design. Both A4 and US Letter sized PDFs are available for download. Print them out on the transparency, cut along the lines, apply transparent double-sided tape to the tabs and you’re in business. If you wish to alter the design he has also posted the SVG source he made in Inkscape.

This is certainly a good option for those of us without the ability to produce laser cut parts.

A Papercraft Resistor Calculator From Adafruit

The Adafruit blog just posted a neat papercraft resistor calculator. If you haven’t yet learned the horribly offensive mnemonic for resistor color codes, now’s your chance to have a cheap and portable resistor value reference.

This papercraft resistor calculator is the latest in the family of Circuit Playground tools that include a fabulous electronic reference app we reviewed some months ago. Instead of an Android or iOS device, the papercraft resistor calculator runs on its own mechanical computer; a series of four printed disks and some paper fasteners.

If you’d like to print out your own resistor calculator, Adafruit put up the PDF on GitHub and posted the Illustrator file on Thingiverse for easy editing. It’s not the old-school cool of a slide rule, but we could easily see this resistor calculator being useful if you’re ever lucky enough to teach electronics to children. At least then you won’t have to share that offensive mnemonic.

Slide Rule For Musical Scales

For all those engineers who dabble in music [Magnetovore] has your back. Musicians simply must know their scales and he came up with a papercraft slide rule for major and minor scales.

The system is very easy to use. He’s uploaded PDF files that let you print out the mask for the top layer and bar chart and directions for the bottom layer. The top layer is laid out like a piano keyboard, with windows for each key and a couple of windows to identify the major and minor scales being displayed. Just slide the mask until each key is a solid color. The color codes show the tonic, third, and dominant for each key so you know where to start. In the video after the break you can see how it works by playing all of the non-black keys in order. But wait, if you order now you’ll get the slide rule for Cello scales at the same low-cost; free!

This is a fun quick-reference, but you really should know your Circle of Fifths. Continue reading “Slide Rule For Musical Scales”

Piano Box Is A Digital Synthesizer Made Of Paper

We love the look of this papercraft piano which [Catarina] built along with some friends at NYC Resistor, a hackerspace in the big apple. It starts off as a cubic black box with a white top. But just lift that top as [Catarina] does in the video after the break and three of the sides fall flat to reveal a pair of speakers and the single-octave keyboard.

The key’s don’t move when you press them. Instead, she decided to use the CapSense Arduino library to implement touch sensitive keys. Each key is made up of a plane of copper foil tape, with a strip of tape running back to the center of the box where it is interfaced with an Arduino Mega hidden there. The Tone library produces the waveforms which are played by the speakers, and a set of LEDs on the upright side of the box illuminate the keyboard diagram as you press each key. You can see that there are short white bars on that display which correspond to the black keys on the keyboard.

If you take a look at the code, you’ll see the libraries really make the code for the project simple.

Continue reading “Piano Box Is A Digital Synthesizer Made Of Paper”