Remember that “PhoneDrone” scam from a while back? With two tiny motors and props that could barely lift a microdrone, it was pretty clearly a fake, but that doesn’t mean it wasn’t a pretty good idea. Good enough, in fact, that [Nick Rehm] came up with his own version of the flying phone case, which actually works pretty well.
In the debunking collaboration between [Mark Rober], [Peter Sripol], and the indispensable [Captain Disillusion], you’ll no doubt recall that after showing that the original video was just a CGI scam, they went on to build exactly what the video purported to do. But alas, the flying phone they came up with was manually controlled. While cool enough, [Nick Rehm], creator of dRehmFlight, can’t see such a thing without wanting to make it autonomous.
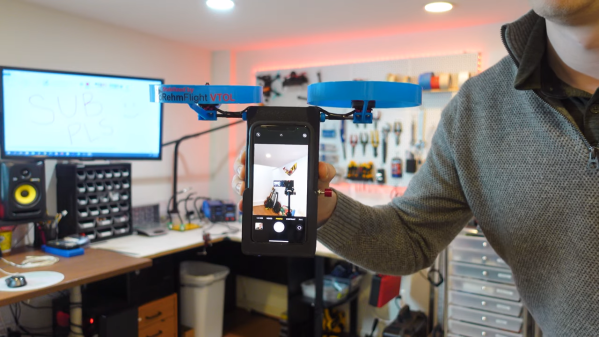
To that end, [Nick] came up with the DroneCase — a bicopter design that allows the phone to hang vertically. The two rotors are on a common axis and can swivel back and forth under control of two separate micro-servos; the combination of tilt rotors and differential thrust gives the craft full aerodynamic control. A modified version of dRehmFlight runs on a Teensy, while an IMU, a lidar module, and a PX4 optical flow sensor round out the sensor suite. The lidar and flow sensor both point down; the lidar is used to sense altitude, while the flow sensor, which is basically just the guts from an optical mouse, watches for translation in the X- and Y-axes.
After a substantial amount of tuning and tweaking, the DroneCase was ready for field tests. Check out the video below for the results. It’s actually quite stable, at least as long as the batteries last. It may not be as flexible as a legit drone, but then again it probably costs a lot less, and does the one thing it does quite well without any inputs from the user. Seems like a solid win to us.
Continue reading “Bicopter Phone Case Might Be Hard To Pocket, But Delivers Autonomous Selfies”