Hardware Virtualization In Microcontrollers

Look at any sufficiently advanced CNC machine or robot, and you’ll notice something peculiar. On one hand, you have a computer running a true operating system for higher-level processing, be it vision or speech recognition, or just connecting to the Internet. On the other hand, you have another computer responsible only for semi-real-time tasks, like moving motors, servos, and reading sensors and switches. You won’t be doing the heavy-lifting tasks with a microcontroller, and the Raspberry Pi is proof enough that real-time functions aren’t meant for a chip running Linux. There are many builds that would be best served with two processors, but that may be changing soon.

Microchip recently announced an addition to the PIC32 family of microcontrollers that will support hardware virtualization. This addition comes thanks to the MIPS M5150 Warrior-M processor, the first microcontroller to support hardware visualization.

Continue reading “Hardware Virtualization In Microcontrollers”

Unix On Your Breadboard

As smartphones continue to get bigger and bigger, the race to have the smallest chip running Unix (or Linux, as the case may be) is still on. A new contender in this arena is [Serge] who has crammed RetroBSD on a Fubarino microcontroller for a powerful breadboard-friendly device.

The device uses a PIC32MX795 processor to run version 2.11BSD Unix for microcontrollers. It uses only 128 kbytes of RAM which is great for the limited space available, but it doesn’t skimp on software. It has a C compiler, assembler, and a whole host of other utilities that you’d expect to find in something much more powerful. All of this comes in a package that has breadboard-compatible pins so you can interface your Unix with the real world.

There’s a video below that shows the device in action, and a whole host of instructions that’ll get you up and running in no time if you have the hardware available. [Serge] mentioned that this would run on other architectures but is looking for others to join the project to port it to those processors. This isn’t the first time we’ve seen *nix installed on a microcontroller, but it is one of the more useful ones!

Continue reading “Unix On Your Breadboard”

Hackaday Prize Entry: A Pic32 Game Console

The official theme of the 2015 Hackaday Prize is to build something that matters. Solving the challenges facing the world is hard, and retro video games, despite what you read on Hackaday, do not matter.

That doesn’t mean there’s not space for the weird, esoteric builds out there; we have a best product prize that will dump $100k, a six month residency in the Hackaday Design Lab, and contacts with a lot of engineers with expertise in manufacturing. [Alex]’s extremely ow cost game console on a Pic32 is exactly what this prize category is looking for.

[Alex]’s project – XORYA – is based on the Pic32MX170F256, a chip that runs up to 50MHz, has 256kB of flash, and a full 64k of RAM. This is far beyond what the guys at Atari imagined back in the 70s, allowing the XORYA to have some amazing graphics.

Right now most of the build is dedicated to fleshing out the video system, and [Alex] has a great demo: rendering the Mandelbrot set in real time in 16 colors on an NTSC display with a resolution of 160×100. That’s a single-chip game console that’s right up there with the Uzebox, and a great example of the potential of the best product category for this year’s Hackaday Prize.


The 2015 Hackaday Prize is sponsored by:

3D Spectrum Analyzer Uses 1280 LEDs

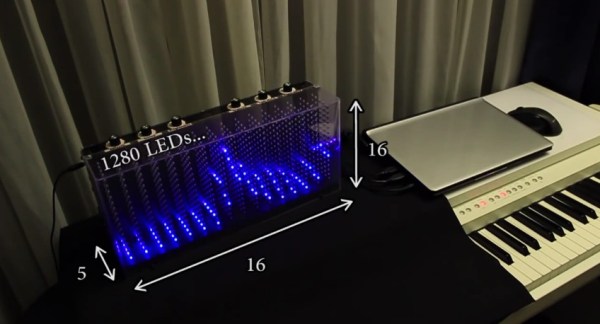
One of [Dooievriend]’s friends recently pressed him into service to write software for a 3d spectrum analyzer/VU that he made. The VU is a fairly complex build: it’s made up of 1280 LEDs in a 16x16x5 matrix controlled by a PIC32 clocked at 80MHz. [Dooievriend] wrote some firmware for the PIC that uses a variation on a discrete Fourier transform to create a 3D VU effect.

j6v2i When [Dooievriend] set out to design the audio analyzing portion of the firmware, his mind jumped to the discrete Fourier transform. This transform calculates the amplitude in a series of frequency bins in the audio—seemingly perfect for a VU. However, after some more research, [Dooievriend] decided to implement a constant Q transform. This transform is very similar to a Fourier transform, but it takes into account the logarithmic way that the human ear interprets sound.
[Dooievriend] started implementing the constant Q transform using an interrupt-based sampler, but he quickly ran into issues with slow floating-point math on his PIC32 (which doesn’t have a hardware floating-point unit). Thankfully he rewrote his code using fixed-point math, and the transform runs nearly real-time. Check out the video after the break to see the VU in action, and a second video that gives some details on the hardware build.

Continue reading “3D Spectrum Analyzer Uses 1280 LEDs”

Spectrum Analyzer On The Cheap

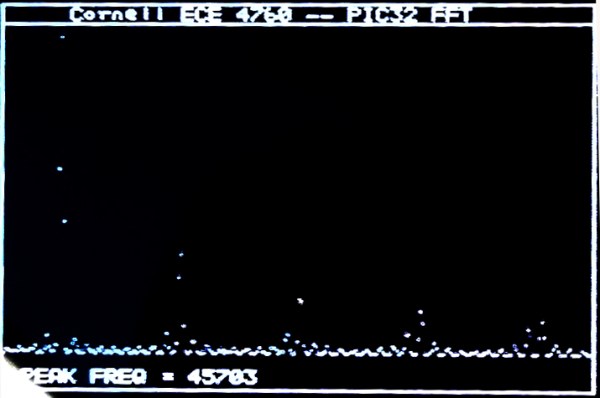
Provided you have an NTSC-compatible TV you can build yourself a really inexpensive spectrum analyzer. From there you just need one trivial piece of hardware to complete this build. [Bruce Land] has come up with a spectrum analyzer that shouldn’t cost any more than $5, if that’s what’s been keeping you from adding this tool to your workbench!

The spectrum analyzer is based on a PIC32 microcontroller which was previously proven in his Oscilloscope project. [Bruce] has managed to squeeze quite a bit out of this robust chip; the spectrum analyzer has 450 kHz bandwidth and runs a 256 Hz TV display and can output over 30 updates per second. The microcontroller runs the Fast Fourier Transform (FFT) to do calculations, with great results.

[Bruce] notes that the project was based on TV framework from another project, and that the FFT was added on top of that. Be sure to check out the source code on the project site if you’ve been on the hunt for an inexpensive spectrum analyzer, and if you need something with more processing power but only slightly more money, check out the FFT that runs on the Raspberry Pi’s GPU.

Hacklet 36 – Oscilloscope Projects

Oscilloscopes are one of the most often used tools of the engineer, hacker, or maker. Voltmeters can do a lot, but when you really need to get a good look at a signal, a good scope is invaluable. This week’s hacklet is triggered by the rising slope of some of the best Oscilloscope projects on Hackaday.io!

rigol500We start with [DainBramage’s] recent project Stretching the Limits of a Rigol DS-1102E Scope. The new Rigol ds1054z may be getting all the press lately, but the older DS-1102E (100 MHz) model is still a very capable scope. [DainBramage] broke out his vintage Singer CSM-1 service monitor to generate frequencies all the way up to 500 MHz. The Rigol did admirably well, detecting a sine wave all the way up to 500 MHz. This is in part due to the scope’s 1 gigasample-per-second sampling rate. Once things got beyond the specified limit of 100 MHz though, the signal began to attenuate.  Not bad for pushing a low-end scope way beyond its limits!


cornel-scopeNext up is [Bruce Land] with his PIC32 oscilloscope. Microcontroller scope projects are nothing new, but one that runs at nearly 1 MHz sampling rate while generating NTSC composite video is nothing to sneeze at. [Bruce] pulled this off by using Direct Memory Access (DMA) to move the data from the ADC to memory, and to get the video data from memory to the I/O pins used to generate video. The video itself is created by a resistor tree DAC. All you need to make black and white video is three resistors and two I/O pins. [Bruce] says the entire scope cost about $4.00 us in parts!

scope-hand[Jacob Christ] mixed art and science with his chipKIT Oscilloscope Plotter. [Jacob] used a Microchip PIC32 based Fubarino to draw patterns on his scope. To do this the scope must be set to X-Y mode. [Jacob] paired his Fubarino with a MCP4902 Digital to Analog Converter (DAC). Using a dedicated DAC is a great way to do this. [Jacob’s] images are a testament to that, as they’re some of the cleanest “scope art” drawings we’ve seen. Much like [Bruce Land], [Jacob] used his project as the basis for a college class. In fact, the image to the left was created by one of his students!

Want more scope goodness? Check out our new Oscilloscope Projects List!

Hackaday.io Update!

Hackaday.io is getting new features every day. Our dev team has just rolled out a new gallery view. Just click on a project’s featured image, or the “View Gallery” button, and you will be taken to a gallery view of every image used in the project – including log images. YouTube videos will render in the gallery as well. It’s a great way to view a timeline of progress for some of the projects on hackaday.io. For a great example of this, check out OpenMV’s gallery.

In other Hackaday.io news, check out the Caption CERN Contest! Every week we put up a new image from CERN’s archives. The Hackaday.io user who comes up with the funniest caption wins a T-Shirt from The Hackaday Store!

Looks like we’ve hit the end of the trace for this Hacklet. Same hack time, same hack channel, bringing you the best of Hackaday.io!

Building A Modern Retro Console

There are a few dozen classic re-imaginings of classic game consoles, using hardware ranging from the ATMegas of the Uzebox to everyone’s favorite, stuffing some ROMs on a Raspi and calling it a day. You don’t necessarily learn anything doing that, which puts [Mike]’s custom game console head and shoulders above the rest.

The build started off as a plan for a Z80 computer with a dual ATMega GPU. He progressed far enough in the design where it would have been a masterpiece, but the inability to mill double-sided boards at home killed the design. Plans then moved on to an FPGA, then to an ATMega with the Analog Device AD725 PAL/NTSC encoder chip. That idea had a similar architecture to the Uzebox, but [Mike] wanted more power. He eventually settled on a PIC32 with the AD725.

This setup was capable of pumping out some impressive graphics, but for moving bits to a screen, you need DMA. [Mike] ran into a problem where the DMA timer runs at a maximum rate of 3.7 MHz. It’s a problem documented in a few projects, leading [Mike] to change his plan once again, this time to the STM32F4.

The bugs are worked out, and now [Mike] can stream a whole lot of pixels to a screen while still having some processing power left over to play a game. It’s a project that’s more than a year and a half old at this point, and so far he’s learned a lot.