Hackers being as a rule practical people, we sometimes get a little guff when we run a story on an art installation, on the grounds of not being sufficiently hacky. We understand that, but sometimes the way an artist weaves technology into their pieces is just too cool to pass us, as with this thread-printing art piece entitled On Framing Textile Ambiguities.
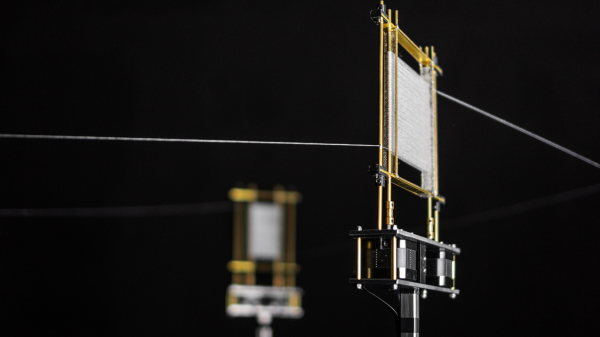
We’ll leave criticism of the artistic statement that [Nathalie Gebert]’s installation makes to others more qualified, and instead concentrate on its technical aspects. The piece has four frames made mainly from brass rods. Three of the frames have vertical rods that are connected to stepper motors and around which is wrapped a single thread. The thread weaves back and forth over the rods on one frame, forming a flat surface that constantly changes as the rods rotate, before heading off to do the same on the others. The fourth frame has a platen that the thread passes over with a pen positioned right above it. As the thread pauses in its endless loop, the pen clicks down onto it, making a dot of color. The dots then wend their way through the frame, occasionally making patterns that are just shy of recognizable before morphing into something new. The video below shows it better than it can be easily described.
Love it or hate it, you’ve got to admit that it has some interesting potential as a display. And it sort of reminds us of this thread-art polar robot, although this one has the advantage of being far simpler.
Continue reading “Art Piece Builds Up Images With Dots On Thread”