Arduino Can Program PIC Too!

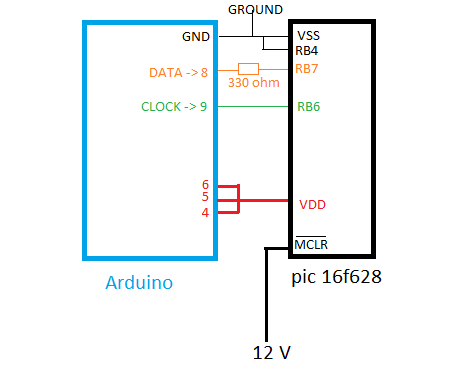
This is a wiring diagram that [Soranne] put together when developing a method of programming PIC microcontrollers using an Arduino board. You can see that he takes care of the 12V issue by connecting the Master Clear (MCLR) pin to an external source. This comes with one warning that the Arduino should always be reset just before making that connection.

He’s tested this with a 16F628 and is happy to report that he can successfully flash the program memory, but hasn’t implemented a way to write to the EEPROM as of yet. This should work for any of the 16F family of chips, but we’d bet this will be extended if some knowledgeable folks decide to lend a hand.

On the PC side of things [Soraane] has been working on a program to push code to the Arduino via the USB connection. He’s developing it in C# and even has a GUI worked up for the project. You can get your hands on the software in the second post of the thread linked above but you’ll have to be logged into the Arduino forum to see the download link.

We think the 12V issue is why we don’t see more roll-your-own programmers for PIC. But there are a few solutions out there like this ATmega8 version.

Firmware Programmer For A Cheap Bluetooth Module

Here’s a nifty programmer for a cheap Bluetooth module. So just how cheap is this part? Does $6.60 sound like an extreme deal?

The information on this hack is spread throughout a series of posts. The link above goes to the completed programmer (kind of a look back on the hack). But you might start with this post about module firmware options. Just because you can get the part inexpensively doesn’t mean that it’s going to work as you expected. [Byron] sourced similar devices from different suppliers and found they were not running the same firmware; the footprints were the same but he features were not. With his help you can tailor the code to your needs and reflash the device.

The programmer that he build has a nice slot for the module which interfaces with the programming lines using pogo pins (spring-loaded contacts). It connects to the CSR BC417 chip’s SPI pins in order to flash the firmware. If you’ve had any experience working with these cheap parts we’d love to hear your tale in the comment section.

[Thanks MS3FGX]

Building An EEPROM Programmer

Behold this ATtiny85 based EEPROM programmer. It seems like a roundabout way of doing things, but [Quinn Dunki] wanted to build to her specifications using tools she had on hand. What she came up with is an ATtinyISP USB programmer, pushing data to an ATtiny85, which then programs an EEPROM chip with said data.

The hardware is the next module for her Veronica 6502 computer build. When we last saw that project [Quinn] was planning to add persistent storage for the operating firmware. This will be in the form of an EEPROM programmed with this device. Using ISP and an ATtiny as a go-between means that she should have no problems reflashing the OS without removing the chip. But it all depends on how she designs the interface.

For example, she blew a whole bunch of time troubleshooting the device because garbage data was being written to the chip. In the end, having her manual bus programmer hooked up during the flashing operation was the culprit. Lesson learned, it’s onward and upward with the build.

We’ve been featuring [Quinn’s] projects a lot lately. That’s in part because they’re really interesting, but also because she does such a great job of documenting her experience.

Using An ATmega8 To Program PIC24FJ Chips

[Fezoj] likes to play around with microcontrollers and decided that he wanted to try a Bus Pirate as a new tool in his adventures. Since it’s open hardware he had his own board made and populated it himself. The trouble is, he works only with AVR chips and doesn’t have a PIC programmer. No problem, he figured out how to flash the PIC24FJ using an ATmega8.

To get started, he grabbed a copy of the flash programming specifications from Microchip. Once he had implemented the protocol in the AVR code, it was just a matter of getting the downloaded PIC firmware to the AVR. An RS232 chip gives him the serial connection he needs, with the help of his own programming software written with Visual Studio.

It’s not a robust solution for prototyping on the PIC platform, but maybe it could be developed for that purpose. For now, all he needed was a bootloader so that he could flash the Bus Pirate via a USB connection.

[via Dangerous Prototypes]

Dev Board From An AVR Programmer

[jethomson] sent in a build he’s been working on that turns an inexpensive AVR programmer into a development board. The build is based on the very affordable USBasp programmer that’s based on an ATmega8. With hundreds of these boards available from China for less than a Hamilton, we’re wondering how soon it will be before we see these boards end up in other projects.

After fiddling with the AVR fuse settings, [jethomson] managed to burn some code to the microcontroller. After that, all that was required to upload software to the programmer is a bit of solder, a push button, and an external programmer. [jethomson] also managed to make this little AVR programmer compatible with the Arduino environment with a small addition to the boards.txt file.

[jethomson] included a few bits of software as an example – he ported the haunted USB cable and adapted the USB business card to print out, “All work and no play makes Jack a dull boy.” Nice work, and we can’t wait to see it in future projects.

Serial Port JTAG Programmer

If you’re planning to do some hacking with CPLD or FPGA chips you’ll need a way to program them. JTAG is one of the options and here’s a cheap method that uses the serial port (translated).

This method requires only four signals (TDI, TMS, TCK and TDO) plus ground. But the problem is that an RS232 serial port operates with 12V logic levels and the JTAG side of the programmer needs to operate with the logic levels native to the device you’re programming. Commercial programmers use a level convert IC to take care of this for you, but that doesn’t mesh with the cheap goal of this project. Instead, [Nicholas] uses Zener diodes and voltage dividers to make the conversion. There is also an LED for each data signal to give some feedback if you’re having trouble.

You can use this along with a programming application that [Nicholas] whipped up using Visual Studio. It works well via the serial port, but he did try programming with a USB-to-Serial dongle. He found that this method slows the process down to an unbearable 5-minutes. Take a look, maybe you can help to get that sloth-like programming up to a manageable speed.

[Thanks Alex]

STK200 Pocket Change Programmer

A common complaints of beginners to microcontroller programming is the availability of DIY tools that do not require a parallel port.  Using not much more than a couple of 74xx series chips and some protoboard, [Rue] was able to create an AVR programmer for less than the cost of some chips it can program – giving parallel programmers a run for thier money. [Rue] used Linux treat the ubiquitous PATA/IDE port as a parallel port. By having avrdude treat the programmer as an Atmel STK200, [Rue] was able to upload a blinky program to his AVR microcontroller through ISP. If anybody can think of an even lower cost unconventional solution give us a shout.