We’ve seen some interesting pitches in personal ads before, but this one takes the cake. Japanese billionaire Yusaku Maezawa is looking for a date to go along with him on his paid trip to the Moon, with the hope of finding a life partner. Maezawa is slated to be SpaceX’s first commercial lunar flyby customer, and will make the trip no earlier than 2023. That should give him plenty of time to go through the 20,000 applications he received from single women 20 and older with bright personalities and positive attitudes. And he should have plenty of time to make an awesome mixtape for the ride.
Imagine snooping through your kid’s garbage can only to find a used syringe lying in there. Most of us would likely be able to tell that the syringe once contained thermal compound or solder paste and be suitably proud of the little chip off the block, but apparently Cooler Master has fielded enough calls from panicked normie parents that they decided to change the design of their applicators. Given the design of the new applicator we doubt that’s really the reason, but it’s a good marketing story, and we can totally see how someone could mistake the old applicator for something illicit.
It looks as though SpaceX could be getting itself into legal trouble with its Starlink launches. Or more correctly, the FCC might, having apparently violated the National Environmental Policy Act, a Nixon-era law that requires government agencies to consider the environmental impact of any projects they approve. The Federal Communications Commission has been using a loophole in the law to claim a “categorical exemption” from these reviews when approving communications projects, particularly space-based projects. It’s not clear whether space is legally considered part of the environment, so the lawyers are hashing that out. If the FCC gets sued and loses, it’s not clear what happens to the existing Starlink satellites or future launches. Stay tuned for details.
Don’t forget that the Open Hardware Summit is coming soon. The 2020 meeting is the 10th anniversary of the confab, to be held on March 13 in New York. Hackaday is, of course, a proud sponsor of the conference, and our own Sophi Kravtiz will be the keynote speaker! Get your tickets soon.
Tired of off-loading data manipulation and analysis tasks to R in your Python programs? Then you’re probably already aware of Pandas, the Python library that converts data into dataframe objects for easier manipulation. Pandas has (have?) been in pre-release for years, but there’s now a legit 1.0.0 release candidate available. Now might be the time for you Python data mungers to get onboard the Pandas Express.
And finally, the Consumer Electronics Show is a yearly gift to anyone in the tech media, providing as it does so many examples of outrageous uses for the latest technology. To wit, we have LuluPet, the world’s first feces-analyzing cat litter box. LuluPet uses a built-in camera along with IR sensors and an “AI chip” to monitor your cat’s dookie and provide an alert if anything looks awry. On the one hand, inspecting cat poop is a job we’d love to outsource, but on the other hand, most cats we know are quick to cover the evidence of their excretions with kitty litter, leaving a clay-encrusted blob rather than the turds with defined borders that would seem to be needed for image recognition to do its job. We’ll reserve judgment on this one until we see a review.
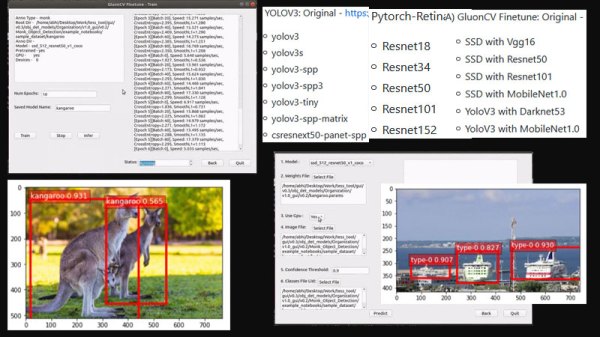
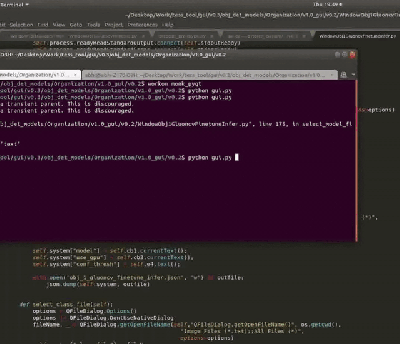 Monk AI is essentially a wrapper for Computer Vision and deep learning experiments. It facilitates users to finetune deep neural networks using transfer learning and is written in Python. Out of the box, it supports Keras and Pytorch and it comes with a few lines of code; you can get started with your very first AI experiment.