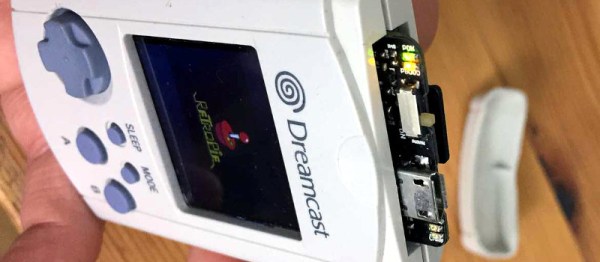
Featured image

Keep The Burglars Away With Some Pi

Ten years ago, we never imagined we would be able to ward off burglars with Pi. However, that is exactly what [Nick] is doing with his Raspberry Pi home security system.

We like how, instead of using a standard siren, [Nick] utilized his existing stereo system to play a custom audio file that he created. (Oh the possibilities!) How many off the shelf alarm systems can you do that with?

The Pi is the brains of the operation, running an open source software program called Home Assistant. If any of the Z-Wave sensors in his house are triggered while the alarm system is armed, the system begins taking several actions. The stereo system is turned on via IR so that the digital alarm audio file can be played. Lights flash on and off. An IP camera takes several snapshots and emails them to [Nick].

Home Assistant didn’t actually have the ability to send images in an email inline at the time that [Nick] was putting together his system. What did [Nick] do about that? He wrote some code to give it that ability, and submitted it through GitHub. That new code was put into a later version of the program. Ah, the beauty of open source software.

Perhaps the most important part of this project is that there were steps taken to help keep the wife-approval factor of the system on the positive side. For example, he configured one of the scripts so that even if the alarm is tripped multiple times in succession, the alarm won’t play over itself repeatedly.

This isn’t [Nick’s] first time being featured here. Check out another project of his which involves a couple of Pi’s communicating with each other via lasers.


The Internet Connected Dog Treat Machine

[Eric] and [Shirin] have a dog called [Pickles], who is the kind of animal that if you are a dog lover you will secretly covet. They evidently dote upon [Pickles], but face the problem that they can’t always be at home to express their appreciation of him. But rather than abandon him entirely, they’ve applied technology to the problem. [Eric] has built an Internet-connected dog treat dispenser, through which they can dispense treats, and watch the lucky mutt wolfing them down.

The body of the machine has been made with lasercut acrylic, and the dispenser mechanism is a rotating hopper driven by a stepper motor. The whole thing — in all its transparent glory — is controlled through a Raspberry Pi, which plays a sound clip of [Shirin] calling [Pickles] for his treat, records his dining enjoyment with its camera, and emails the result to his owners. Behind the scenes it hosts an MQTT server, which can be triggered via an iPhone app, Alexa, or the adafruit.io site. Imagine for a moment: “Alexa, feed my dog!”. It has a ring to it.

He makes the point that this machine is not simply limited to dispensing treats, it could be used to engage [Pickles] in more activities. He hints at a future project involving a ball throwing device (have you ever seen such joy from a dog). There’s no substitute for being there with your dog, but maybe with this device they can make their dog’s life a little less of, well, a dog’s life.

You can see the machine in action in the video we’ve posted below the break.

Continue reading “The Internet Connected Dog Treat Machine”

The Raspberry Pi Becomes A SCSI Device

SCSI devices were found in hundreds of different models of computers from the 80s, from SUN boxes to cute little Macs. These hard drives and CDROMs are slowly dying, and with that goes an entire generation of technology down the drain. Currently, the best method of preserving these computers with SCSI drives is the SCSI2SD device designed by [Michael McMaster]. While this device does exactly what it says it’ll do — turn an SD card into a drive on a SCSI chain — it’s fairly expensive at $70.

[GIMONS] has a better, cheaper solution. It’s a SCSI device emulator for the Raspberry Pi (original link dead, here’s the new location of this writeup). It turns a Raspberry Pi into a SCSI hard drive, magneto-optical drive, CDROM, or an Ethernet adapter using only some glue logic and a bit of code.

As far as the hardware goes, this is a pretty simple build. The 40-pin GPIO connector on the Pi is attached to the 50-pin SCSI connector through a few 74LS641 transceivers with a few resistor packs for pullups and pulldowns. The software allows for virtual disk devices – either a hard drive, magneto-optical drive, or a CDROM – to be presented from the Raspberry Pi. There’s also the option of putting Ethernet on the SCSI chain, a helpful addition since Ethernet to SCSI conversion devices are usually rare and expensive.

Officially, [GIMONS] built this SCSI hard drive emulator for the x68000 computer, developed by Sharp in the late 80s. While these are popular machines for retrocomputing aficionados in Japan, they’re exceptionally rare elsewhere — although [Dave Jones] got his mitts on one for a teardown. SCSI was extraordinarily popular for computers from the 70s through the 90s, though, and since SCSI was a standard this build should work with all of them.

If your retrocomputer doesn’t need a SCSI drive, and you’re feeling left out of the drive-emulation club, the good news is there’s a Raspberry Pi solution for that, too: this Hackaday Prize entry turns a Pi into an IDE hard drive.

Thanks [Gokhan] for the tip!

New Part Day: The $239 Pi Clone

Linaro has announced a new ARM-based single board computer.

The HiKey 960, built in collaboration with 96Boards, gives the user 4 ARM Cortex-A73 cores clocked at 2.4GHz, 4 ARM Cortex-A53 cores clocked at 1.8 GHz, a Mali GPU (ugh), 32GB of Flash storage, 3GB of LPDDR4, HDMI 1.2, WiFi, Bluetooth, USB 3.0 type A, PCIe on an M.2 connector, and a familiar 40-pin GPIO connector whose configuration is not published yet but is one we can make a very educated guess about. This is a powerful ARM-based single-board computer that’s the same size as a credit card.

This single board computer draws more power than a Raspberry Pi (but less than 24 W with a 12V supply), but that’s what you get when you need a powerful ARM chip. Interestingly, the HiKey 960 places all the connectors on one side of the board. This is a feature very often overlooked in ARM-based single board computers; all the ports on your desktop are on the back, and it only makes sense to constrain the cables and dongles to one side of a Nintendo-shaped 3D printed enclosure.

This is not the first ARM-based single board computer that markets itself as a more powerful Pi. The Pine64 was supposed to be significantly more powerful, handle 4K HDMI, and bring Android to the desktop. The first versions of the Pine64 really, really sucked. However, most of the kinks have been worked out and the folks behind the Pine64 are now shipping a somewhat reasonable low-end Chromebookesque laptop for $89. This is a laptop for under a Benjamin, whereas the HiKey 960 will sell for $239. That’s the same price as an Intel NUC or other mini PC running an x86 CPU. Of course, the HiKey 960 will have higher performance compared to the latest Pi, or other Pi Killer such as the Asus Tinker board, but there must be a point of diminishing returns. Either way, we look forward to getting our hands on one of these powerful single board computers.

Hackaday Prize Entry: High Speed Sampling For The Raspberry Pi

The Raspberry Pi has become a firm favorite in our community for its array of GPIOs and other interfaces, as well as its affordable computing power. Unfortunately though despite those many pins, there is a glaring omission in its interfacing capabilities. It lacks an analogue-to-digital converter, so analog inputs have to rely on an expansion card either on those GPIOs or through the USB port.

Most people remain content with simple ADCs such as Microchip’s MCP3008, or perhaps a USB sound card for low frequency moving targets. But not [Kelu124], he’s set his sights on something much faster. The original Pi is reputed to be capable of handling a 10Msamples/s ADC, so he thinks its faster successors should be able to work much faster. To that end, he’s created an ADC pHAT which he thinks should be good for twice that figure.

The choice of silicon is a CA3306E, a 6-bit device that’s rated at 15Msamples/S. It’s something of a dated device as is shown by its DIP package, and a quick look through major suppliers shows it to be no longer available. Happily though, when you look at his GitHub repo it emerges that he’s also producing a board based on the ADC08200, so his software is targetable at other chips.

Whether or not you need your Pi to serve as video digitizer or high-speed instrument, it’s useful and interesting to take a look at a board like this one in action. We often don’t use the raw power of our single board computers, and this project proves that should we ever need to, we can.

If ADCs interest you, take a look at [Bil Herd]’s series on delta-sigma ADCs.

Thanks [Fustini] for the tip.

Linger Keeps You Around After You’ve Gone

We’re not sure if this is art, anti-snooping guerilla warfare, or just a cheeky hack, but we do know that we like it! [Jasper van Loenen]’s Linger keeps the SSIDs that your cell phone (for example) spits out whenever it’s not connected to a WiFi network, and replays them after you’re gone.

Some retail stores and other shady characters use MAC addresses and/or the unique collection of SSIDs that your phone submits in probe requests to fingerprint you and track your movement, either through their particular store or across stores that share a tracking provider. Did you know that you were buying into this when you enabled “location services”? Did the tracking firms ask you if that was ok? Of course not. What are you going to do about it?

Linger replays the probe requests of people who have already moved on, making it appear to these systems as if nobody ever leaves. Under the hood, it’s a Raspberry Pi Zero, two WiFi dongles, and some simple Python software that stores probe requests in a database. There’s also a seven-segment display to indicate how many different probe-request profiles Linger has seen. We’re not sure the price point on this device is quite down to “throwie” level, but we’d love to see some of these installed in the local mall.  Continue reading “Linger Keeps You Around After You’ve Gone”

Get Up Close To Your Soldering With A Pi Zero Microscope

Do your Mark 1 Eyeballs no longer hold their own when it comes to fine work close up? Soldering can be a literal pain under such conditions, and even for the Elf-eyed among us, dealing with pads at a 0.4-mm pitch is probably best tackled with a little optical assistance. When the times comes for a little help, consider building a soldering microscope from a Pi Zero and a few bits and bobs from around the shop.

Affordable commercial soldering scopes aren’t terribly hard to come by, but [magkopian] decided to roll his own by taking advantage of the streaming capabilities of the Raspberry Pi platform, not to mention its affordability. This is a really simple hack — nothing is 3D-printed or custom milled. The stage base is a simple aluminum project box for heat resistance and extra weight, and the arm is a cheap plastic dial caliper. The PiCam is mounted to the sliding jaw of the caliper on a scrap of plastic ruler. The lens assembly of the camera needs to be hacked a little to change the focal length to work within 10 centimeters or so; alternatively, you could splurge and get a camera module with an adjustable lens. The Pi is set up for streaming, and your work area is presented in glorious, lag-free HDMI video.

Is [magkopian]’s scope going to give you the depth perception of a stereo microscope? Of course not. But for most jobs, it’ll probably be enough, and the fact that it can be built on the cheap makes it a great hack in our book.

Continue reading “Get Up Close To Your Soldering With A Pi Zero Microscope”