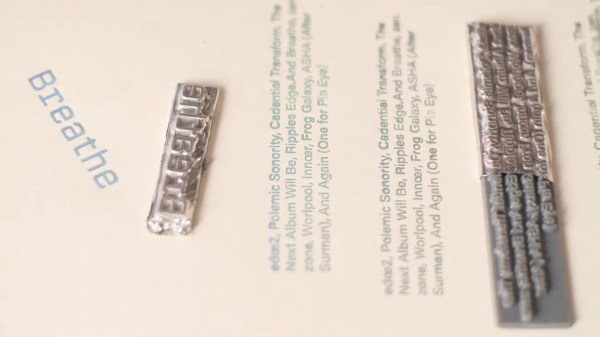
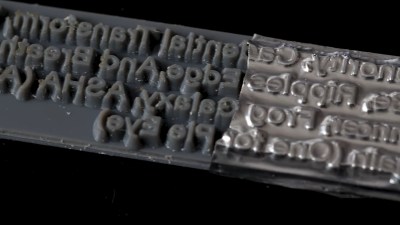
These are test stampings-- the final product looks a lot better.

2025 Component Abuse Challenge: Nail Your Next Decal

One of the hardest parts of a project — assuming it makes it that far — is finishing it up in an aesthetically pleasing manner. As they say, the devil is in the details, wearing Prada. Apparently the devil also has an excellent manicure, because [Tamas Feher] has come up with a way to introduce incredibly detailed decals (down to 0.1 mm) in cheap, repeatable fashion, using a technique borrowed from the local nail salon. 
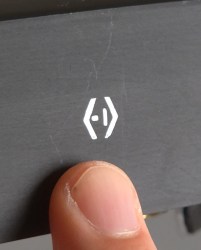
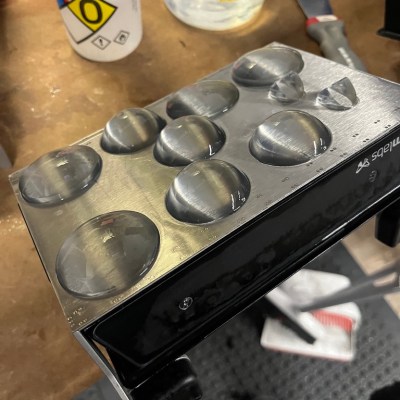
The end result can look quite a bit better than the test piece above.

For those who aren’t in to nail art (which, statistically speaking, is likely to be most of you) there is a common “stamping” technique for putting details onto human fingernails. Nail polish is first applied to voids on a stencil-like plate, then picked up by a smooth silicone stamper, which is then pressed against the nail, reproducing the image that was on the stencil. If that’s clear as mud, there’s a quick demo video embedded bellow.

There’s a common industrial technique that works the same way, which is actually where [Tamas] got the idea. For nail salons and at-home use, there are a huge variety of these stencils commercially available for nail art, but that doesn’t mean you’re likely to find what you want for your project’s front panel.

[Tamas] points out that by using a resin printer to produce the stencil plate, any arbitrary text or symbol can be used. Your logo, labels, whatever. By printing flat to the build plate, you can take advantage of the full resolution of the resin printer — even an older 2 K model would more than suffice here, while higher res like the new 16 K models become the definition of overkill. The prints go quick, as they don’t need any structural thickness: just enough to hold together coming off of the plate, plus enough extra to hold your designs at a 0.15 mm inset. That doesn’t seem very thick, but remember that this only has to hold enough nail polish to be picked up by the stamper.

[Tamas] cautions you have to work fast, as the thin layer of nail polish picked up by the stamper can dry in seconds. You’ll want plenty of nail polish remover (or plain acetone) on hand to clean the stamper once you’ve finished, as well as your stencil. [Tamas] cautions you’ll want to clean it immediately if you ever want to use it again. Good to know.

While this is going outside of the nail art kit’s comfort zone, it might not quite be abuse. It is however a very useful technique to add to our ever-growing quiver of how to make front panels. Besides, we don’t specify you have to literally make components suffer; we just want to see what wild and wonderful substitutions and improvisations you all come up with.

Continue reading “2025 Component Abuse Challenge: Nail Your Next Decal”

The Lowest-Effort Way Yet To Make 3D Printed Lenses Clear

This technique shared by [Andy Kong] is for 3D printed lenses, but would probably be worth a shot for any resin prints that need to be made nice and clear. The link to his post on X is here, but we’ll summarize below.

It’s entirely possible to print lenses on a resin printer, but some amount of polishing is inevitable because an SLA print still has layer lines, however small. We have seen ways to minimize the work involved to get a usable lens, but when it comes right down to it the printing process creates tiny (but inevitable) surface imperfections that have to be dealt with, one way or another.

3D-printed lenses fresh (and wet) from the printer look clear, but have tiny surface imperfections that must be dealt with.

One technique involves applying a thin layer of liquid resin to the surface of the printed lens, then curing it. This isn’t a complete solution because getting an even distribution of resin over the surface can be a challenge. [Andy] has refined this technique to make it ridiculously simple, and here’s how it works.

After printing the lens, place a drop of liquid resin on the lens surface and stretch some cling wrap over the lens. The cling wrap conforms to the shape and curve of the lens while trapping a super thin layer of liquid resin between the cling wrap film and the lens surface. One then cures the resin while holding the cling film taut. After curing, [Andy] says the film peels right off, leaving an ultra-smooth surface behind. No tedious polishing required!

But what about the flat back of the lens? [Andy] suggests that instead of using cling film (which is better at conforming to a curved surface) simply use a drop of resin in a similar way to bond the flat side of the lens to a smooth piece of glass. Or bond the backs of two lenses together to make a duplex lens. This technique opens quite a few possibilities!

Even if one isn’t 3D printing optical lenses, we suspect this technique might be applicable to making crystal-clear 3D prints with a little less effort than would otherwise be needed.

Keep it in mind, and if you find success (or failure!) let us know on the tips line because we absolutely want to hear about it.

How Thermal Post-Curing Resin Prints Affects Their Strength

Tensile strength of resin parts. (Credit: CNC Kitchen)
Credit: CNC Kitchen

Resin 3D prints have a reputation for being brittle, but [Stefan] over at [CNC Kitchen] would like to dispel this myth with the thing which we all love: colorful bar graphs backed up by scientifically appropriate experiments. As he rightfully points out, the average resin printer user will just cure a print by putting it in the sunshine or in a curing station that rotates the part in front of some UV lights. This theoretically should cause these photosensitive resins to fully cure, but as the referenced Formlabs documentation and their Form Cure station indicate, there’s definitely a thermal element to it as well.

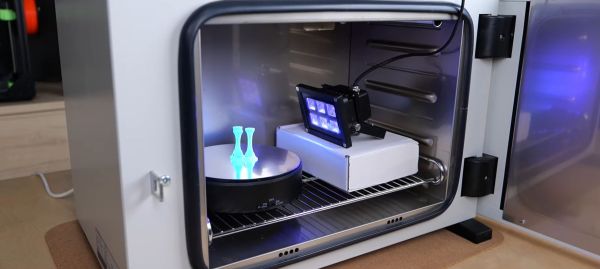
To test the impact of temperature during the UV curing process, the test parts were put into an oven along with the UV lamp. Following this uncured, ambient cured and parts cured at 40 to 80 ºC were exposed to both tensile strength tests as well as impact strength. The best results came from the Siraya Tech Blu resin cured at 80 ºC, with it even giving FDM-printed parts a run for their money, as the following graphs make clear. This shows the value of thermal post-curing, as it anneals the resin prints. This reduces their impact strength somewhat, but massively improves their tensile strength.

Continue reading “How Thermal Post-Curing Resin Prints Affects Their Strength”

High Temp Resin Means Faster Hot Foil Stamping

[This Designed That] does a lot of hot foil stamping. That’s the shiny embellishment you’ll see on wedding invitations and your fancier letterheads. They wanted a way to quickly see if the process is right for a given design, and how it might come together if so. Many of the designs involve letter forms, which they have tried milling out of brass in the past, but the process is fiddly and takes a while. Seeking a faster way to test designs, [This Designed That] turned to 3D printing.

They achieved good results with an Elegoo Mars Pro, but the the most important thing here is the resin needs to withstand at least 130 C, which is the max that [This Deigned That] usually runs it at. The answer was in Phrozen TR300 resin, which can handle temps up to 160 C.

In trials, the stamp heat measured roughly 30 C lower on average than the press, so [This Designed That] kept turning up the heat, but it just wasn’t conductive enough. So they started experimenting with ways to increase heat transfer. First they tried molding metal powder, but it didn’t work. After briefly flirting with electroplating them, [This Designed That] finally tried some aluminum tape, wrapped tight and burnished to the design.

Now the hot foil machine stamps perfectly at only 120 C — the lower end of the standard temperature that [This Designed That] typically runs the thing. They are chuffed at the results, and frankly, so are we. Be sure to check out the process video after the break.

Curious about hot foil stamping machines? Check out this retrofit job.

Continue reading “High Temp Resin Means Faster Hot Foil Stamping”

Hackaday Prize 2023: Ubo Project: Building For Builders

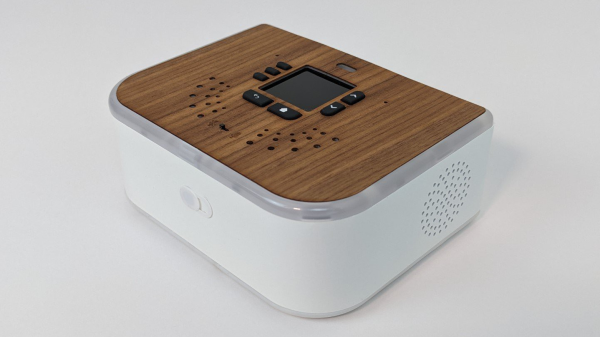
The Ubo Pod by [Mehrdad Majzoobi] is a very highly polished extension pack and enclosure for the Raspberry Pi 4, which shows you how far you can go to turn a bare PCB into something that rivals the hardware offerings from Google and others. Gadgets like the Sonos speakers and Amazon or Google’s covert listening devices (aka Echo, Alexa, or whatever they’re branded as) are fun to play with. Still, the difficulty of hacking custom applications into them and god-forbid adding one’s own extension hardware, makes them fairly closed ecosystems. Add in the concerns of privacy and data security; they look less and less attractive the closer you look. Luckily the Raspberry Pi and its friends have improved the accessibility to the point where it’s positively easy to create whatever you want with whatever hardware you need, and to that end we think [Mehrdad] has done a splendid job.

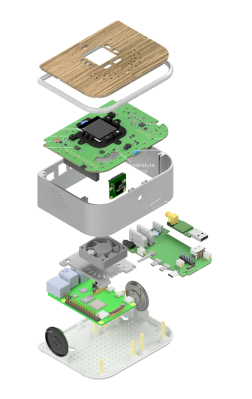
The custom top PCB sits below the wooden top surface, hosting a central LCD display with push buttons located around it. Also sitting atop are some IR transmitters and receivers as well as RGB LEDs for the ring lighting. This top PCB acts as a RPi hat, and plugs into an RPi4 below, which then attaches to a side board via some PCB-mounted connectors, matching up with the USB and audio connectors. This board seems to act purely as an interconnect and form-factor adaptor allowing interfaces to be presented more conveniently without needing wires. This makes for a very clean construction. Extensive use of resin printing is shown, with lots of nice details of how to solve problems such as LED diffusion and bleeding. Overall, a very slick and well-executed project, that is giving us a few ideas for our own projects.

This type of project is commonplace on these fair pages, like this DIY smart speaker for example. With the supply of pi being still a little difficult to deal with, could you roll your own or get an alternative? What about just using your old mobile phone?

Holograms: The Future Of Speedy Nanoscale 3D Printing?

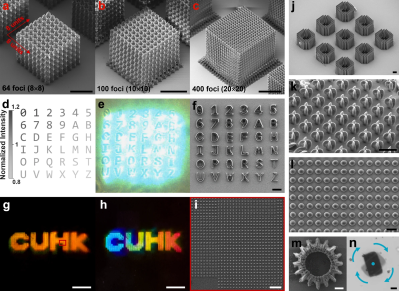
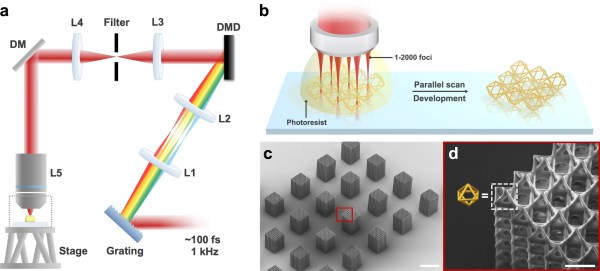
3D printing by painting with light beams on a vat of liquid plastic was once the stuff of science fiction, but now is very much science-fact. More than that, it’s consumer-level technology that we’re almost at the point of being blasé about. Scientists and engineers the world over have been quietly beavering away in their labs on the new hotness, nanoscale 3D printing with varying success. Recently IEESpectrum reports some promising work using holographic imaging to generate nanoscale structures at record speed.

Current stereolithography printers make use of UV laser scanned over the bottom of a vat of UV-sensitive liquid photopolymer resin, which is chemically tweaked to make it sensitive to the UV frequency photons. This is all fine, but as we know, this method is slow and can be of limited resolution, and has been largely superseded by LCD technology. Recent research has focussed on two-photon lithography, which uses a resin that is largely transparent to the wavelength of light concerned, but critically, can be polymerized with enough energy density (i.e. the method requires multiple photons to be simultaneously absorbed.) This is achieved by using pulsed-mode lasers to focus to a very tight point, giving the required huge energy density. This tight focus, plus the ability to pass the beam through the vat of liquid allows much tighter image resolution. But it is slow, painfully slow.
Continue reading “Holograms: The Future Of Speedy Nanoscale 3D Printing?”

The Best Threaded Holes For Resin Parts

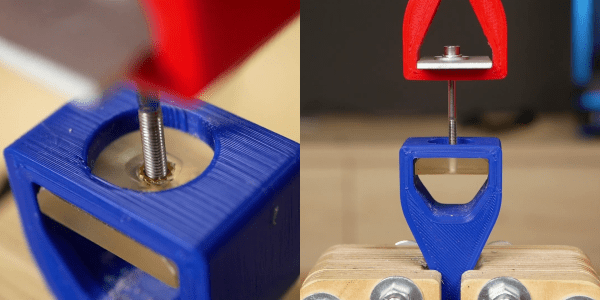
Threaded inserts are great for melting into FDM prints with a soldering iron. The process isn’t so simple for resin prints, since they don’t generally soften with heat. Off course, you can also print the threads directly, screw a bolt into an un-threaded hole, or tap a hole. Following his usual rigorous testing process, [Stefan] from CNC Kitchen investigated various ways of adding threaded holes to resin prints.

After establishing a pull-out force on PLA using threaded inserts (205 kg) and tapped holes (163 kg), [Stefan] tested parts printed with Prusament Tough Anthracite resin. Un-threaded and tapped holes failed at 44 kg and 55 kg respectively, while printed threads were almost twice as strong, reaching 106 kg before breaking. Stephan also tried gluing inserts into the parts using resin and CA glue. The resin didn’t cure properly in the opaque parts (6 kg) while CA was comparable to plastic threads, failing at 52 kg.

Chart of results
TLDR: Print your threads for best results

[Stefan] also tested regular ELEGOO Translucent resin. The higher hardness of the cured resin allowed the parts to hold on to around 100 kg for un-threaded and tapped holes, while printed threads reached 120 kg. Threaded insert glued with resin did better on the transparent parts thanks to improved UV penetration, but were very inconsistent. Inserts glued with CA performed about the same as on the Prusament parts, failing at 56 kg.

In an attempt to improve the performance of the inserts [Stefan] printed some parts with stepped holes to match the geometry of the inserts, which had the advantage of preventing the insert from falling through during gluing. It only made a marginal difference on the Prusament parts but boosted the strength of CA-glued inserts on the ELEGOO resin to 82 kg. Two-part epoxy was also tried, which matched the un-threaded holes in strength.

So for resin parts you’ll probably be best served by just modeling the threads in CAD and printing them directly. If you need to be able to repeatedly screw and unscrew fasteners in a hole without stripping, threaded holes with CA or epoxy might be a better solution.

Continue reading “The Best Threaded Holes For Resin Parts”