Hackaday Links Column Banner

Hackaday Links: February 15, 2015

[Matthias Wandel], also known as the genius/demigod that can make anything out of wood, put together a mount for a Raspberry Pi and a camera. Yes, it’s just a holder for a Raspi, but some of our readers who aren’t up to speed with [Matthias] might want to check out his Youtube channel. There are hundreds of awesome videos. Report back in a month.

[Evan], the guy working his butt off for the MidAtlantic Retro Computing Hobbyists, and the organizer for the Vintage Computer Festival East (we’re going, April 17-19, Wall, NJ) has been working on a book. It’s about mobile computing, and he’s crowdfunding it.

Your keyboard has buttons, and so does and Akai MPC. Daft PunKonsole! Press the space bar for  instrumental part. There is, as yet, no video of someone doing this correctly.

Valentine’s Day was yesterday, and that means Valentine’s Day builds started rolling in on the tip line. Here’s something that’s actually a very simple circuit that’s inspired from an old ‘Electronic Games and Toys’ book by [Len Buckwalter]. Here’s a video of it in action.

A few years ago the name of the game was tiny, credit card-sized ARM boards. It had to come to this: a 64-bit board. ARM Cortex A53 running at 1.2GHz. It also costs $120 and only has a gig of RAM, but there you go.

DIY 6502 Laptop Computer Looks And Works Great

Over the years, we’ve seen a lot of DIY retro computers, but [Dirk Grappendorf] has created one of the most polished looking 6502 systems to date. His battery-powered portable machine utilizes a 4 line by 40 character LCD, and a modified USB keyboard. Cover all that in a slick 3D printed case, and you have a machine that reminds us quite a bit of the venerable TRS-80 Model 100.

homecomputer-6502-v8-via-bread
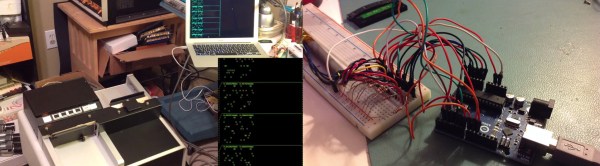
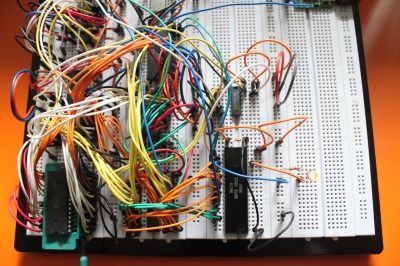
[Dirk] has some great documentation to go with his computer. He started with a classic MOS 6502 processor. He surrounded the processor with a number of support chips correct for the early 80’s period. RAM is easy-to -use static RAM, while ROM is handled by UV erasable EPROM. A pair of MOS 6522 Versatile Interface Adapter (VIA) chips connect the keyboard, LCD, and any other peripherals to the CPU. Sound is of course provided by the 6581 SID chip.  All this made for a heck of a lot of wires when built up on a breadboard. The only thing missing from this build is a way to store software written on the machine. [Dirk] already is looking into ways to add an SD card interface to the machine.

homecomputer-6502-final-4
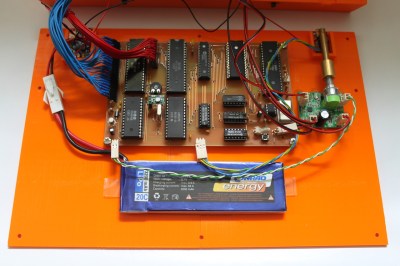
The home building didn’t stop there though. [Dirk] designed and etched his own printed circuit board (PCB) for his computer. DIY PCBs with surface mount components are easy these days, but things are a heck of a lot harder with older through hole components. Every through hole pin and via had to be drilled, and soldered to the top and bottom layers of the board. Not to mention the fact that both layers had to line up perfectly to avoid missing holes! To say this was a lot of work would be an understatement.

homecomputer-6502-final-5
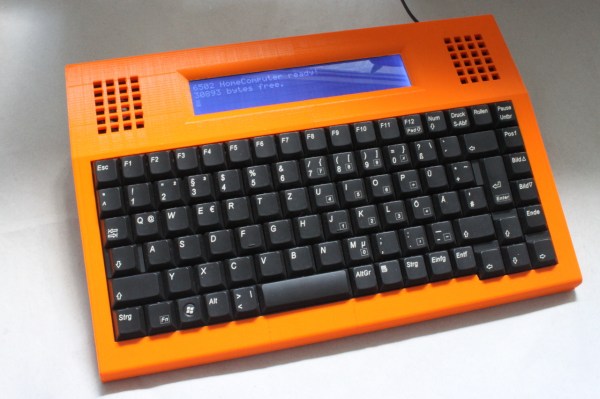
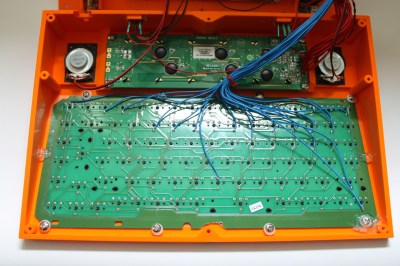
[Dirk] designed a custom 3D printed case for his computer and printed it out on his Ultimaker. To make things fit, he created his design in halves, and glued the case once printing was complete.

If awesome hardware and a case weren’t enough, [Dirk] also spent time designing software for the machine. He wrote his own abbreviated BASIC interpreter along with several BASIC programs. You can find everything over on his GitHub repository.

We always love writing up well-documented, and just generally awesome projects like [Dirk’s]. If you know of any retro computers like this one, drop us a tip!

[Thanks MicroHex!]

Arduino Reads Punch Cards

Punch cards were a standard form of program and data storage for decades, but you’d never know it by looking around today. Card punches and even readers are becoming rare and expensive. Sometimes it takes a bit of hacking [YouTube link] to get that old iron running again!

[Antiquekid3] managed to score an old punch card reader on Ebay, but didn’t have a way to interface with it. The reader turned out to be a Documation M-1000-L. After a bit of searching, [Antiquekid3] managed to find the manual [PDF link] on BitSavers. It turns out that the Documation reader used a discrete output for each row of data. One would think the Documation reader would be a perfect fit for the PDP-8 lurking in the background of [Antiquekid3’s] video, but unfortunately the ‘8 lacks the necessary OMNIBUS card to interface with a reader.

Undaunted, [Antiquekid3] threw some modern hardware into the mix, and used an Arduino Uno as a Documation to Serial interface. The Arduino had plenty of I/O to wire up with the card reader’s interface. It also had a serial interface which made outputting data a snap. The ATmega328 even had enough power to translate each card from one of IBM’s many keypunch formats to serial.

[Antiquekid3’s] test deck of cards turned out to be a floating point data set. Plotting the data with a spreadsheet results in a nice linear set of data points. Of course, no one knows what the data is supposed to mean! Want more punch card goodness? Check out this tweeting punch card reader, or this Arduino based reader which uses LEGO and a digital camera to coax the data from the paper.

Continue reading “Arduino Reads Punch Cards”

Dual Porting A C64 Flash Cart

The old cartridges for the Commodore 64 use EEPROMs to store their data, and the newer Flash carts use either a Flash chip or an SD card to put a whole bunch of games in a small plastic brick. [Stian] and [Runar] thought that wasn’t good enough – they wanted to program cartridges in real time, the ability to reboot the C64 without ever touching it, and a device for coding and testing. What they came up with is the latest advance in Commodore cartridge technology.

The device presents 8k of memory to the C64, but it doesn’t do this with Flash or an EEPROM. Instead, [Stian] and [Runar] are using a dual-port static RAM, specifically one from the IDT7005 series. This chip has two data busses, two address busses, and /CE, /OE, and R/W lines for either side of the chip, allowing other digital circuits to be connected to one small section of the C64’s memory.

Also in the cart is an ATmega16 running V-USB to handle the PC communications. It takes about 1 to 1.5 seconds to transfer an entire 8k over to the cartridge, but this chip can read and write the RAM along with the C64 simultaneously.

If you want a box that will give you the ability to put ever game in existence on a single cartridge, this isn’t the one. However, if you want to write some C64 games and do some live debugging, this is the one for you. The Eagle files are available, and there’s a video demo below.

Continue reading “Dual Porting A C64 Flash Cart”

ZX81 Emulated On An Mbed

This is a wonderful example of the phenomenon of “feature creep”. [Gert] was working on getting a VGA output running on an mbed platform without using (hardly) any discrete components. Using only a few resistors, the mbed was connected to a VGA display running at 640×480. But what could he do with something with VGA out? He decided to emulate an entire Sinclair ZX81 computer, of course.

With more than 1.5 million units sold, the Sinclair ZX81 was a fairly popular computer in the early ’80s. It was [Gert]’s first computer, so it was a natural choice for him to try to emulate. Another reason for the choice was that his mbed-VGA device could only output monochrome color, which was another characteristic of the ZX81.

[Gert] started by modifying a very lean Z80 emulator to make the compiled code run as efficiently as possible on the mbed. Then he went about getting a picture to display on the screen, then he interfaced an SD card and a keyboard to his new machine. To be true to the original, he built everything into an original ZX81 case.

This isn’t the first time we’ve seen a ZX81, but it is one of the better implementations of an emulated version of this system we’ve seen.

Thanks to [Jeroen] for the tip!

The KIM-1 Computer Minified

The KIM-1 wasn’t the first microcomputer available to computer hobbyists and other electron aficionados, but it was the first one that was cheap. It was also exceedingly simple, with just a 6502 CPU, a little more than 1k of RAM, 2k of ROM, a hexadecimal keypad and a few seven-segment displays. Still, a lot of software was written for this machine, and one of these boards can be found in every computer history museum.

[Oscar] thought the KIM-1 was far too cool to be relegated to the history books so he made his own. It’s not a direct copy – this one uses an Arduino for the brains, only breaking out some buttons, a pair of four-digit seven-segment displays, and the I2C and SPI pins on the ‘duino. The KIM-1 is emulated by the Arduino, allowing for the same interface as an original connected up to an old teletype, and [Oscar] got his hands on the original code for Microchess and the first 6502 disassembler from [Woz] and [Baum].

[Oscar] put the schematics for his version of the KIM-1 up, and has the PCBs up on SeeedStudio. If you’re looking for an awesome replica of a vintage computer and a nice weekend project, here ‘ya go.

Restoring A PDP-10 Console Panel

The PDP-10 was one of the first computers [Jörg] had gotten his hands on, and there are very, very few people that can deny the beauty of a panel full of buttons, LEDs, dials, and analog meters. When one of the front panels for a PDP-10 showed up on eBay, [Jörg] couldn’t resist; a purchase that would lead him towards repairing this classic console and making it functional again with a BeagleBone.

The console [Jörg] picked up is old enough to have voted for more than one Bush administration, and over the years a lot of grime has covered the beautiful acrylic panels. After washing the panel in a bathtub, [Jörg] found the dried panel actually looked worse, like an old, damaged oil painting. This was fixed by carefully scraping off the clear coat over two weeks; an important lesson in preserving these old machines. They’re literally falling apart, even the ones in museums.

With the front panel cleaned, [Jörg] turned his attention to the guts of this panel. The panel was wired up for LEDs, and each of the tiny flashlight bulbs in the pushbuttons were replaced. The panel was then connected to a BlinkenBone with a ton of wiring, and the SIMH simulator installed. That turns this console into a complete, working PDP-10, without sucking down kilowatts of power and heating up the room

This isn’t the first time we’ve seen [Jörg] with a BeagleBone and some old DEC equipment; earlier he connected the front panel of a PDP-11 variant to one of these adapters running the same software.