Reverse Engineering Silicon From The First Pocket Calculator

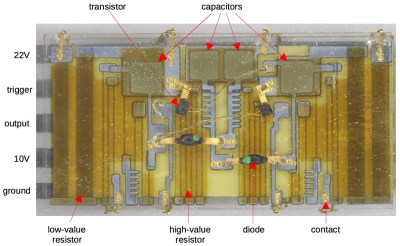
We’ve seen so many explorations of older semiconductors at the hands of [Ken Shirriff], that we know enough to expect a good read when he releases a new one. His latest doesn’t disappoint, as he delves into the workings of one of the first hand-held electronic calculators. The Sharp EL-8 from 1969 had five MOS ICs at its heart, and among them the NRD2256 keyboard/display chip is getting the [Shirriff] treatment with a decapping and thorough reverse engineering.

The basic functions of the chip are explained more easily than might be expected since this is a relatively simple device by later standards. The fascinating part of the dissection comes in the explanation of the technology, first in introducing the reader to PMOS FETs which required a relatively high negative voltage to operate, and then in explaining its use of four-phase logic. We’re used to static logic that holds a state depending upon its inputs, but the technologies of the day all called for an output transistor that would pull unacceptable current for a calculator. Four phase logic solved this by creating dynamic gates using a four-phase clock signal, relying on the an output capacitor in the gate to hold the value. It’s a technology that lose out in the 1970s as later TTL and CMOS variants arrived that did not have the output current drain. Fascinating stuff!

[Ken] gave a talk at the Hackaday Superconference a couple of years ago, if you’ve not seen it then it’s worth a watch.

Remoticon Video: Breaking Encrypted Firmware Workshop

If only you could get your hands on the code to fix the broken features on your beloved electronic widget. But wait, hardware hackers have the skills to write their own firmware… as long as we can get the compiled binary into a format the hardware needs.

Luckily, we have Uri Shaked to walk us through that process. This workshop from the 2020 Hackaday Remoticon demonstrates how to decipher the encryption scheme used on the firmware binary of a 3D printer. Along the way, we learn about the tools and techniques that are useful for many encrypted binary deciphering adventures.

Continue reading “Remoticon Video: Breaking Encrypted Firmware Workshop”

Ground Off Part Number Leads To Chip Detective Work

Sometimes when a piece of electronics lands on the bench, you find that its chips have their markings sanded off. The manufacturer is trying to make the task of the reverse engineer less easy, thus protecting their market. [Maurizio Butti] found an unexpected one in an electronic switch designed for remote control systems, it had the simple job of listening to the PWM signal from a receiver in a model aircraft or similar and opening or closing a FET.

From previous experience he suspected it might be a microcontroller from STC based on the location of power, ground, Rx, and Tx pins. This 8051-compatible device could be readily reprogrammed, so he has able to create his own firmware for it. He’s published the code and it’s pretty simple, as it simply replicates the original. He acknowledges that this might seem odd, but makes the point that it is left open for future upgrades such as for example repeatedly cycling the output as in a flashing light.

We don’t see so much of the STC chips here aside from one of their earlier offerings, but the 8051 core features here more regularly as it’s found in Nordic’s NRF24 series of wireless-capable chips.

Remoticon Video: How To Reverse Engineer A PCB

You hold in your hand a circuit board from a product you didn’t make. How does the thing work? What a daunting question, but it’s both solvable and approachable if you know what you’re doing. The good news is that Eric Schlaepfer knows exactly what he’s doing and boiled down the process of reverse engineering printed circuit boards into this excellent workshop. It was presented live during the 2020 Hackaday Remoticon, and the edited video, which you’ll find below, was just published. Slides for the talk have been published on the workshop project page.

Need proof that he has skills that we all want? Last year Eric successfully reverse-engineered the legendary Sound Blaster audio card and produced his own fully-functional drop-in replacement called the Snark Barker. And then re-engineered it to work with the ancient MCA bus architecture. Whoa.

Continue reading “Remoticon Video: How To Reverse Engineer A PCB”

Taking Over The Amazing Control Panel Of A Vintage Video Switcher

Where does he get such wonderful toys? [Glenn] snagged parts of a Grass Valley Kalypso 4-M/E video mixer switcher control surface from eBay and since been reverse engineering the button and display modules to bend them to his will. The hardware dates back to the turn of the century and the two modules would have been laid out with up to a few dozen others to complete a video mixing switcher console.

[Glenn’s] previous adventures delved into a strip of ten backlit buttons and gives us a close look at each of the keyswitches and the technique he used to pull together his own pinout and schematic of that strip. But things get a lot hairier this time around. The long strip seen above is a “machine control plane” module and includes a dozen addressible character displays, driven by a combination of microcontrollers and FPGAs. The square panel is a “Crosspoint Switch Matrix” module include eight individual 32 x 32 LCDs drive by three dedicated ICs that can display in red, green, or amber.

[Glen] used an STM8 Nucleo 64 to interface with the panels and wrote a bit of code to help map out what each pin on each machine control plane connector might do. He was able to stream out some packets from the plane that changed as he pressed buttons, and ended up feeding back a brute-force of that packet format to figure out the LED display protocols.

But the LCDs on the crosspoint switch were a more difficult nut to crack. He ended up going back to the original source of the equipment (eBay) to get a working control unit that he could sniff. He laid out a man-in-the-middle board that has a connector on either side with a pin header in the middle for his logic analyzer. As with most LCDs, the secret sauce was the initialization sequence — an almost impossible thing to brute force, yet exceedingly simple to sniff when you have a working system. So far he has them running under USB control, and if you are lucky enough to have some of this gear in your parts box, [Glen] has painstakingly recorded all of the details you need to get them up and running.

Remoticon Video: Firmware Reverse Engineering Workshop With Asmita Jha

Taking things apart to see how they work is an important part of understanding a system, and that goes for software as much as for hardware. You can get a jump start on your firmware reverse engineering skills with Asmita Jha’s workshop which was presented live at the Hackaday Remoticon. The video has just been published, and is found below along with a bit more on what she covered in her hands-on labs.

Continue reading “Remoticon Video: Firmware Reverse Engineering Workshop With Asmita Jha”

Scratching That Itch

I did something silly. I bought a lot of ten “broken” cheesy indoor quadcopters on eBay — to hopefully cobble one working one together and to amuse my son. At this point, I’ve got eight working. The bad news is that they all come with dirt-cheap transmitters that aren’t really conducive to flying at all. They’d be a lot more fun if they could be controlled with a real remote. Enter the hackers.

Most all of the cheap quads are based on one of a handful of radio chipsets, although they use different protocols. An enterprising hacker could conceivably just bundle together this handful of radio modules, and the rest would be a simple matter of software. That’s exactly what Pascal Langer’s DIY Multiprotocol TX and supporting firmware does. This hobby project was so successful that compatible hardware is manufactured by more than a few Chinese companies, and non-geeks have them installed in their radios. The module lets you control virtually anything that uses 2.4 GHz. Of course, I’ve got one of them.

I opened up the cheesy drone’s transmitter, found that it used a popular chipset, and worked through all the different supported protocols that used it. No dice. But the radio module did have nicely labeled SPI lines, so I reached out to Pascal. A couple of Sigrok sessions later, he’d figured out that it was trying to bind on a different channel, I’d recompiled the firmware, and was playing with the drone’s other functions.

I just love a good SPI-sniffing session. sigrok-cli -d fx2lafw -c samplerate=4000000 -P spi:clk=D0:mosi=D1:cs=D2 -A spi="mosi transfer" --continuous | grep A0 | uniq reads the SPI lines, decodes the packets, filters out the commands, and removes duplicates, in real-time. All that’s left to do is wiggle the sticks, mash buttons, and take good notes.

None of this was hard, and certainly none of it was expensive. I got my drones under the control of my fancy-schmancy remote, and have a good foothold into controlling them algorithmically later on thanks to everyone’s previous work on reverse engineering these protocols. Support for DF Drone’s SkyTumbler will be included in the next DIY Multiprotocol TX release, and I spent about four or five pleasant hours on this project. Maybe only a handful of people will stumble on this particular protocol — or maybe it will just be me. I did it mostly just to scratch my own particular itch.

But that’s one way open source works, thrives, and grows. Here’s to you all out there, from the Deviation team, who did a lot of the early drone protocol reverse engineering, to Pascal for the DIY Module, to the Sigrok folks who made the tools accessible for me to piggyback on everyone’s previous work. Keep on hacking!